Pioneer F-93 Operating Instructions - Page 11
Iimiv
 |
View all Pioneer F-93 manuals
Add to My Manuals
Save this manual to your list of manuals |
Page 11 highlights
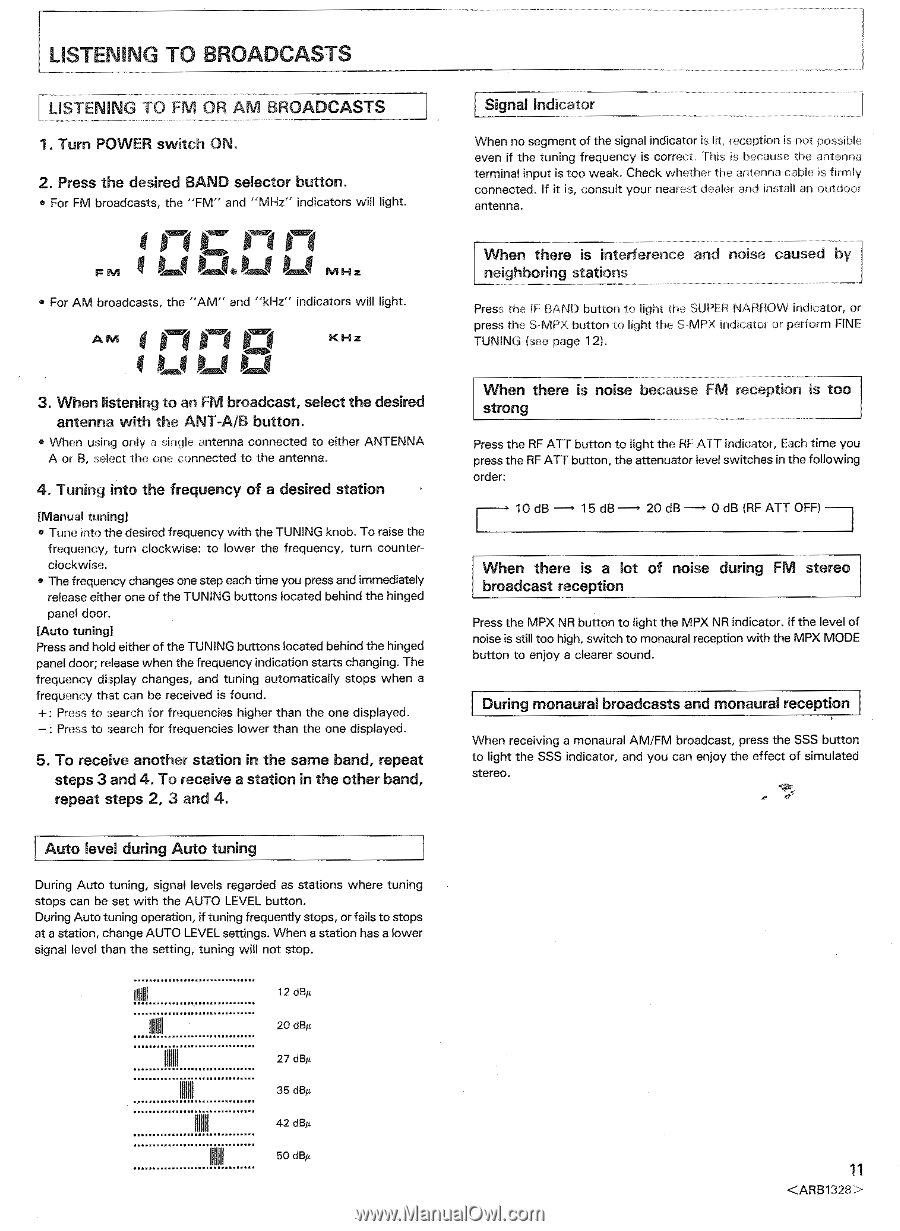
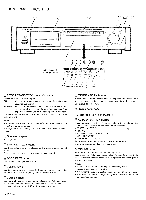
LISTENING TO BROADCASTS LISTENING TO FM OR AM BROADCASTS 1. Turn POWER switch ON. 2. Press the desired BAND selector button. • For FM broadcasts, the "FM" and "MHz" indicators will light. n b E Imo' F NI LI LW LS MHz • For AM broadcasts, the "AM" and "kHz" indicators will light. AM innn KHz 1 1.1 3. When listening to an FM broadcast, select the desired antenna with the ANT-A/B button. • When using only a single antenna connected to either ANTENNA A or B, select the one connected to the antenna. 4. Tuning into the frequency of a desired station [Manual tuning] • Tune into the desired frequency with the TUNING knob. To raise the frequency, turn clockwise: to lower the frequency, turn counterclockwise. • The frequency changes one step each time you press and immediately release either one of the TUNING buttons located behind the hinged panel door. [Auto tuning] Press and hold either of the TUNING buttons located behind the hinged panel door; release when the frequency indication starts changing. The frequency display changes, and tuning automatically stops when a frequency that can be received is found. +: Press to search for frequencies higher than the one displayed. - : Press to search for frequencies lower than the one displayed. 5. To receive another station in the same band, repeat steps 3 and 4. To receive a station in the other band, repeat steps 2, 3 and 4. Auto level during Auto tuning During Auto tuning, signal levels regarded as stations where tuning stops can be set with the AUTO LEVEL button. During Auto tuning operation, if tuning frequently stops, or fails to stops at a station, change AUTO LEVEL settings. When a station has a lower signal level than the setting, tuning will not stop. OhIAI 111111 IIMIV 1111111 12 dBµ 20 dBµ 27 dBµ 35 dBµ 42 dElµ 50 di3µ Signal Indicator When no segment of the signal indicator is lit, reception is not possible even if the tuning frequency is correct. This is because the antenna terminal input is too weak. Check whether the antenna cable is firmly connected. If it is, consult your nearest dealer and install an outdoor antenna. When there is interference and noise caused by neighboring stations Press the IF BAND button to light the SUPER NARROW indicator, or press the S-MPX button to light the S •MPX indicator or perform FINE TUNING (see page 12). When there is noise because FM reception is too strong Press the RF ATT button to light the RE ATT indicator, Each time you press the RF ATT button, the attenuator level switches in the following order: 10 dB- 15 dB 20 dB 0 dB (RE ATT OFF) When there is a lot of noise during FM stereo broadcast reception Press the MPX NR button to light the MPX NR indicator. If the level of noise is still too high, switch to monaural reception with the MPX MODE button to enjoy a clearer sound. During monaural broadcasts and monaural reception When receiving a monaural AM/FM broadcast, press the SSS button to light the SSS indicator, and you can enjoy the effect of simulated stereo. 0 et- 11
-
 1
1 -
2
-
3
-
4
-
5
-
 6
6 -
 7
7 -
 8
8 -
 9
9 -
 10
10 -
 11
11 -
 12
12 -
 13
13 -
 14
14 -
 15
15 -
 16
16
 |
 |