Pioneer FH-X720BT Owner's Manual - Page 6
Preparing the remote control, Setting the clock CLOCK SET, Canceling the demonstration display DEMO - install
 |
View all Pioneer FH-X720BT manuals
Add to My Manuals
Save this manual to your list of manuals |
Page 6 highlights
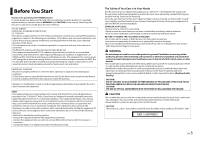
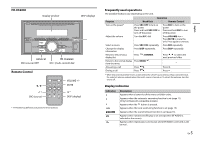
Indication Description Appears when the iPod control function is set (page 9). Appears when a Bluetooth connection is made (page 10). (Only for Bluetooth-compatible models.) Preparing the remote control Remove the insulation sheet before use. How to replace the battery Insert the CR2025 (3 V) battery with the plus (+) and minus (-) poles orientated properly. WARNING • Keep the battery out of the reach of children. Should the battery be swallowed, consult a doctor immediately. • Do not expose the battery or remote control to excessive heat such as direct sunlight or fire. CAUTION • There is a potential danger of explosion if the battery is incorrectly replaced. When replacing the battery, replace it with the same type. • Do not handle or store the battery with metallic tools or objects. • If the battery leaks, remove the battery and wipe the remote control completely clean. Then install a new battery. • When disposing of used batteries, compliance with governmental regulations or environmental institutions' rules that apply in your country/area must be followed that pertain to any special handling needed for disposal. • "Perchlorate Material - special handling may apply. See www.dtsc.ca.gov/hazardouswaste/perchlorate. (Applicable to California, U.S.A.)" Important • Do not store the remote control in high temperatures or direct sunlight. • Do not let the remote control fall onto the floor, where it may become jammed under the brake or accelerator pedal. 6 En Setting the clock (CLOCK SET) When you turn the ignition switch to ON after installation, [SET UP :YES] appears in the display. 1 Press the M.C. dial. The setup menu disappears after 30 seconds of no operation. If you prefer not to set at this time, turn the M.C. dial to select [NO], then press to confirm. 2 Turn the M.C. dial to adjust the hour, then press to confirm. The indicator moves to the minute setting automatically. 3 Turn the M.C. dial to adjust the minute, then press to confirm. [QUIT] appears. 4 Turn the M.C. dial to select [YES], then press to confirm. NOTES • You can cancel the menu setting by pressing SRC/OFF. • This setting can be made at any time. See page 17 for more details. Canceling the demonstration display (DEMO OFF) 1 Press the M.C. dial to display the main menu. 2 Turn the M.C. dial to select [SYSTEM], then press to confirm. 3 Turn the M.C. dial to select [DEMO OFF], then press to confirm. 4 Turn the M.C. dial to select [YES], then press to confirm. INITIAL settings 1 Press and hold SRC/OFF until the unit turns off. 2 Press the M.C. dial to display the main menu. 3 Turn the M.C. dial to select [INITIAL], then press to confirm. 4 Turn the M.C. dial to select an option, then press to confirm. NOTE The options vary depending on the unit.
-
 1
1 -
 2
2 -
 3
3 -
 4
4 -
 5
5 -
 6
6 -
 7
7 -
 8
8 -
 9
9 -
 10
10 -
 11
11 -
 12
12 -
13
-
14
-
15
-
16
-
17
-
18
-
19
-
20
-
21
-
22
-
23
-
24
-
25
-
26
-
27
-
28
-
29
-
30
-
31
-
32
-
33
-
34
-
35
-
36
-
37
-
38
-
39
-
40
-
41
-
42
-
43
-
44
-
45
-
46
-
47
-
48
-
49
-
50
-
51
-
52
-
53
-
54
-
55
-
56
-
57
-
58
-
59
-
60
-
61
-
62
-
63
-
64
-
65
-
66
-
67
-
68
-
69
-
70
-
71
-
72
-
73
-
74
-
75
-
76
-
77
-
78
-
79
-
80
-
81
-
82
-
83
-
84
-
85
-
86
-
87
-
88
 |
 |