Pioneer P90HDD Owner's Manual - Page 30
witching CD information, ecording from a source other, than the built-in CD, ecording function menu
 |
UPC - 012562575896
View all Pioneer P90HDD manuals
Add to My Manuals
Save this manual to your list of manuals |
Page 30 highlights
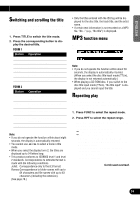
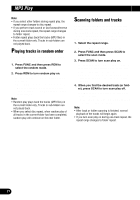
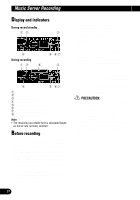
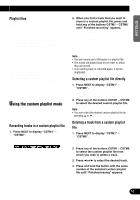
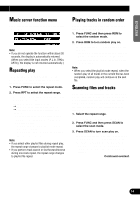
Music Server Recording Note: • If REC is pressed during recording, recording is ter- minated. • In the event of skipping, the recording will revert to the beginning of the track (retry function). • On record standby, the current track is repeated. This is cancelled when recording begins. • Even if the random, track scan and pause are set to on, the current track is repeated when the mode is switched to the record standby status. When the recording is started, the repeat play is canceled. • Fast forward and fast reverse do not operate when the product is on record standby. Switching CD information When recording from the built-in CD, you can switch CD information during record standby or recording. • Press DISP to change the CD information display. Press DISP repeatedly to switch between the following displays: Recording range "Disc" and "Continue" Play time = remaining disc time = total disc time Recording range "Track" Play time = remaining track time = total track time Recording from a source other than the built-in CD This product can make analog recordings from other equipment. 1. Press SOURCE to select the desired source. Press SOURCE until the desired source appears. 2. Press and hold REC until you have the record standby status. "Ready" and "M.Server pause" appear in sequence and the product goes into the record standby status. • When performing multi-CD recording, you can set the recording mode (refer to "Selecting the recording range" on page 30) and the bit rate (refer to "Selecting the recording quality" on page 30). • When recording from a source other than the multi-CD (such as a TV tuner or AUX output, etc.), the bit rate should be set only as specified (refer to "Selecting the recording quality" on page 30.) 3. Press REC to start recording. Recording begins as soon as REC is pressed. • When performing multi-CD recording, press 2 or 3 right before pressing REC to select the track. 4. Press REC again to stop the recording. "Ready" and "M.Server pause" appear in sequence and the product goes into the record standby status. 5. Press BAND to cancel the record standby status. Note: • If the CD sound from the source CD falls below a certain level, a track number will be added automatically. By pressing 5 during recording, it is possible to add a track number manually (up to 400). • Depending on the recording source CD, the unit may determine a track ends in the middle or may not be able to determine the end of a track. • If the CD skips during recording, it will be recorded as is. • When recording where there is a lot of vibration, such as on the road, track numbers will be added automatically. Recording function menu The recording function menu has the following functions: Note: • If you do not operate the function within about 30 seconds, the display is automatically returned. • The record mode setting mode (R.MODE) is dis- played for settings only for CD recording. 29
-
 1
1 -
2
-
3
-
4
-
5
-
6
-
7
-
8
-
9
-
10
-
11
-
12
-
13
-
14
-
15
-
16
-
17
-
18
-
19
-
20
-
21
-
22
-
23
-
24
-
 25
25 -
 26
26 -
 27
27 -
 28
28 -
 29
29 -
 30
30 -
 31
31 -
 32
32 -
 33
33 -
 34
34 -
 35
35 -
36
-
37
-
38
-
39
-
40
-
41
-
42
-
43
-
44
-
45
-
46
-
47
-
48
-
49
-
50
-
51
-
52
-
53
-
54
-
55
-
56
-
57
-
58
-
59
-
60
-
61
-
62
-
63
-
64
-
65
-
66
-
67
-
68
-
69
-
70
-
71
-
72
-
73
-
74
-
75
-
76
-
77
-
78
-
79
-
80
-
81
-
82
-
83
-
84
-
85
-
86
-
87
-
88
-
89
-
90
-
91
-
92
-
93
-
94
-
95
-
96
-
97
-
98
-
99
-
100
-
101
-
102
-
103
-
104
-
105
-
106
-
107
-
108
-
109
-
110
-
111
-
112
-
113
-
114
-
115
-
116
-
117
-
118
-
119
-
120
-
121
-
122
-
123
-
124
-
125
-
126
-
127
-
128
-
129
-
130
-
131
-
132
-
133
-
134
-
135
-
136
-
137
-
138
-
139
-
140
-
141
-
142
-
143
-
144
-
145
-
146
-
147
-
148
-
149
-
150
-
151
-
152
-
153
-
154
-
155
-
156
-
157
-
158
-
159
-
160
-
161
-
162
-
163
-
164
-
165
-
166
-
167
-
168
 |
 |