Pioneer P90HDD Owner's Manual - Page 63
PRECAUTION, Before operating the auto-equalization, function, Carrying out auto-equalizing
 |
UPC - 012562575896
View all Pioneer P90HDD manuals
Add to My Manuals
Save this manual to your list of manuals |
Page 63 highlights
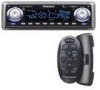
ENGLISH ESPAÑOL DEUTSCH PRECAUTION: • Carrying out auto-equalizing under the following conditions may damage the speakers. Be sure to check conditions thoroughly before carrying out auto-equalizing. - When speakers are incorrectly connected. (e.g., When a rear speaker is connected to a subwoofer output.) - When a speaker is connected to a power amp delivering output higher than the speaker's maximum input power capability. • If the microphone is placed in an unsuitable position the measurement tone may become loud and measurement may take a long time, resulting in a drain on battery power. Be sure to place the microphone in the specified location. (Refer to "Carrying out auto-equalizing.) Before operating the auto-equalization function • Carry out auto-equalizing in as quiet a place as possible, with the car engine and air conditioning switched off. Also cut power to car phones or portable telephones in the car, or remove from the car before carrying out autoequalizing. Sounds other than the measurement tone (surrounding sounds, engine sound, telephones ringing etc.) may prevent correct measurement of car interior acoustic characteristics. • Be sure to carry out auto-equalizing using the supplied microphone. Using another microphone may prevent measurement, or result in incorrect measurement of car interior acoustic characteristics. • Neither front nor rear speaker is connected, auto-equalizing cannot be carried out. • When this product is connected to a power amp with input level control, auto-equalizing may not be possible if you lower power amp input level. Set the power amp's input level to the standard position. • Auto-equalizing changes the audio settings as below: - The fader/balance settings return to the center position. (Refer to page 56.) - The graphic equalizer curve switches to "FLAT". (Refer to page 55.) - When a subwoofer is connected to this product, it will be adjusted automatically either subwoofer output and high pass filter setting for rear speaker. • If you carry out auto-equalizing when an autoequalizer curve already exists, the previous curve will be erased. Carrying out auto-equalizing 1. Stop the car in a place that is as quiet as possible, close all doors, windows and the sun roof, and then turn the engine off. If the engine is left running, engine noise may prevent correct auto-equalizing. 2. Fix the supplied microphone in the center of the headrest of the driver's seat, facing forward, using the belt (sold separately). The auto-equalizer curve may differ depending on where you place the microphone. If desired, place the microphone on the front passenger seat to carry out auto-equalizing. Continued overleaf. FRANÇAIS ITALIANO NEDERLANDS 62
-
 1
1 -
2
-
3
-
4
-
5
-
6
-
7
-
8
-
9
-
10
-
11
-
12
-
13
-
14
-
15
-
16
-
17
-
18
-
19
-
20
-
21
-
22
-
23
-
24
-
25
-
26
-
27
-
28
-
29
-
30
-
31
-
32
-
33
-
34
-
35
-
36
-
37
-
38
-
39
-
40
-
41
-
42
-
43
-
44
-
45
-
46
-
47
-
48
-
49
-
50
-
51
-
52
-
53
-
54
-
55
-
56
-
57
-
 58
58 -
 59
59 -
 60
60 -
 61
61 -
 62
62 -
 63
63 -
 64
64 -
 65
65 -
 66
66 -
 67
67 -
 68
68 -
69
-
70
-
71
-
72
-
73
-
74
-
75
-
76
-
77
-
78
-
79
-
80
-
81
-
82
-
83
-
84
-
85
-
86
-
87
-
88
-
89
-
90
-
91
-
92
-
93
-
94
-
95
-
96
-
97
-
98
-
99
-
100
-
101
-
102
-
103
-
104
-
105
-
106
-
107
-
108
-
109
-
110
-
111
-
112
-
113
-
114
-
115
-
116
-
117
-
118
-
119
-
120
-
121
-
122
-
123
-
124
-
125
-
126
-
127
-
128
-
129
-
130
-
131
-
132
-
133
-
134
-
135
-
136
-
137
-
138
-
139
-
140
-
141
-
142
-
143
-
144
-
145
-
146
-
147
-
148
-
149
-
150
-
151
-
152
-
153
-
154
-
155
-
156
-
157
-
158
-
159
-
160
-
161
-
162
-
163
-
164
-
165
-
166
-
167
-
168
 |
 |