Pioneer PDP-503CMX Technical Manual - Page 15
Remote Control Unit, Remote Control Unit - value
 |
View all Pioneer PDP-503CMX manuals
Add to My Manuals
Save this manual to your list of manuals |
Page 15 highlights
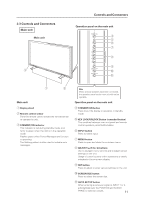
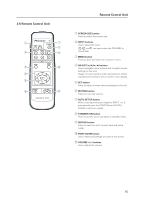
2.5 Remote Control Unit 1 7 8 2 9 3 0 4 5 6 - Remote Control Unit 1 SCREEN SIZE button Press to select the screen size. 2 INPUT buttons Use to select the input. ( , , and are used when the PDA-5002 is connected.) 3 MENU button Press to open and close the on-screen menu. 4 ADJUST (5/∞/3/2) buttons Use to navigate menu screens and to adjust various settings on the unit. Usage of cursor buttons within operations is clearly indicated at the bottom the on-screen menu display. 5 SET button Press to adjust or enter various settings on the unit. 6 MUTING button Press to mute the volume. 7 AUTO SET UP button When entering a computer signal to INPUT 1 or 2, automatically sets the POSITION and CLOCK/ PHASE to optimum values. 8 STANDBY/ON button Press to put the unit in operation or standby mode. 9 DISPLAY button Press to view the unit's current input and setup mode. 0 POINT ZOOM button Use to select and enlarge one part of the screen. - VOLUME (+/-) buttons Use to adjust the volume. 15
-
 1
1 -
2
-
3
-
4
-
5
-
6
-
7
-
8
-
9
-
 10
10 -
 11
11 -
 12
12 -
 13
13 -
 14
14 -
 15
15 -
 16
16 -
 17
17 -
 18
18 -
 19
19 -
 20
20 -
21
-
22
-
23
-
24
-
25
 |
 |
