Pioneer PDP-6010FD Owner's Manual - Page 11
Installation Precautions - plasma
 |
View all Pioneer PDP-6010FD manuals
Add to My Manuals
Save this manual to your list of manuals |
Page 11 highlights
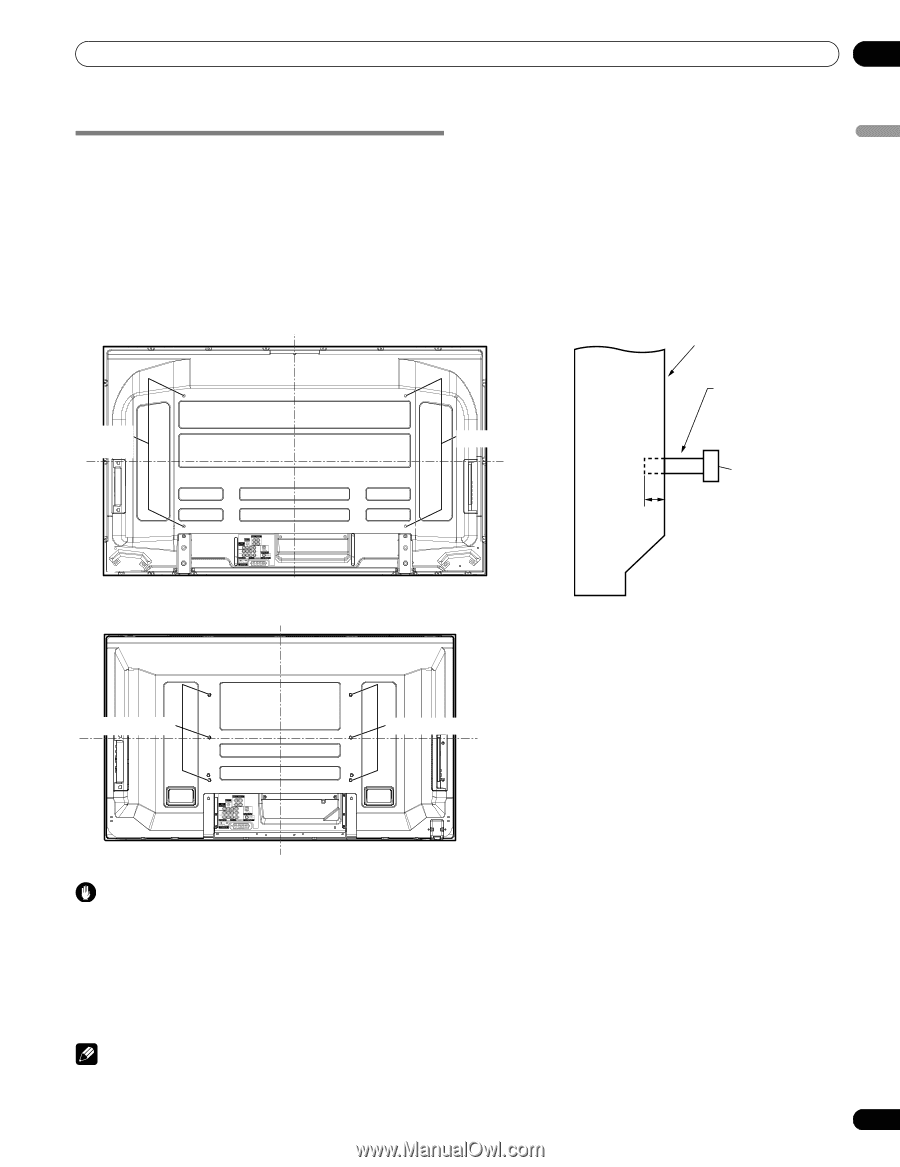
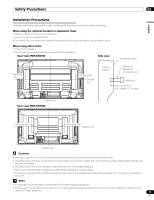
Safety Precautions 02 English Installation Precautions Observe the following precautions when installing with any items such as the optional bracket. When using the optional brackets or equivalent items • Ask your dealer to perform the installation. • Be sure to use the supplied bolts. • For details, see the instruction manual that comes with the optional bracket (or equivalent items). When using other items • Consult your dealer. • The following mounting holes can be used for the installation: Rear view (PDP-6010FD) Side view Mounting surface Mounting hole 4 5 Mounting hole Median line Plasma display Mounting bracket (or equivalent item) M8 screw 12 mm to 18 mm (0.5 inches to 0.7 inches) Median line Rear view (PDP-5010FD) Mounting hole 4 5 Mounting hole Median line Median line Caution • Be sure to use four or more mounting holes symmetrical to the vertical and horizontal median lines. • Use M8 screws, which go 12 mm to 18 mm (0.5 inches to 0.7 inches) in depth from the mounting surface of the plasma display. See the side view above. • Be careful not to block the ventilation opening at the rear of the plasma display. • Be sure to install the plasma display on a flat surface because it contains glass. • The screw holes other than the above are to be used only for the specified products. Never use them for mounting non-specified products. Note • It is strongly recommended to use the optional Pioneer mounting products. • Pioneer shall not be liable for any personal injury or product damage that results from the use of mounting items other than the optional Pioneer products. 11 En
-
 1
1 -
2
-
3
-
4
-
5
-
 6
6 -
 7
7 -
 8
8 -
 9
9 -
 10
10 -
 11
11 -
 12
12 -
 13
13 -
 14
14 -
 15
15 -
 16
16 -
17
-
18
-
19
-
20
-
21
-
22
-
23
-
24
-
25
-
26
-
27
-
28
-
29
-
30
-
31
-
32
-
33
-
34
-
35
-
36
-
37
-
38
-
39
-
40
-
41
-
42
-
43
-
44
-
45
-
46
-
47
-
48
-
49
-
50
-
51
-
52
-
53
-
54
-
55
-
56
-
57
-
58
-
59
-
60
-
61
-
62
-
63
-
64
-
65
-
66
-
67
-
68
-
69
-
70
-
71
-
72
-
73
-
74
-
75
-
76
-
77
-
78
-
79
-
80
-
81
-
82
-
83
-
84
-
85
-
86
-
87
-
88
-
89
-
90
-
91
-
92
-
93
-
94
-
95
-
96
-
97
-
98
-
99
-
100
-
101
-
102
-
103
-
104
-
105
-
106
-
107
-
108
-
109
-
110
-
111
-
112
-
113
-
114
-
115
-
116
-
117
-
118
-
119
-
120
-
121
-
122
-
123
-
124
-
125
-
126
-
127
-
128
-
129
-
130
-
131
-
132
-
133
-
134
-
135
-
136
-
137
-
138
-
139
-
140
-
141
-
142
-
143
-
144
-
145
-
146
-
147
-
148
-
149
-
150
-
151
-
152
-
153
-
154
-
155
-
156
-
157
-
158
-
159
-
160
-
161
-
162
-
163
-
164
-
165
-
166
-
167
-
168
-
169
-
170
-
171
-
172
-
173
-
174
-
175
-
176
-
177
-
178
-
179
-
180
-
181
-
182
-
183
-
184
-
185
-
186
-
187
-
188
-
189
-
190
-
191
-
192
-
193
-
194
-
195
-
196
-
197
-
198
-
199
-
200
-
201
-
202
-
203
-
204
-
205
-
206
-
207
-
208
-
209
-
210
-
211
-
212
-
213
-
214
-
215
-
216
-
217
-
218
-
219
-
220
-
221
-
222
-
223
-
224
-
225
-
226
-
227
-
228
-
229
-
230
-
231
-
232
-
233
-
234
-
235
-
236
-
237
-
238
-
239
-
240
-
241
-
242
-
243
-
244
-
245
-
246
-
247
-
248
-
249
-
250
-
251
-
252
-
253
-
254
-
255
-
256
-
257
-
258
-
259
-
260
-
261
-
262
-
263
-
264
-
265
-
266
-
267
-
268
-
269
-
270
-
271
-
272
-
273
-
274
-
275
-
276
-
277
-
278
-
279
-
280
-
281
-
282
-
283
-
284
-
285
-
286
-
287
-
288
-
289
-
290
-
291
-
292
-
293
-
294
-
295
-
296
-
297
-
298
 |
 |