Pioneer PL-30-K Owners Manual - Page 10
Connect the lead wires. - headshell
 |
View all Pioneer PL-30-K manuals
Add to My Manuals
Save this manual to your list of manuals |
Page 10 highlights
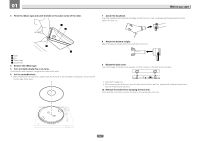
02 Removing the cartridge 1 Turn the headshell lock nut and remove the headshell. 2 Loosen the cartridge mount screws and remove them. 3 Disconnect the lead wires on the cartridge side. Operation Attaching the cartridge 1 Connect the lead wires. They are color-coded as shown below. Be careful to connect them properly. Color Function Red Right channel (R) White Left channel (L) Green Right channel ground (RG) Blue Left channel ground (LG) Upside L R LG RG (Backside of cartridge) 2 Attach the cartridge. To achieve the required overhang, mount in such a way that the stylus tip is positioned about 45 mm from the edge of the headshell's mount surface (the rubber washer), as shown on the diagram below. ! The overhang for this player should be 19 mm. Back side Front side 45 mm (1 3/4 in.) Mount parallel. Mount perpendicular. 3 Tighten the cartridge mount screws to mount the cartridge. Notes ! After replacing the cartridge, be sure to readjust the horizontal balance, stylus pressure, and anti-skating value. ! The thickness of the terminal depends on the replacement cartridge, and some may not connect securely. In this case, use the included spare lead wire. 10
-
 1
1 -
2
-
3
-
4
-
 5
5 -
 6
6 -
 7
7 -
 8
8 -
 9
9 -
 10
10 -
 11
11 -
 12
12 -
 13
13 -
 14
14 -
 15
15 -
16
-
17
-
18
-
19
-
20
-
21
-
22
-
23
-
24
-
25
-
26
-
27
-
28
-
29
-
30
-
31
-
32
-
33
-
34
-
35
-
36
 |
 |
