Pioneer PL-30-K Owners Manual - Page 9
Playback, Pausing playback, Finishing playback, Additional information - manual
 |
View all Pioneer PL-30-K manuals
Add to My Manuals
Save this manual to your list of manuals |
Page 9 highlights
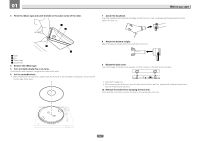
02 Operation English Place of installation Place the unit on a level surface that is free of external vibration. ! To the extent possible, keep the unit away from the speaker system. ! When the unit is very close to a radio (AM/FM broadcasting), the radio could generate noise. Keep the distance as far away from the unit as possible. Playback Prepare as follows; ! Place a record on the turntable. ! Remove the stylus cover while paying attention not to touch the stylus tip. 1 Press the [SPEED] button to set the record's playing speed. To play 45's, set the button to the raised position [v]; for 33 1/3 records, the button must be in the depressed position [w]. ! To play a standard EP record, attach the EP record adapter to the center spindle and play the EP record. 2 Move the [SIZE SELECT] lever to set the record size. To play 17 cm records, set the lever position to [17]; for 30 cm records, set the lever position to [30]. ! To play a standard EP record, attach the EP record adapter to the center spindle and play the EP record. 3 Press the [START] button for over 1 second. The turntable starts turning and playback starts automatically. ! Once the record is played, the tone arm returns to its original position and the turntable automatically stops turning. ! Once you have finished playing records, attach the stylus cover to protect the stylus tip. ! This set has an auto return function by which the tone arm automatically returns to its original position once a specific point is reached after a record finishes playing. Though there is no problem with records of normal size, with records including grooves up to this point, the auto return function may be activated before playback is finished. Notes ! Do not touch the tone arm or turntable or turn off the power while a record is playing. ! The auto play system cannot be used for 25 cm records. In this case operate manually. If the tone arm does not return to its original position after playback stops, press the [STOP] button. Additional information Replacing the stylus The included stylus has a service life of about 400 hours. To avoid damaging valuable records, replace the stylus without delay. Purchase a replacement stylus at the store where you purchased the record player or your nearest repair and inquiry outlet. Specify that you want the replacement stylus exclusively for PL-30-K. ! Turn off the amplifier's power before replacing the stylus, and unplug the player's power cord. ! The stylus tip is an extremely delicate part, so handle it very carefully. Use a soft brush to gently remove any dust from the stylus tip. ! Removing the headshell makes it easy to replace the stylus. Removing the replaceable stylus 1 Holding the cartridge steady with one hand, grasp the replaceable stylus with the other hand, and then push down it. 2 Pull the stylus off gently in the direction of arrow. Attaching the replaceable stylus 1 Holding the cartridge steady with one hand, grasp the replaceable stylus with the other hand, point the catch on the replaceable stylus, insert it all the way into the long hole in the cartridge. 2 Push up in the direction of arrow until a click is heard. Pausing playback Pull up the lifter lever. The stylus of the cartridge lifts away from the record. ! To resume playback, push down the lifter lever. Finishing playback 1 Pull up the lifter lever to return the tone arm to the arm rest and then push down the lifter lever. 2 Press the [STOP] button. ! Once you have finished playing records, attach the stylus cover to protect the stylus tip. Replacing the cartridge If you wish to mount a different cartridge on this player, use one weighing approximately 4.5 g to 9.5 g. To purchase a headshell only, ask for one exclusively for PL-30-K at your store of purchase or nearest repair and inquiry outlet. 9
-
 1
1 -
2
-
3
-
 4
4 -
 5
5 -
 6
6 -
 7
7 -
 8
8 -
 9
9 -
 10
10 -
 11
11 -
 12
12 -
 13
13 -
 14
14 -
15
-
16
-
17
-
18
-
19
-
20
-
21
-
22
-
23
-
24
-
25
-
26
-
27
-
28
-
29
-
30
-
31
-
32
-
33
-
34
-
35
-
36
 |
 |
