Pioneer PL-30-K Owners Manual - Page 8
Connecting your equipment
 |
View all Pioneer PL-30-K manuals
Add to My Manuals
Save this manual to your list of manuals |
Page 8 highlights
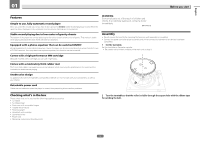
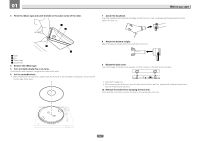
02 Operation Adjusting the stylus pressure 1 Return the tone arm to the arm rest. 2 Match the "0" on the stylus pressure adjustment ring to the center line of the arm rear shaft. While using your finger to hold the balance weight to keep it from moving, turn only the stylus pressure adjustment ring so that the number "0" comes to the black center line of the tone arm rear shaft. Connecting your equipment Connecting your equipment ! Be sure to turn off the power and unplug the power cord from the power outlet whenever making or changing connections. ! Refer to the operating instructions for the component to be connected. ! Connect the power cord after all the connections between devices have been completed. Descriptions of terminals PHONO LINE AC IN 3 Adjust the stylus pressure. Turn the balance weight to adjust to the appropriate stylus pressure value for your cartridge. ! When turning the balance weight, the stylus pressure adjustment ring turns together. While observing the adjustment ring, adjust the stylus pressure to the appropriate value. ! The appropriate stylus pressure for the included cartridge is 3.5 g. Set to "3.5". Adjusting anti-skating This adjustment is made to prevent stylus jumping. 1 Match to the same scale position as the stylus pressure value. 2 Turn the [ANTI-SKATING] dial to match the reference mark to the same value as the cartridge stylus pressure value. NTI-SKATIN A G 1 23 1 Equalizer switch Move this switch to appropriate position according to the audio input terminal of the pre-main amplifier or other component. 2 RCA output terminals Connects to the audio input terminal of the pre-main amplifier or other component. 3 AC IN terminal Connects to a power outlet using the included power cord. Wait until all connections between the equipment are completed before connecting the power cord. ! Be sure to use the included power cord. Connecting to a pre-main amplifier and component 1 Set the equalizer switch to appropriate position. PHONO: When connecting to the PHONO input terminal (the built-in equalizer of record player is not used.) LINE: When connecting a terminal other than the PHONO input terminal (the built-in equalizer of record player is used.) 2 Connect the RCA output terminal to the input terminal of the pre-main amplifier or other component. 3 Connect the power cord. Connects to a power outlet using the included power cord. Wait until all connections between the equipment are completed before connecting the power cord. ! Before connecting to the outlet (AC outlet) mounted on the connected equipment, check the wattage displayed on the outlet. (This unit consumes 2 W of power.) ! If the player starts operating when the power cord is plugged in, press the [STOP] button. 8
-
 1
1 -
2
-
 3
3 -
 4
4 -
 5
5 -
 6
6 -
 7
7 -
 8
8 -
 9
9 -
 10
10 -
 11
11 -
 12
12 -
 13
13 -
14
-
15
-
16
-
17
-
18
-
19
-
20
-
21
-
22
-
23
-
24
-
25
-
26
-
27
-
28
-
29
-
30
-
31
-
32
-
33
-
34
-
35
-
36
 |
 |
