Pioneer PRS-D2000SPL Owner's Manual - Page 10
Connecting the Power Terminal
 |
UPC - 012562858937
View all Pioneer PRS-D2000SPL manuals
Add to My Manuals
Save this manual to your list of manuals |
Page 10 highlights
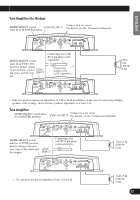
Connecting the Unit Connecting the Power Terminal • Always use the recommended battery and ground wire, which is sold separately. Connect the battery wire directly to the car battery positive terminal (+) and the ground wire to the car body. • Recommended wires size (AWG: American Wire Gauge) is as follows. The battery wire, the ground wire and the optional direct ground wire must be same size. • Use a 10 AWG to 20 AWG wire for the system remote control wire. Battery Wire and Ground Wire Size Wire Length less than 2.1 m less than 3.6 m less than 5.2 m less than 6.4 m less than 7 ft. less than 12 ft. less than 17 ft. less than 21 ft. Wire Size 4 AWG 2 AWG 1 AWG 0 AWG 1. Pass the battery wire from the engine compartment to the interior of the vehicle. • After making all other connections to the amplifier, connect the battery wire terminal of the amplifier to the positive (+) terminal of the battery. The maximum length of the wire between the fuse and the positive (+) terminal of the battery is 45 cm (1 ft. 6 in.). Engine Interior of compartment the vehicle Fuse 300 A Positive (+) Each amplifier must terminal be SEPARATELY fused at 300 A. Drill a 14 mm (1/2 in.) hole into the vehicle body. Insert the O-ring rubber grommet into the vehicle body. 2. Expose the end of wires using nippers or a cutter. • Battery wire, ground wire: 23 mm to 25 mm (7/8 in. to 1 in.) • System remote control wire: 14 mm to 16 mm (1/2 in. to 5/8 in.) 3. Connect the wires to the terminal. • Fix the wires securely with the terminal screws. System remote control terminal Power terminal Battery wire Terminal screw Terminal screw GND terminal System remote control wire Ground wire WARNING Failure to securely fasten the battery wire to the terminal using the terminal screws could cause the terminal area to overheat and could result in damage and injury including minor burns. 4. Put the wire ties in the slits and wrap the wire ties around the wires. • Wrap the wire tie around the wire insulation, not the stripped wire. • Cut off any excess portions of the wire ties. Wire tie 9
-
 1
1 -
2
-
3
-
4
-
 5
5 -
 6
6 -
 7
7 -
 8
8 -
 9
9 -
 10
10 -
 11
11 -
 12
12 -
 13
13 -
 14
14 -
 15
15 -
16
-
17
-
18
-
19
-
20
-
21
-
22
-
23
-
24
-
25
-
26
-
27
-
28
-
29
-
30
-
31
-
32
-
33
-
34
-
35
-
36
-
37
-
38
-
39
-
40
-
41
-
42
-
43
-
44
-
45
-
46
-
47
-
48
-
49
-
50
-
51
-
52
-
53
-
54
-
55
-
56
 |
 |
