Pioneer STZ-D10Z-R Operating Instructions - Page 13
Rear panel - steez audio
 |
View all Pioneer STZ-D10Z-R manuals
Add to My Manuals
Save this manual to your list of manuals |
Page 13 highlights
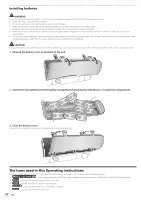
Rear panel VOL MIN MAX MIC 5V 500mA PC connect USB PHONES AUX IN 1 2 34 5 6 7 1 Battery cover 2 Microphone volume knob Use to adjust the volume of the sound inputted through the microphone. The sound from the microphone is always outputted when the device's power is on, but not outputted when headphones are connected. 3 Microphone jack Use to connect your microphone. 4 PC connect terminal Use the supplied USB cable to connect the PC. (page 24) 5 USB terminal Use to connect your USB mass storage devices or STEEZ PORTABLE an audio source. (page 15, 17) 6 PHONES jack Use to connect headphones. When the headphones are connected, there is no sound output from the speakers. 7 AUX IN terminal Connect a mobile portable music player device, etc. using a commercially available stereo mini-jack cable. (page 19) 8 DC IN terminal Plug the supplied AC adapter. (page 9) DC IN 18 V 8 En 13
-
 1
1 -
2
-
3
-
4
-
5
-
6
-
7
-
 8
8 -
 9
9 -
 10
10 -
 11
11 -
 12
12 -
 13
13 -
 14
14 -
 15
15 -
 16
16 -
 17
17 -
 18
18 -
19
-
20
-
21
-
22
-
23
-
24
-
25
-
26
-
27
-
28
-
29
-
30
-
31
-
32
 |
 |
