Pioneer VSX-1017TXV-K Owner's Manual - Page 15
your HDMI component. - vsx vsx
 |
UPC - 000411865816
View all Pioneer VSX-1017TXV-K manuals
Add to My Manuals
Save this manual to your list of manuals |
Page 15 highlights
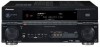
Connecting your equipment 03 VSX-1017TXV OPTICAL DIGITAL ANTENNA IN 1 (DVD/LD) IN 2 (TV/SAT) OUT IN 1 (DVR/ VCR1) IN 2 (TV/SAT) IN 3 (CD) COMPONENT VIDEO Y PB PR IN 1 Y PB PR IN 2 Y PB PR Y PB PR ASSIGNABLE 1 3 OUT HDMI ASSIGNABLE 12 XM IN ASSIGNABLE 13 S-VIDEO CONTROL OUT IN iPod IN IN IN OUT IN VIDEO AUDIO IN L IN 1 (DVD/LD) R IN 2 (DVR/VCR2) CD COAXIAL ASSIGNABLE 12 OUT IN IN IN OUT IN CD-R/TAPE/MD DVD/LD TV/SAT DVR/VCR1 AM LOOP L OUT P CENTER L IN 3 R SUB R FRONT WOOFER OUT IN MONITOR OUT OUT IN L DVR/VCR2 R FRONT MULTI CH Y PB PR 2 COMPONENT VIDEO TV The HDMI connection transfers uncompressed digital video, as well as almost every kind of digital audio that the connected component is compatible with, including DVD-Video, DVD-Audio (see below for limitations), Video CD/Super VCD, CD and MP3. HDMI/DVI-equipped component HDMI OUT 1 3 DIGITAL OUT AUDIO OUT L AUDIO R OPTICAL DIGITAL ANTENNA IN 1 (DVD/LD) IN 2 (TV/SAT) OUT IN 1 (DVR/ VCR1) IN 2 (TV/SAT) IN 3 (CD) COMPONENT VIDEO Y PB PR IN 1 Y PB PR IN 2 Y PB PR Y PB PR ASSIGNABLE 1 3 OUT HDMI ASSIGNABLE 12 XM IN ASSIGNABLE 13 S-VIDEO CONTROL OUT IN iPod IN IN IN OUT IN VIDEO AUDIO IN L IN 1 (DVD/LD) R IN 2 (DVR/VCR2) CD COAXIAL ASSIGNABLE 12 OUT IN IN IN OUT IN CD-R/TAPE/MD DVD/LD TV/SAT DVR/VCR1 AM L OUT IN 3 R OUT OUT DVR/ VSX-1017TXV Y PB PR 1 COMPONENT VIDEO DVD player 1 Connect the component video outputs of your source to a set of ASSIGNABLE COMPONENT VIDEO inputs. Connect using a three-way component video cable. • Since they are assignable, it doesn't matter which component video inputs you use for which source. After connecting everything, you'll need to assign the component video inputs-see The Input Assign menu on page 52. 2 Connect the COMPONENT VIDEO OUT jacks to the component video inputs on your TV or monitor. Use a three-way component video cable. 2 HDMI IN HDMI/DVI-compatible monitor or plasma display 1 Use an HDMI cable to connect the HDMI IN 1/2 interconnect on this receiver to an HDMI output on your HDMI component. 2 Use an HDMI cable to connect the HDMI OUT interconnect on this receiver to an HDMI interconnect on an HDMI-compatible monitor.1 • The arrow on the cable connector body should be facing right for correct alignment with the connector on the player. Connecting using HDMI If you have an HDMI or DVI (with HDCP) equipped component, you can connect it to this receiver using a commercially available HDMI cable. Note 1 • To see the on-screen display, you must also connect your TV to this receiver with a composite video, component video or S-video cable. • For optimum performance, the output settings for an HDMI component (screen resolution, the DeepColor feature, etc.) should be coincided with the ones that an HDMI-compatible monitor connected adopts. 15 En
-
 1
1 -
2
-
3
-
4
-
5
-
6
-
7
-
8
-
9
-
 10
10 -
 11
11 -
 12
12 -
 13
13 -
 14
14 -
 15
15 -
 16
16 -
 17
17 -
 18
18 -
 19
19 -
 20
20 -
21
-
22
-
23
-
24
-
25
-
26
-
27
-
28
-
29
-
30
-
31
-
32
-
33
-
34
-
35
-
36
-
37
-
38
-
39
-
40
-
41
-
42
-
43
-
44
-
45
-
46
-
47
-
48
-
49
-
50
-
51
-
52
-
53
-
54
-
55
-
56
-
57
-
58
-
59
-
60
-
61
-
62
-
63
-
64
-
65
-
66
-
67
-
68
-
69
-
70
-
71
-
72
-
73
-
74
 |
 |
