Pioneer VSX-1017TXV-K Owner's Manual - Page 16
Signal Sel - av receiver
 |
UPC - 000411865816
View all Pioneer VSX-1017TXV-K manuals
Add to My Manuals
Save this manual to your list of manuals |
Page 16 highlights
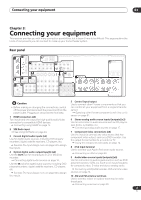
03 Connecting your equipment 3 To hear audio from your HDMI component through this system, make analog and/or digital connections as necessary. On the rear panel, you must connect to the audio jacks from a set of audio/video inputs (for example, DVR/VCR1 or DVR/VCR2 as shown in the illustration). • Without this connection, HDMI audio will still be output from your TV or plasma display (though no sound will be heard from this receiver). 4 Assign the HDMI input(s) you connected to the corresponding input source. If the connected HDMI component is different from the default settings for the HDMI input terminals of this receiver, you need to change the settings specified in Assigning the HDMI inputs on page 53. 5 Use the input source buttons to select the input source you assigned in the previous step, then press SIGNAL SEL to select the audio input signal. You can also use the front panel controls to do this (see Choosing the input signal on page 30). • If the video signal does not appear on your TV or plasma display, try adjusting the resolution settings on your component or display. Note that some components (such as video game units) have resolutions that may not be displayed. In this case, use an (analog) S-video or composite connection. About HDMI HDMI (High Definition Multimedia Interface) supports both video and audio on a single digital connection for use with DVD players, DTV, set-top boxes, and other AV devices. HDMI was developed to provide the technologies of High Bandwidth Digital Content Protection (HDCP) as well as Digital Visual Interface (DVI) in one specification. HDCP is used to protect digital content transmitted and received by DVI-compliant displays. HDMI has the capability to support standard, enhanced, or high-definition video plus standard to multi-channel surround-sound audio. HDMI features include uncompressed digital video, a bandwidth of up to 2.2 gigabytes per second (with HDTV signals), one connector (instead of several cables and connectors), and communication between the AV source and AV devices such as DTVs. HDMI, the logo and High-Definition Multimedia Interface are trademarks or registered trademarks of HDMI licensing LLC. Connecting digital audio sources This receiver has both digital inputs and outputs, allowing you to connect digital audio components for playback and for making digital recordings. Most digital components also have analog connections. See Connecting analog audio sources on the following page if you want to connect these too. VSX-1017TXV OPTICAL DIGITAL ANTENNA IN 1 (DVD/LD) IN 2 (TV/SAT) OUT IN 1 (DVR/ VCR1) IN 2 (TV/SAT) IN 3 (CD) COMPONENT VIDEO Y PB PR IN 1 Y PB PR IN 2 Y PB PR Y PB PR ASSIGNABLE 1 3 OUT HDMI ASSIGNABLE 12 XM IN ASSIGNABLE 13 S-VIDEO CONTROL OUT IN iPod IN IN IN OUT IN VIDEO AUDIO IN L IN 1 (DVD/LD) R IN 2 (DVR/VCR2) CD COAXIAL ASSIGNABLE 12 OUT IN IN IN OUT IN CD-R/TAPE/MD DVD/LD TV/SAT DVR/VCR1 AM L L OUT IN 3 R OUT OUT DVR/V 1 OPTICAL COAXIAL DIGITAL OUT OPTICAL 2 DIGITAL IN CD-R, MD, DAT, etc. 1 Connect an optical-type1 digital audio output on your digital component to the DIGITAL 3 (CD) input. Use an optical cable for the connection. 2 For recording equipment, connect the optical-type DIGITAL output to a digital input on the recorder. Use an optical cable to connect to the DIGITAL OUT.2 Note 1 • If your digital component only has a coaxial digital output, you can connect it to one of the coaxial inputs on this receiver using a coaxial cable. When you set up the receiver you'll need to tell the receiver which input you connected the component to (see also The Input Assign menu on page 52). • The digital outputs from other components can be connected to any spare digital audio inputs on this receiver. You can assign them when setting up the receiver (see also The Input Assign menu on page 52). 2 In order to record some digital sources, you must make analog connections as explained in Connecting analog audio sources below. 16 En
-
 1
1 -
2
-
3
-
4
-
5
-
6
-
7
-
8
-
9
-
10
-
 11
11 -
 12
12 -
 13
13 -
 14
14 -
 15
15 -
 16
16 -
 17
17 -
 18
18 -
 19
19 -
 20
20 -
 21
21 -
22
-
23
-
24
-
25
-
26
-
27
-
28
-
29
-
30
-
31
-
32
-
33
-
34
-
35
-
36
-
37
-
38
-
39
-
40
-
41
-
42
-
43
-
44
-
45
-
46
-
47
-
48
-
49
-
50
-
51
-
52
-
53
-
54
-
55
-
56
-
57
-
58
-
59
-
60
-
61
-
62
-
63
-
64
-
65
-
66
-
67
-
68
-
69
-
70
-
71
-
72
-
73
-
74
 |
 |
