Pioneer VSX-41 Owner's Manual - Page 48
Remote Setup, Multi Control, Search, Enter
 |
View all Pioneer VSX-41 manuals
Add to My Manuals
Save this manual to your list of manuals |
Page 48 highlights
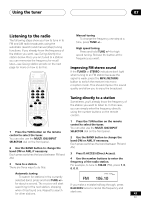
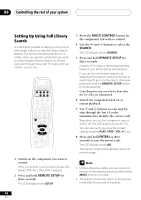
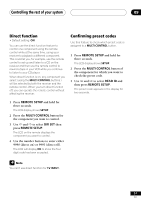
09 Controlling the rest of your system Setting Up Using Full Library Search An alternative method of setting up the remote with preset codes is to use the Library Search feature. The remote transmits batches of 10 codes; when you see the component you want to control respond (by turning on or off) you just scan through those last 10 codes until you find the correct one. SOURCE RECEIVER LEARN ERASE SEARCH BY BRAND DVD RCV TV VCR MULTI CONTROL CD TUN CD-R TVC 1 2 3 TEST TONE 4 CH SELECT 7 INPUT ATT 5 FL DIMMER 6 LEVEL 8 9 +10 EFFECT DISPLAY DISC 0 ENTER DTV INFO ¶ MPX/RETURN 7 D.ACCESS T.EDIT/GUIDE 38 BAND 1 CLASS ¡ DTV ON/OFF DTV MENU 4¢ TOP MENU AUDIO SUB TITLE ANGLE REMOTE SETUP STANDARD ADV.SURR. STEREO INPUT SEL. SIGNAL SEL MIDNIGHT/ LOUDNESS MUTE RECEIVER CONTROL TUNE ST U SET P ST ENTER TUNE CHANNEL MENU TV VOL TV INPUT MASTER VOLUME TV TV CONTROL 1 Switch on the component you want to control. If the component is some kind of player (CD player, VCR, etc.), then start it playing. 2 Press and hold REMOTE SETUP for three seconds. The LCD display shows SETUP. 3 Press the MULTI CONTROL button for the component you want to control. 4 Use the } and ] buttons to select the SEARCH. The LCD display shows SEARCH. 5 Press and hold REMOTE SETUP for three seconds. A batch of 10 codes is transmitted and the transmit icon blinks during transmission. If you see the component respond, by stopping (for playback components only) or switching off, go on to the step 6, otherwise press and hold the REMOTE SETUP button for three seconds. Cancelling this step can only be done after the 10 codes are transmitted. 6 Switch the component back on or restart playback. 7 Use ' and ' buttons to scan step-bystep through the last 10 codes transmitted to identify the correct code. Stop when you see the component stop or switch off. The LCD display shows the I.D. You can also verify you have the correct code by pressing PLAY, STOP., VOL +/-, etc. 8 Press and hold ENTER for three seconds to save the preset code. The LCD display shows OK. The remote control automatically returns to normal usage. • Unless otherwise stated, you can cancel or exit any of the steps by pressing and holding MUTE for three seconds. • The remote control will return to its previous mode after 30 seconds of inactivity. 48 En
-
 1
1 -
2
-
3
-
4
-
5
-
6
-
7
-
8
-
9
-
10
-
11
-
12
-
13
-
14
-
15
-
16
-
17
-
18
-
19
-
20
-
21
-
22
-
23
-
24
-
25
-
26
-
27
-
28
-
29
-
30
-
31
-
32
-
33
-
34
-
35
-
36
-
37
-
38
-
39
-
40
-
41
-
42
-
 43
43 -
 44
44 -
 45
45 -
 46
46 -
 47
47 -
 48
48 -
 49
49 -
 50
50 -
 51
51 -
 52
52 -
 53
53 -
54
-
55
-
56
-
57
-
58
-
59
-
60
-
61
-
62
-
63
-
64
-
65
-
66
-
67
-
68
-
69
-
70
-
71
-
72
 |
 |
