Pioneer VSX-52TX Owner's Manual - Page 72
Settings, Display
 |
View all Pioneer VSX-52TX manuals
Add to My Manuals
Save this manual to your list of manuals |
Page 72 highlights
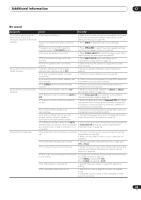
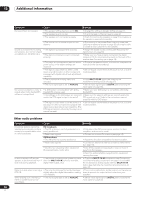
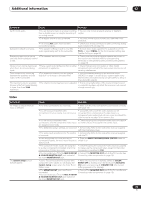
12 Additional information Symptom Can't record video. Cause Remedy • You are trying to record a source connected • Connect the source component to either the composite to the component video jacks. video or the S-video jacks (see Connecting video components on page 18). • The source is copy protected. • You can't record sources that have been copy protected. • The recorder's video input is hooked up using a different type of cable to the source video output. • Hook up the source and the recorder using the same type of video cable (see About the video converter on page 15). Settings Symptom The Auto MCACC Setup continually shows an error. Cause • The ambient noise level in the room is too high, or obstacles are blocking the setup microphone. After using the Auto MCACC Setup, the speaker size setting (LARGE or SMALL) is incorrect. The display shows KEY LOCK ON when you try to make settings. 12V TRG ERR blinks in the display. • There was some inaudible low-frequency noise in the room. • Your Pioneer dealer has enabled the key lock feature. • There is a problem with the 12V trigger connection. Remedy • Keep the noise level in the room as low as possible when using the Auto MCACC Setup (see Other problems when using the Auto MCACC Setup on page 13 for more on this). If the noise cannot be kept low enough, you will have to set up the surround sound manually (page 43). • The low-frequency noise could have been caused by an air conditioner or motor. Switch off all appliances in the room and rerun the Auto MCACC Setup. • Ask your Pioneer dealer to disable the key lock. • Turn the receiver off and check the 12V trigger connection. Display Symptom Cause Remedy The display is dark or off. • The display is set to dark or off. • Press FL. DIMMER on the remote control repeatedly to select a different brightness. After making an adjustment the • The display is set to off. display goes off. • Press FL. DIMMER on the remote control repeatedly to select a different brightness. You can't get DIGITAL to display • There is a problem with the digital when using the SIGNAL SELECT connections or the digital input is assigned button. incorrectly. • Check your digital connections and/or assign the digital inputs correctly (see Assigning the digital inputs on page 63). • The multichannel analog inputs are selected. • Press MULTI CH IN again (see Selecting the multichannel analog inputs on page 37). The Dolby/DTS indicator doesn't • The player is paused. light when playing Dolby/DTS software. • The player's sound output settings are wrong. • Press play. • Set the player correctly (consult the manual that came with the player, if necessary). When playing a DVD-Audio disc, • The audio from these discs is output from • This is not a malfunction. See also the operating the DVD player display shows 96 the analog audio jacks of the DVD player only; instructions that came with your DVD player. kHz. However, the receiver's the receiver does not show the sampling rate display does not. of the input signal through the analog inputs. During playback of a DTS 96/24 • The receiver's input signal type is set to source, the display doesn't show analog. 96kHz. • Set the receiver to AUTO or DIGITAL (see Choosing the input signal on page 33). When playing Dolby Digital or DTS sources, the receiver's format indicators do not light. • No digital connection, or the digital connection is incorrect. • The receiver's input signal type is set to analog. • Check the digital audio connection (page 16). • Set the receiver to AUTO or DIGITAL (see Choosing the input signal on page 33). • The DVD player is set to output Dolby Digital • Check the settings on the player. Set the output for and/or DTS audio as PCM. Dolby Digital and DTS (no PCM conversion). See also the operating instructions that came with your DVD player. • The disc has several playback audio tracks; • Switch the playback audio channel on your DVD player. the one currently playing is actually PCM. See the operating instructions that came with your DVD player. 72 En
-
 1
1 -
2
-
3
-
4
-
5
-
6
-
7
-
8
-
9
-
10
-
11
-
12
-
13
-
14
-
15
-
16
-
17
-
18
-
19
-
20
-
21
-
22
-
23
-
24
-
25
-
26
-
27
-
28
-
29
-
30
-
31
-
32
-
33
-
34
-
35
-
36
-
37
-
38
-
39
-
40
-
41
-
42
-
43
-
44
-
45
-
46
-
47
-
48
-
49
-
50
-
51
-
52
-
53
-
54
-
55
-
56
-
57
-
58
-
59
-
60
-
61
-
62
-
63
-
64
-
65
-
66
-
 67
67 -
 68
68 -
 69
69 -
 70
70 -
 71
71 -
 72
72 -
 73
73 -
 74
74 -
 75
75 -
 76
76 -
 77
77 -
78
-
79
 |
 |
