Pioneer VSX-815-K Owner's Manual - Page 28
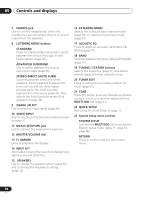
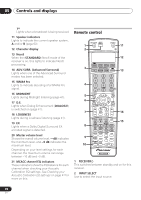
buttons, MCACC SETUP MIC jack, FL DIMMER, INPUT ATT, ACOUSTIC EQ, System Setup menu controls - treble
 |
UPC - 012562731247
View all Pioneer VSX-815-K manuals
Add to My Manuals
Save this manual to your list of manuals |
Page 28 highlights
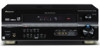
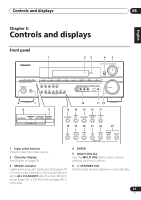
05 Controls and displays 7 PHONES jack Use to connect headphones. When the headphones are connected, there is no sound output from the speakers. 8 LISTENING MODE buttons STANDARD Press for Standard decoding and to switch between the various Pro Logic IIx and Neo:6 options (page 34). ADVANCED SURROUND Use to switch between the various surround modes (page 35). STEREO/DIRECT (AUTO SURR) Switches between direct and stereo playback. Direct playback bypasses the tone controls and any other signal processing for the most accurate reproduction of a source (page 37). Also selects the Auto Surround mode (Auto playback on page 34). 9 SIGNAL SELECT Use to select an input signal (page 38). 10 VIDEO INPUT See Connecting to the front panel video terminal on page 21. 11 MCACC SETUP MIC jack Use to connect the supplied microphone. 12 MASTER VOLUME dial 13 FL DIMMER Dims or brightens the display. 14 INPUT ATT Attenuates (lowers) the level of an analog input signal to prevent distortion. 15 SPEAKERS Use to change the speaker system (page 62) and to change the impedance setting (page 72). 16 EXTENDED MODE Selects the surround back channel mode (page 39) or virtual surround back mode (page 40). 17 ACOUSTIC EQ Press to select an Acoustic Calibration EQ setting (page 37). 18 BAND Switches between the tuner AM and FM bands (page 51). 19 TUNING / STATION buttons Selects the frequency (page 51) and station presets (page 52) when using the tuner. 20 TUNER EDIT Press to memorize and name a station for recall (page 52). 21 TONE Press this button to access the bass and treble controls, which you can then adjust with the MULTI JOG dial (page 41). 22 QUICK SETUP See Using the Quick Setup on page 11. 23 System Setup menu controls SYSTEM SETUP Use with the MULTI JOG dial to access the System Setup menu (page 11, page 43, page 66). RETURN Press to confirm and exit the current menu. 28 En
-
 1
1 -
2
-
3
-
4
-
5
-
6
-
7
-
8
-
9
-
10
-
11
-
12
-
13
-
14
-
15
-
16
-
17
-
18
-
19
-
20
-
21
-
22
-
 23
23 -
 24
24 -
 25
25 -
 26
26 -
 27
27 -
 28
28 -
 29
29 -
 30
30 -
 31
31 -
 32
32 -
 33
33 -
34
-
35
-
36
-
37
-
38
-
39
-
40
-
41
-
42
-
43
-
44
-
45
-
46
-
47
-
48
-
49
-
50
-
51
-
52
-
53
-
54
-
55
-
56
-
57
-
58
-
59
-
60
-
61
-
62
-
63
-
64
-
65
-
66
-
67
-
68
-
69
-
70
-
71
-
72
-
73
-
74
-
75
-
76
 |
 |
