| Section |
Page |
| Contents |
4 |
| Flow of settings on the receiver |
6 |
| 1 Before you start |
6 |
| j |
6 |
| 2 Determining the speakers’ application (page 15) |
6 |
| j |
6 |
| 3 Connecting the speakers |
6 |
| j |
6 |
| 4 Connecting the components |
6 |
| j |
6 |
| 5 Switching the speaker impedance (page 36) |
6 |
| j |
6 |
| 6 Power On |
6 |
| j |
6 |
| 7 Changing the OSD display language (OSD Language) (page 36) |
6 |
| j |
6 |
| 8 Surround back speaker setting (page 94) |
6 |
| j |
6 |
| 9 MCACC speaker settings |
6 |
| j |
6 |
| 10 The Input Setup menu (page 39) |
6 |
| j |
6 |
| 11 Basic playback (page 41) |
6 |
| j |
6 |
| 12 Adjusting the sound and picture quality as desired |
6 |
| j |
6 |
| 13 Other optional adjustments and settings |
6 |
| j |
6 |
| 14 Making maximum use of the remote control |
6 |
| Before you start |
7 |
| Checking what’s in the box |
7 |
| Installing the receiver |
7 |
| Loading the batteries |
7 |
| CAUTION |
7 |
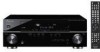
| Controls and displays |
8 |
| Front panel |
8 |
| 1 INPUT SELECTOR dial |
8 |
| 2 u STANDBY/ON |
8 |
| 3 Tuner controls |
8 |
| 4 PHASE CONTROL indicator - Lights to indicate Phase Control is selected (page 59). |
8 |
| 5 Character display |
8 |
| 6 ENTER |
8 |
| 7 Remote sensor |
8 |
| 8 MASTER VOLUME dial |
8 |
| 9 PHONES jack |
9 |
| 10 Listening mode buttons |
9 |
| 11 SPEAKERS |
9 |
| 12 MULTI-ZONE controls |
9 |
| 13 iPod/iPhone/USB, VIDEO INPUT terminals |
9 |
| 14 MCACC SETUP MIC jack |
9 |
| Display |
9 |
| 1 SIGNAL indicators |
9 |
| 2 Program format indicators |
9 |
| 3 Digital format indicators |
9 |
| 4 S.RTRV |
10 |
| 5 MULTI-ZONE |
10 |
| 6 DSD PCM - Light during DSD (Direct Stream Digital) to PCM conversion with SACDs. |
10 |
| 7 SOUND |
10 |
| 8 PQLS |
10 |
| 9 UP MIX |
10 |
| 10 Listening mode indicators |
10 |
| 11 (PHASE CONTROL) |
10 |
| 12 Analog signal indicators |
10 |
| 13 Tuner indicators |
10 |
| 14 |
10 |
| 15 Master volume level |
10 |
| 16 Input function indicators |
10 |
| 17 Scroll indicators |
10 |
| 18 Matrix decoding format indicators |
10 |
| 19 Speaker indicators |
10 |
| 20 SLEEP |
10 |
| 21 MSTR |
10 |
| 22 Character display |
10 |
| 23 Remote control mode indicator |
10 |
| Remote control |
11 |
| 1 u RECEIVER |
11 |
| 2 Input function buttons |
11 |
| 3 Number buttons and other receiver/ component controls |
11 |
| 4 TV CONTROL buttons |
12 |
| 5 Tuner/component control buttons/HOME MENU |
12 |
| 6 i/j/k/l (TUNE/PRESET) /ENTER |
12 |
| 7 Receiver controls |
12 |
| 8 Component control buttons |
12 |
| 9 AUDIO - Changes the audio or channel on DVD discs. |
13 |
| 10 REMOTE SETUP - Use to input the preset code when making remote control settings and to set the remote control mode (page 73). |
13 |
| 11 MULTI-ZONE operation selector switch |
13 |
| 12 Remote control LED |
13 |
| 13 u SOURCE |
13 |
| 14 MASTER VOLUME +/- |
13 |
| 15 MUTE |
13 |
| 16 |
13 |
| Operating range of remote control unit |
13 |
| Connecting your equipment |
14 |
| Rear panel |
14 |
| Important |
14 |
| CAUTION |
14 |
| Determining the speakers’ application |
15 |
| [1] 7.1ch surround connection (Simple connection & Best surround) |
15 |
| [2] 5.1ch surround & Front Bi-amping connection (High quality surround) |
15 |
| [3] 5.1ch surround & Zone 2 connection (Multi Zone) |
15 |
| [4] 5.1ch surround & Speaker B connection |
16 |
| Other speaker connection |
16 |
| Placing the speakers |
17 |
| Some tips for improving sound quality |
17 |
| Connecting the speakers |
18 |
| CAUTION |
18 |
| Bare wire connections |
18 |
| 1 Twist exposed wire strands together. (fig. A) |
18 |
| 2 Loosen terminal and insert exposed wire. (fig. B) |
18 |
| 3 Tighten terminal. (fig. C) |
18 |
| Banana plug connections |
18 |
| Important |
18 |
| CAUTION |
18 |
| Installing your speaker system |
19 |
| Standard 5.1/6.1/7.1-channel surround connections |
19 |
| Bi-amping your speakers |
20 |
| CAUTION |
20 |
| Bi-wiring your speakers |
20 |
| . To bi-wire a speaker, connect two speaker cables to the speaker terminal on the receiver. |
20 |
| CAUTION |
20 |
| Selecting the Surr Back system |
21 |
| Zone 2 setup |
21 |
| 1 Connect a pair of speakers to the surround back speaker terminals. |
21 |
| 2 Select ‘ZONE 2’ from the Surr Back System menu. |
21 |
| Speaker B setup |
21 |
| 1 Connect a pair of speakers to the surround back speaker terminals. |
21 |
| 2 Select ‘Speaker B’ from the Surr Back System menu. |
21 |
| Bi-Amping setup |
21 |
| 1 Connect a Bi-amp compatible speakers to the front and surround back speaker terminals. |
21 |
| 2 Select the ‘Front Bi-Amp’ setting from the ‘Surr Back System’ menu. |
21 |
| About the audio connection |
22 |
| Sound signal priority l |
22 |
| HDMI |
22 |
| HD audio |
22 |
| Digital (Coaxial) |
22 |
| Conventional digital audio |
22 |
| Digital (Optical) |
22 |
| RCA (Analog) |
22 |
| (White/Red) |
22 |
| Conventional analog audio |
22 |
| CAUTION |
22 |
| About the video converter |
22 |
| Connecting your TV and playback components |
23 |
| Connecting using HDMI |
23 |
| About HDMI |
24 |
| Connecting your DVD player with no HDMI output |
25 |
| Connecting your TV with no HDMI input |
26 |
| Connecting a satellite/cable receiver or other set-top box |
27 |
| Connecting a HDD/DVD recorder, VCR and other video sources |
28 |
| Connecting the multichannel analog inputs |
28 |
| Connecting other audio components |
29 |
| About the WMA9 Pro decoder |
29 |
| Connecting AM/FM antennas |
30 |
| 1 Pull off the protective shields of both AM antenna wires. |
30 |
| 2 Push open the tabs, then insert one wire fully into each terminal, then release the tabs to secure the AM antenna wires. |
30 |
| 3 Fix the AM loop antenna to the attached stand. |
30 |
| 4 Place the AM antenna on a flat surface and in a direction giving the best reception. |
30 |
| 5 Connect the FM wire antenna in the same way as the AM loop antenna. |
30 |
| Connecting external antennas |
30 |
| MULTI-ZONE setup |
31 |
| Making MULTI-ZONE connections |
31 |
| MULTI-ZONE listening options |
31 |
| Basic MULTI-ZONE setup (Zone 2) |
31 |
| . Connect a separate amplifier to the AUDIO ZONE2 OUT jacks and a TV monitor to the VIDEO ZONE2 OUT jack, both on this receiver. |
31 |
| MULTI-ZONE setup using speaker terminals (Zone 2) |
31 |
| . Connect a TV monitor to the VIDEO ZONE2 OUT jacks on this receiver. |
31 |
| Connecting an IR receiver |
32 |
| 1 Connect the IR receiver sensor to the IR IN jack on the rear of this receiver. |
32 |
| 2 Connect the IR IN jack of another component to the IR OUT jack on the rear of this receiver to link it to the IR receiver. |
32 |
| Operating other Pioneer components with this unit’s sensor |
32 |
| Important |
32 |
| 1 Decide which component you want to use the remote sensor of. |
32 |
| 2 Connect the CONTROL OUT jack of that component to the CONTROL IN jack of another Pioneer component. |
33 |
| Connecting your SiriusConnect™ Tuner |
33 |
| . Connect a SiriusConnect™ tuner to the SIRIUS IN jack on the rear of this receiver. |
33 |
| Connecting a component to the front panel inputs |
34 |
| Connecting an iPod |
34 |
| . Switch the receiver into standby then use the supplied iPod cable to connect your iPod to the iPod/iPhone/USB terminal on the front panel of this receiver. |
34 |
| Connecting a USB device |
35 |
| . Switch the receiver into standby then connect your USB device to the iPod/iPhone/ USB terminal on the front panel of this receiver. |
35 |
| Plugging in the receiver |
35 |
| . Plug the AC power cord into a convenient AC power outlet. |
35 |
| CAUTION |
35 |
| Basic Setup |
36 |
| Switching the speaker impedance |
36 |
| 1 Switch the receiver into standby. |
36 |
| 2 While holding down ENTER on the front panel, press u STANDBY/ON. |
36 |
| Changing the OSD display language (OSD Language) |
36 |
| 1 Press on the remote control, then press HOME MENU. |
36 |
| 2 Select ‘System Setup’ from the HOME MENU. |
36 |
| 3 Select ‘OSD Language’ from the System Setup menu. |
36 |
| 4 Select the desired language. |
36 |
| 5 Select ‘OK’ to change the language. |
36 |
| Automatically setting up for surround sound (Auto MCACC) |
37 |
| Important |
37 |
| CAUTION |
37 |
| 1 Switch on the receiver and your TV. |
37 |
| 2 Connect the microphone to the MCACC SETUP MIC jack on the front panel. |
37 |
| 3 Select Surr Back System setting, select an MCACC preset, press and then select START. |
37 |
| 4 Follow the instructions on-screen. |
38 |
| 5 Wait for the test tones to finish, then confirm the speaker configuration in the GUI screen. |
38 |
| 6 Make sure ‘OK’ is selected, then press ENTER. |
38 |
| 7 The Auto MCACC Setup procedure is completed and the Home Menu menu reappears automatically. |
39 |
| Problems when using the Auto MCACC Setup |
39 |
| The Input Setup menu |
39 |
| 1 Switch on the receiver and your TV. |
39 |
| 2 Press on the remote control, then press HOME MENU. |
39 |
| 3 Select ‘System Setup’ from the HOME MENU. |
39 |
| 4 Select ‘Input Setup’ from the System Setup menu. |
39 |
| 5 Select the input function that you want to set up. |
39 |
| 6 Select the input(s) to which you’ve connected your component. |
40 |
| 7 When you’re finished, proceed to the settings for other inputs. |
40 |
| 8 When you’re finished, press RETURN. |
40 |
| Input function default and possible settings |
40 |
| Basic playback |
41 |
| Playing a source |
41 |
| 1 Switch on your system components and receiver. |
41 |
| 2 Select the input function you want to play. |
41 |
| 3 Press AUTO/ALC/DIRECT (AUTO SURR/ ALC/STREAM DIRECT) to select ‘AUTO SURROUND’ and start playback of the source. |
41 |
| 4 Use the volume control to adjust the volume level. |
41 |
| Playing a source with HDMI connection |
42 |
| . Use INPUT SELECT to select the HDMI input you’ve connected to (for example, HDMI 1). |
42 |
| Selecting the multichannel analog inputs |
42 |
| 1 Make sure you have set the playback source to the proper output setting. |
42 |
| 2 Use INPUT SELECT to select MULTI CH IN. |
42 |
| Playing an iPod |
43 |
| 1 Switch on the receiver and your TV. |
43 |
| 2 Press iPod USB on the remote control to switch the receiver to the iPod/USB. |
43 |
| Playing back audio files stored on an iPod |
43 |
| Finding what you want to play |
43 |
| 1 Use i/j to select a category, then press ENTER to browse that category. |
43 |
| 2 Use i/j to browse the selected category (e.g., albums). |
43 |
| 3 Continue browsing until you arrive at what you want to play, then press d to start playback. |
43 |
| Tip |
44 |
| Basic playback controls |
44 |
| Switching the iPod controls |
44 |
| 1 Press iPod CTRL to switch the iPod controls. |
44 |
| 2 Press iPod CTRL again to switch back to the receiver controls. |
44 |
| Playing a USB device |
45 |
| 1 Switch on the receiver and your TV. |
45 |
| 2 Press iPod USB on the remote control to switch the receiver to the iPod/USB. |
45 |
| Important |
45 |
| Playing back audio files stored on a USB memory device |
45 |
| 1 Use i/j to select ‘Music’ from the USB Top menu. |
46 |
| 2 Use i/j to select a folder, then press ENTER to browse that folder. |
46 |
| 3 Continue browsing until you arrive at what you want to play, then press d to start playback. |
46 |
| Basic playback controls |
46 |
| Playing back photo files stored on a USB memory device |
47 |
| 1 Use i/j to select ‘Photos’ from the USB Top menu. |
47 |
| 2 Use i/j to select a folder, then press ENTER to browse that folder. |
47 |
| 3 Continue browsing until you arrive at what you want to play, then press d to start playback. |
47 |
| Basic playback controls |
47 |
| Slideshow Setup |
47 |
| 1 Use i/j to select ‘Slideshow Setup’ from the USB Top menu. |
47 |
| 2 Select the setting you want. |
47 |
| 3 When you’re finished, press RETURN. |
47 |
| About playable file formats |
48 |
| Music files |
48 |
| Photo files |
48 |
| Listening to Satellite Radio |
49 |
| . Press SIRIUS to switch to the SIRIUS input. |
49 |
| Listening to SIRIUS Radio |
49 |
| Selecting channels and browsing by genre |
50 |
| 1 Press i/j to enter the SIRIUS Channel Guide, then navigate through the channels one at time with i/j, then press ENTER to listen to the SIRIUS radio broadcast. |
50 |
| Tip |
50 |
| Saving channel presets |
50 |
| 1 Select the channel you want to memorize. |
50 |
| 2 Press T.EDIT. |
50 |
| 3 Press CLASS to select one of the seven classes, then press k/l to select the channel preset you want. |
50 |
| 4 Press ENTER. |
50 |
| Tip |
50 |
| Listening to channel presets |
50 |
| 1 Press CLASS to select the class in which the channel is stored. |
50 |
| 2 Press k/l to select the channel preset you want. |
50 |
| Using the SIRIUS Menu |
51 |
| 1 Press TOP MENU. |
51 |
| 2 Use i/j to select a menu item, then press ENTER. |
51 |
| 3 When you’re finished press TOP MENU to return to the reception display. |
51 |
| Listening to the radio |
51 |
| 1 Press TUNER to select the tuner. |
51 |
| 2 Use BAND to change the band (FM or AM), if necessary. |
51 |
| 3 Tune to a station. |
51 |
| Improving FM sound |
51 |
| Using Neural THX |
51 |
| Tuning directly to a station |
51 |
| 1 Press TUNER to select the tuner. |
51 |
| 2 Use BAND to change the band (FM or AM), if necessary. |
51 |
| 3 Press D.ACCESS (Direct Access). |
52 |
| 4 Use the number buttons to enter the frequency of the radio station. |
52 |
| Saving station presets |
52 |
| 1 Tune to a station you want to memorize. |
52 |
| 2 Press T.EDIT (TUNER EDIT). |
52 |
| 3 Press CLASS to select one of the seven classes, then press PRESET k/l to select the station preset you want. |
52 |
| 4 Press ENTER. |
52 |
| Naming station presets |
52 |
| 1 Choose the station preset you want to name. |
52 |
| 2 Press T.EDIT (TUNER EDIT). |
52 |
| 3 Input the name you want. |
52 |
| Tip |
52 |
| Listening to station presets |
52 |
| 1 Press TUNER to select the tuner. |
52 |
| 2 Press CLASS to select the class in which the station is stored. |
52 |
| 3 Press PRESET k/l to select the station preset you want. |
52 |
| Listening to your system |
53 |
| Important |
53 |
| Auto playback |
53 |
| . While listening to a source, press , then press AUTO/ALC/DIRECT (AUTO SURR/ALC/STREAM DIRECT) for auto playback of a source. |
53 |
| Tip |
53 |
| Listening in surround sound |
53 |
| Standard surround sound |
53 |
| . While listening to a source, press , then press STANDARD (STANDARD SURROUND). |
53 |
| Using the Advanced surround effects |
54 |
| . Press , then press ADV SURR (ADVANCED SURROUND) repeatedly to select a listening mode. |
54 |
| Tip |
55 |
| Listening in stereo |
55 |
| . While listening to a source, press , then press STEREO for stereo playback. |
55 |
| Using Front Stage Surround Advance |
55 |
| . While listening to a source, press , then press STEREO to select Front Stage Surround Advance modes. |
55 |
| Using Stream Direct |
56 |
| . While listening to a source, press , then press AUTO/ALC/DIRECT (AUTO SURR/ALC/STREAM DIRECT) to select the mode you want. |
56 |
| Using surround back channel processing |
56 |
| . Press , then press SBch repeatedly to cycle the surround back channel options. |
56 |
| Using the Virtual Surround Back mode |
57 |
| . Press SBch repeatedly to cycle the virtual surround back channel options. |
57 |
| Setting the Up Mix function |
57 |
| 1 Switch the receiver into standby. |
57 |
| 2 While holding down ENTER on the front panel, press u STANDBY/ON. |
57 |
| 3 Press ENTER to confirm. |
57 |
| Selecting MCACC presets |
58 |
| . While listening to a source, press , then press MCACC. |
58 |
| Choosing the input signal |
58 |
| . Press , then press SIGNAL SEL to select the input signal corresponding to the source component. |
58 |
| Better sound using Phase Control |
59 |
| . Press , then press PHASE CTRL (PHASE CONTROL) to switch on phase correction. |
59 |
| KURO LINK |
60 |
| Making the KURO LINK connections |
60 |
| Important |
60 |
| Cautions on the KURO LINK function |
61 |
| About connections with a product of a different brand that supports the KURO LINK function |
61 |
| KURO LINK Setup |
62 |
| 1 Press , then press Home Menu. |
62 |
| 2 Select ‘System Setup’, then press ENTER. |
62 |
| 3 Select ‘Other Setup’, then press ENTER. |
62 |
| 4 Select the ‘KURO LINK’ setting you want. |
62 |
| 5 Select the ‘Display Power Off’ setting you want. |
62 |
| 6 When you’re finished, press HOME MENU. |
62 |
| Setting the PQLS function |
62 |
| 1 Press , then press PQLS to select PQLS setting. |
62 |
| Before using synchronization |
63 |
| 1 Put all components into standby mode. |
63 |
| 2 Turn the power on for all components, with the power for the flat panel TV being turned on last. |
63 |
| 3 Choose the HDMI input to which the TV is connected to this receiver, and see if video output from connected components displays properly on the screen or not. |
63 |
| 4 Check whether the components connected to all HDMI inputs are properly displayed. |
63 |
| Synchronized amp mode |
63 |
| Synchronized amp mode operations |
63 |
| Canceling synchronized amp mode |
63 |
| Using other functions |
64 |
| Setting the Audio options |
64 |
| Important |
64 |
| 1 Press , then press AUDIO PARAMETER. |
64 |
| 2 Use i/j to select the setting you want to adjust. |
64 |
| 3 Use k/l to set it as necessary. |
64 |
| 4 Press RETURN to confirm and exit the menu. |
64 |
| Setting the Video options |
67 |
| Important |
67 |
| 1 Press , then press VIDEO PARAMETER. |
67 |
| 2 Use i/j to select the setting you want to adjust. |
67 |
| 3 Use k/l to set it as necessary. |
67 |
| 4 Press RETURN to confirm and exit the menu. |
67 |
| Switching the speaker system |
69 |
| . Use SPEAKERS on the front panel to select a speaker system setting. |
69 |
| Using the MULTI-ZONE controls |
69 |
| 1 Press the MULTI-ZONE ON/OFF button on the front panel. |
69 |
| 2 Press MULTI-ZONE CONTROL on the front panel. |
69 |
| 3 Use the INPUT SELECTOR dial to select the source for the sub zone. |
69 |
| 4 Use the MASTER VOLUME dial to adjust the volume for the sub zone. |
70 |
| 5 When you’re finished, press MULTI-ZONE CONTROL again to return to the main zone controls. |
70 |
| MULTI-ZONE remote controls |
70 |
| Making an audio or a video recording |
70 |
| 1 Select the source you want to record. |
70 |
| 2 Prepare the source you want to record. |
70 |
| 3 Prepare the recorder. |
71 |
| 4 Start recording, then start playback of the source component. |
71 |
| Reducing the level of an analog signal |
71 |
| . Press , then press A.ATT to switch the input attenuator on or off. |
71 |
| Using the sleep timer |
71 |
| . Press , then press SLEEP repeatedly to set the sleep time. |
71 |
| Dimming the display |
71 |
| . Press , then press DIMMER repeatedly to change the brightness of the front panel display. |
71 |
| Checking your system settings |
71 |
| 1 Press , then press STATUS to check the system settings. |
71 |
| 2 When you’re finished, press STATUS again to switch off the display. |
71 |
| Resetting the system |
72 |
| 1 Switch the receiver into standby. |
72 |
| 2 While holding down ENTER on the front panel, press u STANDBY/ON. |
72 |
| 3 Select ‘RESET’ using PRESET +/-, then press ENTER on the front panel. |
72 |
| 4 Press ENTER to confirm. |
72 |
| Default system settings |
72 |
| Controlling the rest of your system |
73 |
| Operating multiple receivers |
73 |
| 1 Check the operation selector switch to MAIN. |
73 |
| 2 Press . |
73 |
| 3 Press and hold REMOTE SETUP, then release it after the LED flashes twice. |
73 |
| 4 Use the number buttons to enter the 5- digit preset code (see below). |
73 |
| Setting the remote to control other components |
73 |
| Note |
73 |
| Selecting preset codes directly |
73 |
| 1 Press the input function button for the component you want to control. |
73 |
| 2 Press and hold REMOTE SETUP, then release it after the LED flashes twice. |
73 |
| 3 Use the number buttons to enter the 5- digit preset code. |
73 |
| 4 Repeat steps 1 through 3 for the other components you want to control. |
74 |
| Resetting the remote control presets |
74 |
| 1 Check the operation selector switch to MAIN. |
74 |
| 2 Press . |
74 |
| 3 Press and hold REMOTE SETUP, then release it after the LED flashes twice. |
74 |
| 4 Use the number buttons to enter 9, 8, 1. |
74 |
| Default preset codes |
74 |
| DVD |
74 |
| 31571 |
74 |
| BD |
74 |
| 32442 |
74 |
| DVR |
74 |
| 22306 |
74 |
| HDMI |
74 |
| 32442 |
74 |
| TV |
74 |
| 14001 |
74 |
| CD |
74 |
| 70468 |
74 |
| CD-R |
74 |
| 71087 |
74 |
| VIDEO |
74 |
| 20058 |
74 |
| TV CTRL |
74 |
| 14001 |
74 |
| 61935 |
74 |
| Controls the components |
74 |
| a. Controls for SACD. |
76 |
| b. Controls for MD. |
76 |
| The Advanced MCACC menu |
77 |
| Making receiver settings from the Advanced MCACC menu |
77 |
| 1 Switch on the receiver and your TV. |
77 |
| 2 Press on the remote control, then press HOME MENU. |
77 |
| 3 Select ‘Advanced MCACC’ from the HOME MENU, then press ENTER. |
77 |
| 4 Select the setting you want to adjust. |
77 |
| Automatic MCACC (Expert) |
78 |
| Important |
78 |
| CAUTION |
78 |
| THX® |
78 |
| 1 Select ‘Auto MCACC’ from the Advanced MCACC menu, then press ENTER. |
78 |
| 2 Select the parameters you want to set. |
78 |
| 3 Connect the microphone to the MCACC SETUP MIC jack on the front panel. |
79 |
| 4 When you’re finished settings the options, select START then press ENTER. |
80 |
| 5 Follow the instructions on-screen. |
80 |
| 6 Wait for the Auto MCACC Setup to finish outputting test tones. |
80 |
| 7 If necessary, confirm the speaker configuration in the GUI screen. |
80 |
| 8 Make sure ‘OK’ is selected, then press ENTER. |
81 |
| 9 The Auto MCACC Setup procedure is completed and the Advanced MCACC menu reappears automatically. |
81 |
| Manual MCACC setup |
82 |
| CAUTION |
82 |
| Important |
82 |
| 1 Select ‘Manual MCACC’ from the Advanced MCACC menu. |
82 |
| 2 Select the setting you want to adjust. |
82 |
| Fine Channel Level |
83 |
| 1 Select ‘Fine Channel Level’ from the Manual MCACC setup menu. |
83 |
| 2 Adjust the level of the left channel. |
83 |
| 3 Select each channel in turn and adjust the levels (+/-10.0 dB) as necessary. |
83 |
| 4 When you’re finished, press RETURN. |
83 |
| Fine Speaker Distance |
83 |
| 1 Select ‘Fine SP Distance’ from the Manual MCACC setup menu. |
84 |
| 2 Adjust the distance of the left channel from the listening position. |
84 |
| 3 Select each channel in turn and adjust the distance as necessary. |
84 |
| 4 When you’re finished, press RETURN. |
84 |
| Standing Wave |
85 |
| 1 Select ‘Standing Wave’ from the Manual MCACC setup menu. |
85 |
| 2 Adjust the parameters for the Standing Wave Control. |
85 |
| 3 When you’re finished, press RETURN. |
85 |
| Acoustic Calibration EQ Adjust |
85 |
| 1 Select ‘EQ Adjust’ from the Manual MCACC setup menu. |
86 |
| 2 Select the channel(s) you want and adjust to your liking. |
86 |
| Tip |
86 |
| 3 When you’re finished, press RETURN. |
86 |
| Acoustic Calibration EQ Professional |
86 |
| How to use Acoustic Calibration EQ Professional |
86 |
| Using Acoustic Calibration EQ Professional |
87 |
| 1 Select ‘EQ Professional’, then press ENTER. |
87 |
| 2 Select an option and press ENTER. |
87 |
| 3 If you selected ‘Reverb Measurement’, select EQ ON or OFF, and then START. |
87 |
| 4 If you selected ‘Reverb View’, you can check the reverb characteristics for each channel. Press RETURN when you’re done. |
88 |
| 5 If ‘Advanced EQ Setup’ is selected, select the MCACC memory to be stored, then enter the desired time setting for calibration, and then select START. |
88 |
| Checking MCACC Data |
89 |
| 1 Press , then press HOME MENU. |
89 |
| 2 Select ‘MCACC Data Check’ from the HOME MENU. |
89 |
| 3 Select the setting you want to check. |
89 |
| 4 Press RETURN to go back to MCACC Data Check menu, repeating steps 2 and 3 to check other settings. |
89 |
| 5 When you’re finished, press RETURN. |
89 |
| Speaker Setting |
89 |
| 1 Select ‘Speaker Setting’ from the MCACC Data Check menu. |
89 |
| 2 Select the channel you want to check. |
89 |
| Channel Level |
89 |
| 1 Select ‘Channel Level’ from the MCACC Data Check menu. |
90 |
| 2 When ‘MCACC’ is highlighted, use k/l to select the MCACC preset you want to check. |
90 |
| Speaker Distance |
90 |
| 1 Select ‘Speaker Distance’ from the MCACC Data Check menu. |
90 |
| 2 When ‘MCACC’ is highlighted, use k/l to select the MCACC preset you want to check. |
90 |
| Standing Wave |
90 |
| 1 Select ‘Standing Wave’ from the MCACC Data Check menu. |
90 |
| 2 When ‘Filter Channel’ is highlighted, use i/j to select the channel for which you want to check standing wave control. |
90 |
| 3 Press k to highlight ‘MCACC’, then use i/j to select the MCACC preset you want to check. |
90 |
| Acoustic Cal EQ |
90 |
| 1 Select ‘Acoustic Cal EQ’ from the MCACC Data Check menu. |
90 |
| 2 When ‘Ch’ is highlighted, use i/j to select the channel. |
90 |
| 3 Press k to highlight ‘MCACC’, then use i/j to select the MCACC preset you want to check. |
90 |
| Data Management |
91 |
| 1 Press , then press HOME MENU. |
91 |
| 2 Select ‘Data Management’ from the HOME MENU. |
91 |
| 3 Select the setting you want to adjust. |
91 |
| Renaming MCACC presets |
91 |
| 1 Select ‘Memory Rename’ from the Data Management setup menu. |
91 |
| 2 Select the MCACC preset you want to rename, then select an appropriate preset name. |
91 |
| 3 Repeat for as many MCACC presets as necessary, then press RETURN when you’re finished. |
91 |
| Copying MCACC preset data |
92 |
| 1 Select ‘MCACC Memory Copy’ from the Data Management setup menu. |
92 |
| 2 Select the setting you want to copy. |
92 |
| 3 Select the MCACC preset you’ll be copying the settings ‘From’, then specify where you want to copy them (‘To’). |
92 |
| 4 Select ‘OK’ to confirm and copy the settings. |
92 |
| Clearing MCACC presets |
92 |
| 1 Select ‘MCACC Memory Clear’ from the Data Management setup menu. |
92 |
| 2 Select the MCACC preset you want to clear. |
92 |
| 3 Select ‘OK’ to confirm and clear the preset. |
92 |
| The system and the other setup |
93 |
| Making receiver settings from the System Setup menu |
93 |
| 1 Switch on the receiver and your TV. |
93 |
| 2 Press , then press HOME MENU. |
93 |
| 3 Select ‘System Setup’ from the HOME MENU, then press ENTER. |
93 |
| 4 Select the setting you want to adjust. |
93 |
| Manual speaker setup |
94 |
| CAUTION |
94 |
| 1 Select ‘Manual SP Setup’, then press ENTER. |
94 |
| 2 Select the setting you want to adjust. |
94 |
| 3 Make the adjustments necessary for each setting, pressing RETURN to confirm after each screen. |
94 |
| Surround back speaker setting |
94 |
| 1 Select ‘Surr Back System’ from the Manual SP Setup menu. |
94 |
| 2 Select the surround back speaker setting. |
95 |
| 3 When ‘Setting Change?’ is displayed, select Yes. |
95 |
| Speaker Setting |
95 |
| 1 Select ‘Speaker Setting’ from the Manual SP Setup menu. |
95 |
| 2 Choose the set of speakers that you want to set, then select a speaker size. |
95 |
| 3 Select ‘X. OVER’ and set the crossover frequency. |
96 |
| 4 When you’re finished, press RETURN. |
96 |
| Channel Level |
96 |
| 1 Select ‘Channel Level’ from the Manual SP Setup menu. |
96 |
| 2 Select a setup option. |
96 |
| 3 Confirm your selected setup option. |
97 |
| 4 Adjust the level of each channel using k/ l. |
97 |
| 5 When you’re finished, press RETURN. |
97 |
| Tip |
97 |
| Speaker Distance |
97 |
| 1 Select ‘Speaker Distance’ from the Manual SP Setup menu. |
97 |
| 2 Adjust the distance of each speaker using k/l. |
97 |
| 3 When you’re finished, press RETURN. |
97 |
| Tip |
97 |
| X-Curve |
98 |
| 1 Select ‘X-Curve’ from the Manual SP Setup menu. |
98 |
| 2 Choose the X-Curve setting you want. |
98 |
| 3 When you’re finished, press RETURN. |
98 |
| The Other Setup menu |
98 |
| 1 Press on the remote control, then press HOME MENU. |
98 |
| 2 Select ‘System Setup’ from the HOME MENU. |
98 |
| 3 Select ‘Other Setup’, then press ENTER. |
98 |
| 4 Select the setting you want to adjust. |
98 |
| 5 Make the adjustments necessary for each setting, pressing RETURN to confirm after each screen. |
99 |
| Multi Channel Input Setup |
99 |
| 1 Select ‘Multi Ch In Setup’ from the Other Setup menu. |
99 |
| 2 Select the ‘SW Input Gain’ setting you want. |
99 |
| 3 Select the ‘Video Input’ setting you want. |
99 |
| 4 When you’re finished, press RETURN. |
99 |
| ZONE Audio Setup |
99 |
| 1 Select ‘ZONE Audio Setup’ from the Other Setup menu. |
99 |
| 2 Select the volume level setting of ZONE 2. |
99 |
| 3 When you’re finished, press RETURN. |
100 |
| Power ON Level Setup |
100 |
| 1 Select ‘Power ON Level Setup’ from the Other Setup menu. |
100 |
| 2 Select the Power ON Level setting you want. |
100 |
| 3 When you’re finished, press RETURN. |
100 |
| Volume Limit Setup |
100 |
| 1 Select ‘Volume Limit Setup’ from the Other Setup menu. |
100 |
| 2 Select the Volume Limit setting you want. |
100 |
| 3 When you’re finished, press RETURN. |
100 |
| Remote Control Mode Setup |
101 |
| 1 Select ‘Remote Control Mode Setup’ from the Other Setup menu. |
101 |
| 2 Select the Remote Control Mode setting you want. |
101 |
| 3 Select “OK” to change the remote control mode. |
101 |
| 4 Follow the instructions on the screen to change the remote control’s setting. |
101 |
| 5 When you’re finished, press RETURN. |
101 |
| Flicker Reduction Setup |
101 |
| 1 Select ‘Flicker Reduction Setup’ from the Other Setup menu. |
101 |
| 2 Select the Flicker Reduction setting you want. |
101 |
| 3 When you’re finished, press RETURN. |
101 |
| General |
116 |
| Plasma Television |
118 |
| LCD |
118 |
| HDTV |
118 |
| Rear Projection TV |
118 |
| TV/DVD Combination |
118 |
| TV/VCR Combination |
118 |
| General |
119 |
| PVR |
120 |
| General |
120 |
| Blu-ray |
121 |
| HD-DVD |
121 |
| DVD-R |
121 |
| DVD/PVR Combination |
121 |
| DVD/VCR Combination |
122 |
| General |
122 |
| CD-R |
122 |
| MD |
122 |
| General |
123 |
| SAT/PVR Combination |
123 |
| General |
123 |
| Cable/PVR Combination |
124 |
| Specifications |
125 |
| Amplifier section |
125 |
| Audio Section |
125 |
| Tuner Section |
125 |
| Video Section |
125 |
| Digital In/Out Section |
125 |
| Integrated control section |
125 |
| Miscellaneous |
125 |
| Furnished Parts Number |
125 |
| Note |
125 |
 1
1 9
9 10
10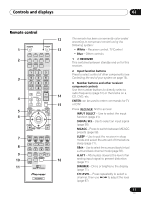 11
11 12
12 13
13 14
14 15
15 16
16 17
17 18
18 19
19

