Pioneer VSX-D509S Owner's Manual - Page 11
Connecting Digital Components - powering off
 |
View all Pioneer VSX-D509S manuals
Add to My Manuals
Save this manual to your list of manuals |
Page 11 highlights
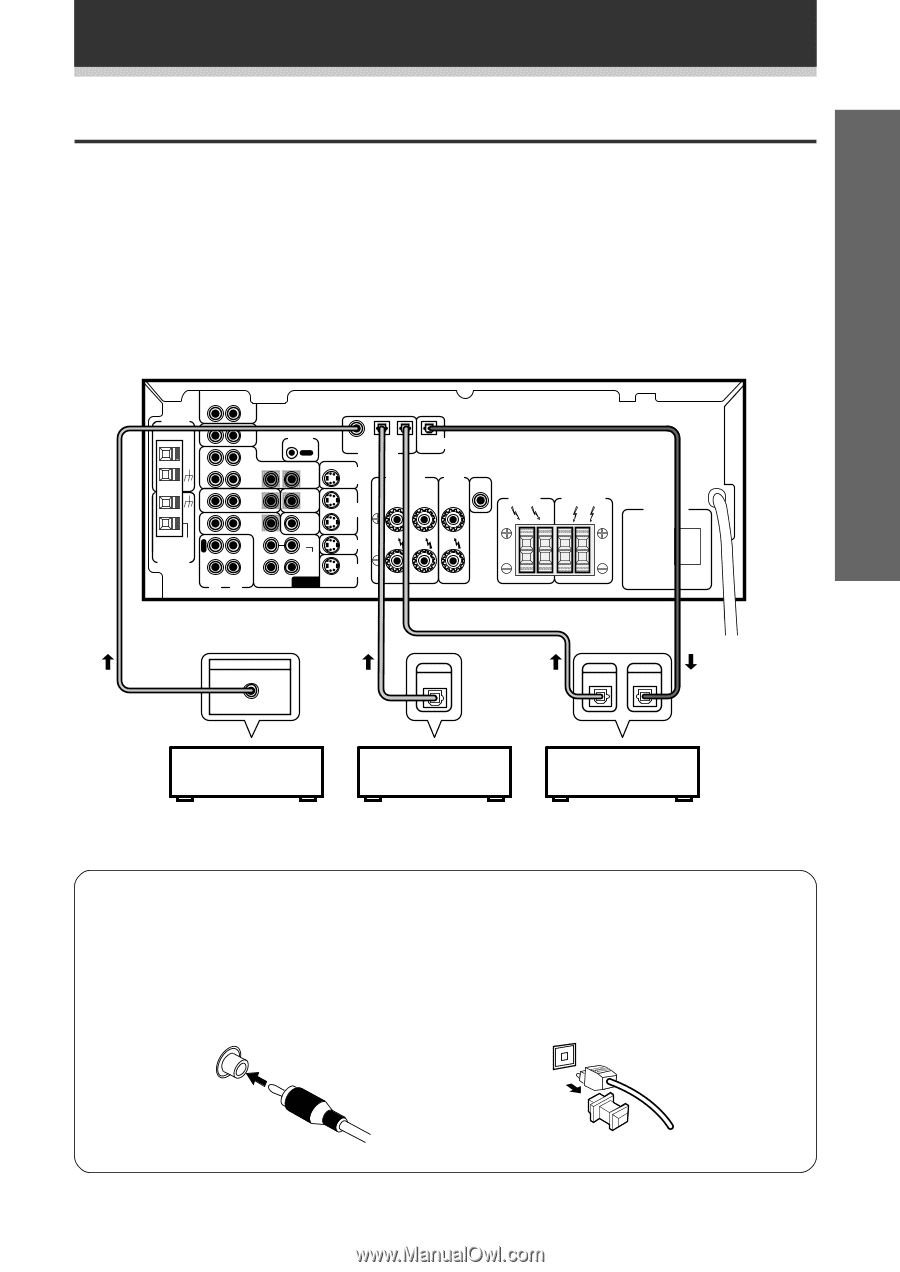
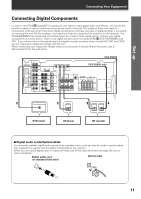
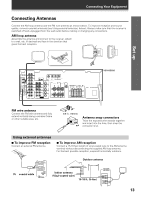
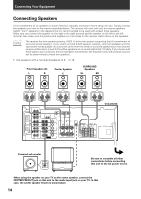
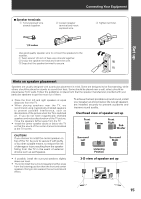
Set up Connecting Your Equipment Connecting Digital Components In order to use PCM/2 Digital/DTS soundtracks, you need to make digital audio connections. You can do this by either coaxial or optical connections (you do not need to do both). The quality of these two types of connections is the same but since some digital components only have one type of digital terminal, it is a matter of matching like with like (for example, the coaxial out from the component to coaxial in on the receiver). The VSX-D409/D509S has coaxial and two optical inputs for a total of three digital inputs. Connect your digital components as shown below. There is one digital out jack which is marked PCM/2/DTS (VSX-D509S only) OUT. If you connect this to the optical input on a digital recorder (currently these include MD, DAT and CD-R) you can make direct digital recordings with this unit. When connecting your equipment, always make sure the power is turned off and the power cord is disconnected from the wall outlet. VSX-D509S IN AM LOOP ANTENNA IN O U T IN AUX CD VCR / DVR IN CONTROL OUT OUT IN IN FM UNBAL 75Ω FM ANTENNA R E C P L A Y R TV / SAT IN DVD / LD IN TO MONTOR TV SUB WOOFER PREOUT OUT R CD - R / TAPE / MD IN SUB L WOOFER L SURROUND CENTER DVD 5.1 CH INPUT VSX-D509S only COAX OPT1 OPT2 PCM / 2 / DTS DIGITAL IN OPT DIGITAL OUT TO S MONTOR OUT TV S OUT VCR / DVR S IN A FRONT SPEAKERS RL CENTER SPEAKERS CENTER PREOUT S TV / IN SAT S IN DVD / LD SURROUND SPEAKERS RL B FRONT SPEAKERS RL AC OUTLET DIGITAL OUT COAX DIGITAL OUT DIGITAL OUT DIGITAL IN DVD player CD player CD recorder 7 Digital audio cords/Optical cables Commercially available digital audio coaxial cords (standard video cords can also be used) or optical cables (not supplied) are used to connect digital components to this receiver. When you use optical digital input or output terminals, pull off the caps and insert the plugs. Be sure to insert completely. Digital audio cord Optical cable (or standard video cord) 11
-
 1
1 -
2
-
3
-
4
-
5
-
 6
6 -
 7
7 -
 8
8 -
 9
9 -
 10
10 -
 11
11 -
 12
12 -
 13
13 -
 14
14 -
 15
15 -
 16
16 -
17
-
18
-
19
-
20
-
21
-
22
-
23
-
24
-
25
-
26
-
27
-
28
-
29
-
30
-
31
-
32
-
33
-
34
-
35
-
36
-
37
-
38
-
39
-
40
-
41
-
42
-
43
-
44
-
45
-
46
-
47
-
48
-
49
-
50
-
51
-
52
-
53
-
54
-
55
-
56
-
57
-
58
-
59
-
60
 |
 |