Polk Audio PA660.4 PA880 Owner's Manual - Page 8
Set Up And Troubleshooting, Troubleshooting Tips - manual
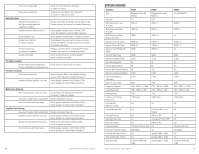
 |
View all Polk Audio PA660.4 manuals
Add to My Manuals
Save this manual to your list of manuals |
Page 8 highlights
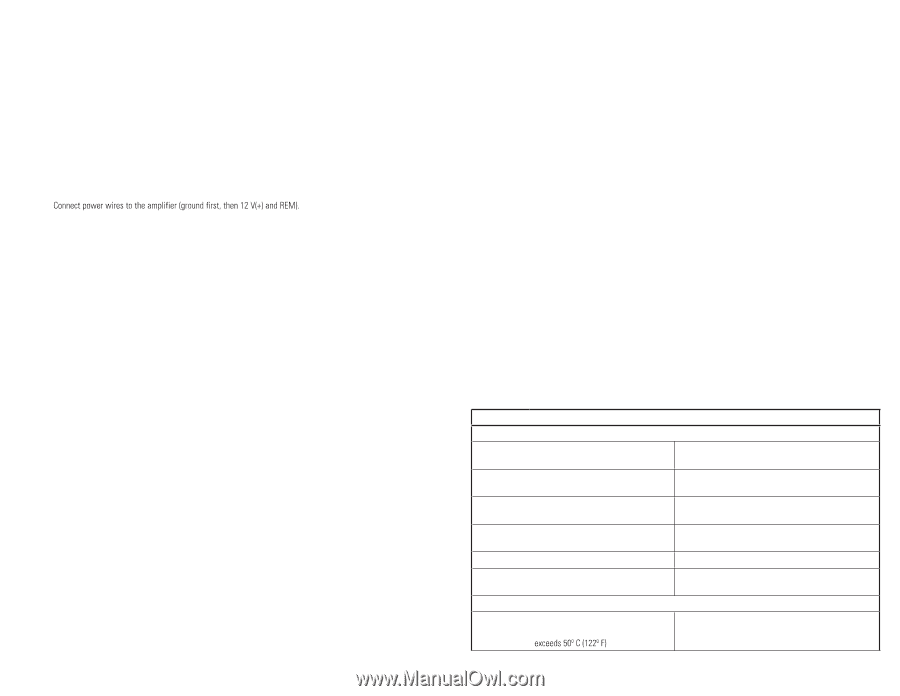
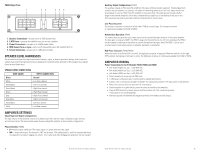
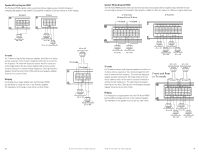
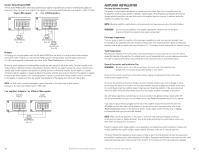
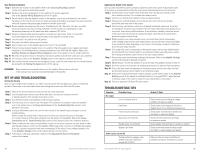
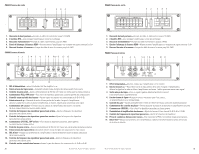
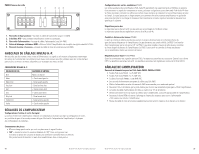
Step By Step Installation Step 1: Determine the location for the amplifier. Refer to the Choosing Mounting Locations section of this guide for detailed information. Step 2: Decide on the system configuration for your amplifier. For system suggestions, refer to the Speaker Wiring Diagrams section of this guide. Step 3: Run all the wires from the amplifier location to the speakers, source unit, and battery. Do not connect the battery at this time. Be sure to run Line levels and power and speaker wires away from factory electrical wires and system as they pose a great potential for induced system noise. Step 4: Pre-drill amplifier mounting holes. Be sure to "think before you drill." Gas tanks, fuel lines, and other obstructions have a nasty way of hiding themselves. For best results use a marking pen to mark the mounting holes and pre-drill these holes with a standard 1/8" drill bit. Step 5: Mount the amplifier. Make sure the amplifier is mounted on a flat surface. If this is not possible, do not over tighten the screws so that the chassis of the amplifier is twisted or bent. Step 6: Turn the vehicle's key switch to the off position. Step 7: Disconnect the vehicle's battery ground terminal. Step 8:Ê œ˜˜iVÌÊ«œÜiÀÊ܈Ài iÊ>“«ˆvˆi v i˜Ê£ÓÊ6 Step 9: Connect the line level and speaker wires to the amplifier. Check the quality of your speakers and signal connections. This will determine the ultimate performance of your Polk Audio PA amplifier. Refer to the Amplifier Settings and Speaker Wiring Diagrams sections of this guide for correct wiring instructions. Step 10: Reconnect the ground terminal to the battery after power, speaker, and line level connections are completed. Step 11: Set crossovers. Refer to the Amplifier Settings section of this manual for detailed instructions. Step 12: Once satisfied that all connections and settings are correct, install the fuse located near the vehicle's battery and proceed to the Testing the System section of this manual. WARNING! Never exceed the recommended fuse size of this amplifier. Failure to do so will result in the voiding of your warranty and possible damage to the amplifier. SET UP AND TROUBLESHOOTING Testing the System After you have completed the installation, you need to test the system. This will help ensure years of trouble-free operation. Please refer to the listed steps below when testing the sound of your Polk Audio PA system. Step 1: Check all the wiring connections to be sure they are correct and secure. Step 2: Turn the signal source volume control all the way down. Set any tone controls to their flat or defeated positions. This includes the loudness control. Step 3: Turn the level controls of the amplifier to their minimum positions. Step 4: Turn the source unit on. Check to see if the power LED located on the connection side of the amplifier is on. If not, please refer to the Power Connections and the Troubleshooting Tips sections of this manual for instructions. Step 5: If using an aftermarket source unit, turn the level controls of the amplifier about one quarter of a turn counterclockwise. Slowly increase the volume level of the source unit so that you can hear the output of the system. If no sound is heard or if the output is distorted, turn the system off immediately. Refer to the Power Connections and the Troubleshooting Tips sections of this manual to solve your installation problems. Step 6: Check to make sure the output for each channel is correct. If the active crossovers are used, check to make sure that each output is correct from the amplifier. When using active crossovers on midrange and tweeters, do not use crossover frequencies lower than recommended. If the system is not configured properly, refer to the Amplifier Settings section of this manual and take corrective action. Step 7: If the output is clear and undistorted, continue to the Adjusting the Sound of the System section of this manual. 14 © 2010 Polk Audio-all rights reserved Adjusting the Sound of the System Once you have checked the system's operation, adjust the sound of the system. Adjusting the sound of the system is accomplished by setting the level controls and adjusting the internal crossovers. Step 1: Turn the signal source volume control all the way down. Set any tone controls to their flat or defeated positions. This includes the loudness control. Step 2: Turn the level controls of the amplifier to their minimum positions. Step 3: Choose music with high dynamic content that you like, with which you are familiar, and will be used most often in the system. Step 4: Turn the source unit's volume control up to its highest undistorted output level. If you lack test equipment, this point occurs between 3/4 to full volume depending on the quality of your source unit. Listen for any audible distortion. If any distortion is audible, reduce the volume of the source unit until you have an undistorted output. Leave the volume control at this position during your system tuning. Step 5: While listening to your chosen dynamic music, turn up the level control corresponding to the midrange output until you hear slight distortion and turn the level control back slightly for an undistorted output. Depending on your system, the midrange and tweeter output may be on the same output channels. Step 6: Turn up the level control corresponding to the tweeter output until you hear slight distortion and turn back the level control slightly for an undistorted output. Depending on your system the midrange and tweeter output may be on the same output channels. Step 7: Fine-tune the output level between midrange and tweeters. Refer to the Amplifier Settings section of this manual for detailed instructions. Step 8: Repeat Steps 5-7 for the rear speakers. If you do not have rear speakers continue to Step 10. Step 9: Set levels between the front and rear midrange and tweeters for optimum front/rear balance. Step 10: Turn up the level control corresponding to the woofer output until you hear slight distortion and turn back the level control slightly for an undistorted output. Step 11: Fine-tune the output level between satellite speakers and the woofers. Refer to the Amplifier Settings section of this manual for detailed instructions. If using an PRGC-1, adjust the level to the bass output of the woofer to match the sonic requirements of the system. Step 12: Enjoy your awesome Polk Audio PA sound system. TROUBLESHOOTING TIPS Symptom No output Probable Cause Low or no remote turn-on Fuse blown Power wires not connected Audio input not connected. Speaker wires not connected Speakers are blown Audio cycles on and off Thermal protection engages when amplifier heat sink temperature iÝVii`ÃÊxä¨Ê Action To Take Check remote turn-on voltage at voltage amplifier and repair as needed. Check power wire's integrity and check for speaker shorts. Fix as needed and replace fuse. Check power wire and ground connections and repair or replace as needed. Check line level connections and repair or replace as needed. Check speaker wires and repair or replace as needed. Check system with known working speaker and repair or replace speakers as needed. Make sure there is proper ventilation for amplifier and improve ventilation as needed. © 2010 Polk Audio-all rights reserved 15
-
 1
1 -
2
-
 3
3 -
 4
4 -
 5
5 -
 6
6 -
 7
7 -
 8
8 -
 9
9 -
 10
10 -
 11
11 -
 12
12 -
 13
13 -
14
-
15
-
16
-
17
-
18
-
19
-
20
-
21
-
22
-
23
-
24
-
25
-
26
-
27
-
28
-
29
 |
 |