Poulan 1600 User Manual - Page 19
not remove
 |
View all Poulan 1600 manuals
Add to My Manuals
Save this manual to your list of manuals |
Page 19 highlights
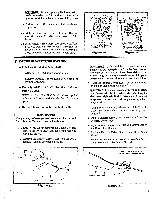
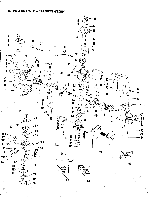
CAUTION: Before replacing the fan housing, makecertainthat the"off"button terminal on the ignition moduleisnot bent.Seeinsert, Figure26. 24. Position the "off' button terminal as shown. Figure 26. 25. Make certain the engine will stop after reassemblyiscompleted.Startengine, press the"off" button. 26. If the engine will notstop, movechoketothe"On" position, (Figure 8) to stop engine. Dissemble fan housingand besurethe "off" buttonterminal (Figure 26) is in the correct position. Reassemble parts. I PULLEY SCREW / PULLEY RATCHET PULLEY_ ,„„0 HOLES f. l I PULLEY ROPE NOTCH GROOVE Figure 29 ATUU PULLEY---NOTCH ROPE GROOVE Figure 30 F. DRIVE SHAFT LUBRICATION • Lubricate the Flexible Drive Shaft: - After each ten (10) hours of operation. - Before operating if the unit has been stored for 90 days or longer. • Use only WEED EATER® Flex Shaft Lube - Part No. 30102. NOTE: A tube of"FlexShaft Lube" hasbeensupplied with your unit to be used after the first 10 hours of operation . • Use the following procedure for best results: AWARNING Ifengine hasjust beenoperated, avoid touchingthemuffler. A hot muffler can cause serious burns. 1. Loosen (but do not remove) the Clamp Bolt and remove the Drive Shaft Housing from the Engine Shroud. Figure 1. 2. Remove the Flexible Drive Shaft from the Drive Shaft Housing as shown in Figure 31. CAUTION: Lay the flexible drive shaft on a clean surface. Avoid laying the shaft on the floor, ground or on any surface that may have dirt or debris. Even after wiping theshaft, grease residuecan pick up dirt particles that can cause damage or premature failure. 3. Check the Flexible Drive Shaft for broken wires, twists or kinks and replace, if damage is found. CAUTION:t Take care to avoid injuring your hands and fingers with broken wires when checking for damage or wiping the flexible drive shaft. A cloth will not prevent the broken wires from puncturing or tearing your skin. 4. Using a clean cloth, wipe the surface of the Flexible Drive Shaft thoroughly to remove any old grease. Figure 32_ 5. Apply a uniform coat of lute to the entire surface of the Flexible Drive Shaft. 6. Inject the remainingcontentsof the tube intothe top of the Drive Shaft Housing. 7. Replace Flexible Drive Shaft in the Drive Shaft Housing. 8. Follow the instructions in 'Assembly" to replace Drive Shaft Housing into the Engine Shroud. WIPE THE SURFACE OF THE FLEXIBLE DRIVE SHAFT Figure 33. Figure 32 19
-
 1
1 -
2
-
3
-
4
-
5
-
6
-
7
-
8
-
9
-
10
-
11
-
12
-
13
-
 14
14 -
 15
15 -
 16
16 -
 17
17 -
 18
18 -
 19
19 -
 20
20 -
 21
21 -
 22
22 -
 23
23 -
 24
24
 |
 |
