Poulan PR2322 Owner Manual - Page 6
Inspect And Clean Unit And Labels - spark plug
 |
View all Poulan PR2322 manuals
Add to My Manuals
Save this manual to your list of manuals |
Page 6 highlights
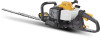
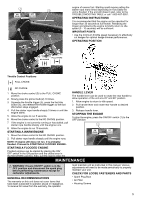
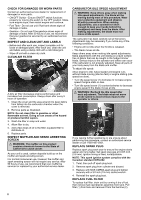
CHECK FOR DAMAGED OR WORN PARTS Contact an authorized service dealer for replacement of damaged or worn parts. • ON/OFF Switch - Ensure ON/OFF switch functions properly by moving the switch to the OFF position. Make sure engine stops; then restart engine and continue. • Fuel Tank - Do not use unit if fuel tank shows signs of damage or leaks. • Gearbox - Do not use if the gearbox shows signs of damage or leaks. After 50 hours of use, we recommend that your gearbox be serviced by an authorized service dealer. INSPECT AND CLEAN UNIT AND LABELS • Before and after each use, inspect complete unit for loose or damaged parts. After each use, clean the unit and labels using a damp cloth with a mild detergent. • Wipe off unit with a clean dry cloth. CLEAN AIR FILTER A dirty air filter decreases engine performance and increases fuel consumption. Always clean after every 5 hours of operation. 1. Clean the cover and the area around it to keep debris from falling into the carburetor chamber when the cover is removed. 2. Remove parts as illustrated. NOTE: Do not clean filter in gasoline or other flammable solvent. Doing so can create a fire hazard or produce harmful vapors. 3. Wash the filter in soap and water. 4. Allow filter to dry. 5. Add a few drops of oil to the filter; squeeze filter to distribute oil. 6. Replace parts. INSPECT MUFFLER AND SPARK ARRESTING SCREEN aa WARNING: The muffler on this product contains chemicals known to the State of California to cause cancer. As your unit is used, carbon deposits build up on the muffler and spark arresting screen. For normal homeowner use, however, the muffler and spark arresting screen will not require any service. After 50 hours of use, we recommend that your muffler be serviced or replaced by your authorized service dealer. CARBURETOR IDLE SPEED ADJUSTMENT aa WARNING: Keep others away when making idle speed adjustments. The blade will be moving during most of this procedure. Wear your protective equipment and observe all safety precautions. When making adjustments, use a screwdriver short enough to keep your hands behind the handguard and away from the blade. After making adjustments, the blade must not move at idle speed. The carburetor has been carefully set at the factory. Adjustments may be necessary if you notice any of the following conditions: • Engine will not idle when the throttle is released. • The blade moves at idle. Keep others away when making idle speed adjustments. Make adjustments with the unit resting on a level surface free of debris that can be caught in the hedge trimmer blade. Serious injury to the operator and others can occur if the carburetor is not properly adjusted. Keep all parts of your body away from the blade and muffler. To adjust idle speed: Allow engine to idle. Adjust speed until engine runs without blade moving (idle too fast) or engine stalling (idle speed too slow). • Turn idle speed screw (1) clockwise to increase engine speed if engine stalls or dies. • Turn idle speed screw (1) counterclockwise to decrease engine speed if the blade moves at idle. aa WARNING: Recheck the idle speed after each adjustment. The blade must not move at idle speed to avoid serious injury to the operator or others. If you require further assistance or are unsure about performing this procedure, contact an authorized service dealer or call 1-800-487-5951. REPLACE SPARK PLUG Replace spark plug each year to ensure the engine starts easier and runs better. Set spark plug gap at 0.025 inch (0.6 mm). Ignition timing is fixed, nonadjustable. NOTE: This spark ignition system complies with the Canadian standard ICES-002. 1. Twist, then pull off spark plug boot. 2. Remove spark plug from cylinder and discard. 3. Replace with NGK CMR6A spark plug and tighten securely with a 3/4 inch (19 mm) socket wrench. 4. Reinstall the spark plug boot. REPLACE FUEL FILTER To replace fuel filter, drain unit by running it dry of fuel, then remove fuel cap/retainer assembly from tank. Pull filter (1) from tank and remove it from the fuel line (2). 6
-
 1
1 -
 2
2 -
 3
3 -
 4
4 -
 5
5 -
 6
6 -
 7
7 -
 8
8 -
 9
9 -
 10
10 -
 11
11 -
 12
12 -
13
-
14
-
15
-
16
-
17
-
18
-
19
-
20
-
21
-
22
-
23
-
24
-
25
-
26
-
27
-
28
 |
 |