Poulan PRLM21i Owner Manual - Page 9
Maintenance
 |
View all Poulan PRLM21i manuals
Add to My Manuals
Save this manual to your list of manuals |
Page 9 highlights
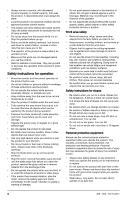
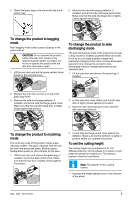
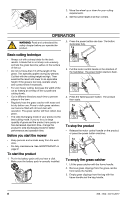
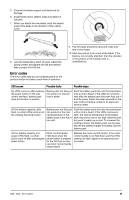
CAUTION: Do not drag the bag when you empty the grass catcher to prevent wear. To change the cutting mode The product can be changed to one of three different cutting modes while in operation by pressing the cutting mode button. • Auto mode - The product automatically adjusts the cutting speed of the product in response to the quantity of grass being cut. • Note: The product is set to Auto mode by default while in operation. • Boost mode - The product operates at high speed regardless of the quantity of grass being cut. • While the product is in operation, press the cutting mode button one time to change from Auto mode to Boost mode. The cutting mode button then illuminates. • ECO mode - The product operates at low speed regardless of the quantity of grass being cut. • While the product is in operation, press the cutting mode button one time to change from Boost mode to ECO mode. The cutting mode button then illuminates and flashes. • To go back to the default Auto mode, press the cutting mode button one time while the product is in operation. The cutting mode button then stops flashing. Note: If the motor control handle is released during operation, the product stays in the current cutting mode. If the product automatically stops, or the operator presses the power button, the cutting mode used before is erased from memory and the product starts in Auto mode when started again. Battery status indication during operation The display on the user control interface shows the battery capacity and if there are problems with the battery pack. The battery capacity is shown while the machine is in operation. LED lights Battery status All Green Fully Charged (100% - 76%) LEDs come on LED 1, 2 and The battery pack is 75% - 51% 3 come on charged. LED 1 and 2 The battery pack is 50% - 26% come on charged. LED 1 comes The battery pack is 25% - 6% on charged. LED 1 flashes The battery pack is 5% - 0% charg- ed. If there is an error with the battery pack during operation, all four green LEDs of the battery state of charge display flash. Remove the battery pack from the machine and press the indicator button on the battery pack to show the error code for the error. The LED's on the battery pack illuminate and show an error code if an error has occurred. Consult the battery manual for a list of error codes and solutions to the errors. MAINTENANCE WARNING: Read and understand the safety chapter before you clean, repair or do maintenance on the product. General recommendations for maintenance The warranty on this product does not include incorrect or not careful operation of the product by the operator. To receive full value from the warranty, the operator must do maintenance on the product as written in the instructions of this manual. Different adjustments must be made at different intervals to keep your product in correct work condition. • Examine the blade for wear each year. To examine the tires • Keep the tires free of unwanted material and chemicals to prevent damage to the rubber. • Keep the tires away from stumps, stones, ruts, sharp objects and other objects which can cause damage to the tires. To do a general inspection • Check that nuts and screws are tight. • Make sure no cables are pinched. Maintenance schedule Use the maintenance schedule to see the necessary maintenance requirements of your product, and when the maintenance must occur. The intervals are calculated on average use of the product and may be different because of how frequently you use it. • Tighten bolts and nuts before each use and before storage. • Clean and examine the grass catcher, if installed, before and after each use, and before storage. • Examine the tires before each use. • Clean the product after each use and before storage. Use a scraper to clean below the deck. 355 - 002 - 03.10.2017 9
-
 1
1 -
2
-
3
-
 4
4 -
 5
5 -
 6
6 -
 7
7 -
 8
8 -
 9
9 -
 10
10 -
 11
11 -
 12
12 -
 13
13 -
 14
14 -
15
-
16
 |
 |