Poulan PRST15i Owner Manual - Page 8
Assembly, Operation
 |
View all Poulan PRST15i manuals
Add to My Manuals
Save this manual to your list of manuals |
Page 8 highlights
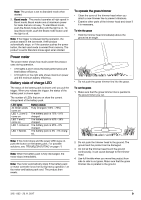
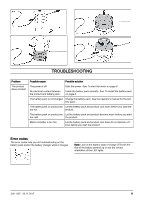
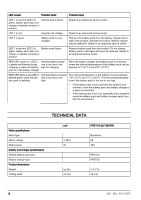
ASSEMBLY WARNING: Read the safety chapter before you assemble the product. To change the position of the loop handle 4. Make sure the screws on the latch are tightened. To attach the cutting attachment guard and the trimmer head (straight shaft) 1. Attach the cutting attachment guard (A) to the shaft with the bolts (L). Make sure to use the correct cutting attachment guard and the correct trimmer head. 1. Release the latch. 2. Move the loop handle to the correct work position. 3. Close the latch. 4. Make sure the screws on the latch are tightened. To change the length of the shaft The telescoping shaft of the product lets you change the shaft to the correct length. 1. Release the latch. 2. Move the lower shaft to extend it or to make it short. 3. Close the latch. 2. Turn the trimmer head (H) counterclockwise to tighten the trimmer head to the gearbox (Left hand threads). H OPERATION WARNING: Read and understand the safety chapter before you operate the product. Before you start the product • Keep persons and animals away from the work area. • Do daily maintenance. See Daily maintenance on page 10. To install the battery pack • Align the ribs of the battery pack with the slots in the battery compartment. Push the battery pack into the battery compartment until you hear a click. • To remove the battery pack, push and hold the battery release button and pull out the battery pack. To start the motor 1. Install the battery pack. See To install the battery pack on page 8. 2. Push the power button until the light is on. 3. Hold the assist handle with your left hand. 4. Press and hold the trigger lockout with your right hand. 5. While you hold the trigger lockout, squeeze and hold the trigger. Continue to squeeze the trigger to operate the product. • Squeeze the trigger lightly for lower speed. • Squeeze the trigger more for higher speed. 6. Use the product. To stop the motor 1. Release the trigger. 2. Push the power button until the light is off. To change the power mode The power mode of the product can be changed while the product is in operation. There are 2 power modes: 1. Standard mode - Saves energy and maximizes run time. Standard mode is applicable for most tasks. 8 316 - 002 - 20.11.2017
-
 1
1 -
2
-
 3
3 -
 4
4 -
 5
5 -
 6
6 -
 7
7 -
 8
8 -
 9
9 -
 10
10 -
 11
11 -
 12
12 -
 13
13 -
14
-
15
-
16
-
17
-
18
-
19
-
20
-
21
-
22
-
23
-
24
-
25
-
26
-
27
-
28
-
29
-
30
-
31
-
32
-
33
-
34
-
35
-
36
-
37
-
38
-
39
-
40
 |
 |