ProForm 1300 Zlt Treadmill Uk Manual - Page 12
Start both Washer Head Screws
 |
View all ProForm 1300 Zlt Treadmill manuals
Add to My Manuals
Save this manual to your list of manuals |
Page 12 highlights
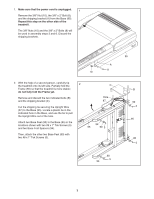
11. Attach the handrail assembly (E) to the console assembly (D) with two #8 x 3/4" Washer Head Screws (2). Start both Washer Head Screws, and then tighten them. Be careful not to overtighten the Washer Head Screws. Attach a Console Clamp (105) to the console assembly (D) with two #8 x 1" Screws (107). Start both Screws, and then tighten them. Be careful not to overtighten the Screws. Attach the other Console Clamp (105) in the same way. Remove the wire ties from the Handrails (82, 83). If necessary, press the 5/16" Cage Nuts (38) back into place. 11 2 38 82 83 2 E 38 D 107 107 105 105 12. Slide the Left Upright Cover (80) onto the Left 12 Upright (84). Slide the Right Upright Cover (86) onto the Right Upright (85). 84 80 85 86 12
-
 1
1 -
2
-
3
-
4
-
5
-
6
-
 7
7 -
 8
8 -
 9
9 -
 10
10 -
 11
11 -
 12
12 -
 13
13 -
 14
14 -
 15
15 -
 16
16 -
 17
17 -
18
-
19
-
20
-
21
-
22
-
23
-
24
-
25
-
26
-
27
-
28
-
29
-
30
-
31
-
32
-
33
-
34
-
35
-
36
 |
 |

12
12. Slide the Left Upright Cover (80) onto the Left
Upright (84).
Slide the Right Upright Cover (86) onto the
Right Upright (85).
12
80
84
85
86
11. Attach the handrail assembly (E) to the console
assembly (D) with two #8 x 3/4" Washer Head
Screws (2).
Start both Washer Head Screws,
and then tighten them. Be careful not to
overtighten the Washer Head Screws.
Attach a Console Clamp (105) to the console
assembly (D) with two #8 x 1" Screws (107).
Start both Screws, and then tighten them. Be
careful not to overtighten the Screws.
Attach
the other Console Clamp (105) in the same way.
Remove the wire ties from the Handrails (82,
83). If necessary, press the 5/16" Cage Nuts
(38) back into place.
D
105
105
83
82
2
2
11
107
107
38
38
E