ProForm 390 E Elliptical Canadian English Manual - Page 12
Press a Pivot Cover A 19 and a Pivot Cover B
 |
View all ProForm 390 E Elliptical manuals
Add to My Manuals
Save this manual to your list of manuals |
Page 12 highlights
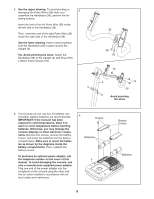
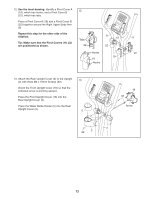
12. See the inset drawing. Identify a Pivot Cover A (19), which has hooks, and a Pivot Cover B (22), which has tabs. Press a Pivot Cover A (19) and a Pivot Cover B (22) together around the Right Upper Body Arm (9). Repeat this step for the other side of the elliptical. Tip: Make sure that the Pivot Covers (19, 22) are positioned as shown. 12 Tabs 22 8 19 9 22 Hooks 22 19 19 Hooks 13. Attach the Rear Upright Cover (3) to the Upright (2) with three M4 x 16mm Screws (92). 13 Orient the Front Upright Cover (16) so that the indicated arrow is pointing upward. Press the Front Upright Cover (16) into the Rear Upright Cover (3). Press the Water Bottle Holder (5) into the Rear Upright Cover (3). 5 16 92 Arrow 2 92 3 12
-
 1
1 -
2
-
3
-
4
-
5
-
6
-
 7
7 -
 8
8 -
 9
9 -
 10
10 -
 11
11 -
 12
12 -
 13
13 -
 14
14 -
 15
15 -
 16
16 -
 17
17 -
18
-
19
-
20
-
21
-
22
-
23
-
24
-
25
-
26
-
27
-
28
 |
 |

12
12.
See the inset drawing.
Identify a Pivot Cover A
(19), which has hooks, and a Pivot Cover B
(22), which has tabs.
Press a Pivot Cover A (19) and a Pivot Cover B
(22) together around the Right Upper Body Arm
(9).
Repeat this step for the other side of the
elliptical.
Tip: Make sure that the Pivot Covers (19, 22)
are positioned as shown.
12
22
22
19
13
13. Attach the Rear Upright Cover (3) to the Upright
(2) with three M4 x 16mm Screws (92).
Orient the Front Upright Cover (16) so that the
indicated arrow is pointing upward.
Press the Front Upright Cover (16) into the
Rear Upright Cover (3).
Press the Water Bottle Holder (5) into the Rear
Upright Cover (3).
9
8
19
92
5
92
16
Arrow
3
2
Tabs
Hooks
Hooks
19
22