ProForm 390 Spx Instruction Manual - Page 5
Assembly
 |
View all ProForm 390 Spx manuals
Add to My Manuals
Save this manual to your list of manuals |
Page 5 highlights
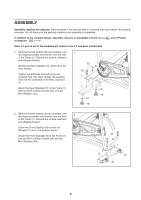
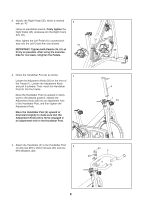
ASSEMBLY Assembly requires two persons. Place all parts of the exercise bike in a cleared area and remove the packing materials. Do not dispose of the packing materials until assembly is completed. In addition to the included tool(s), assembly requires an adjustable wrench screwdriver . and a Phillips Note: If a part is not in the hardware kit, check to see if it has been preattached. 1. Remove the two screws, the two washers, and the shipping bracket (not shown) from the rear of the Frame (1). Discard the screws, washers, and shipping bracket. Identify the Rear Stabilizer (7), which does not have wheels. Tighten two M10 Hex Nuts (49) onto two Leveling Feet (16). Next, tighten the Leveling Feet into the underside of the Rear Stabilizer (7). Attach the Rear Stabilizer (7) to the Frame (1) with two M10 x 25mm Screws (34) and two M10 Washers (33). 1 34 33 33 1 7 49 16 49 16 2. Remove the two screws, the two washers, and the shipping bracket (not shown) from the front 2 of the Frame (1). Discard the screws, washers, and shipping bracket. Orient the Front Stabilizer (8) so that the Wheels (21) are in the position shown. Attach the Front Stabilizer (8) to the Frame (1) with two M10 x 25mm Screws (34) and two M10 Washers (33). 34 33 1 8 21 21 5
-
 1
1 -
 2
2 -
 3
3 -
 4
4 -
 5
5 -
 6
6 -
 7
7 -
 8
8 -
 9
9 -
 10
10 -
 11
11 -
12
-
13
-
14
-
15
-
16
-
17
-
18
-
19
-
20
 |
 |
