ProForm 390 Spx Instruction Manual - Page 7
the Hex Nuts.
 |
View all ProForm 390 Spx manuals
Add to My Manuals
Save this manual to your list of manuals |
Page 7 highlights
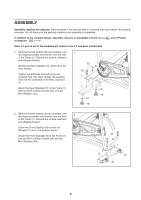
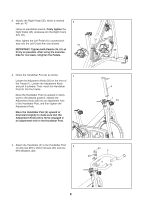
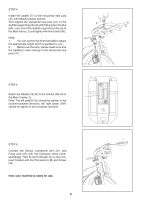
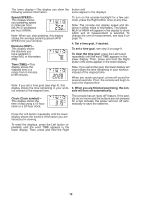
6. Orient the Seat Post (2) as shown. 6 Locate the Adjustment Knob (23) on the rear of the Frame (1). Loosen the Adjustment Knob and pull it outward. Then, insert the Seat Post (2) into the Frame. Move the Seat Post (2) upward or downward to the desired position, release the Adjustment Knob (23) into an adjustment hole in the Seat Post, and then tighten the Adjustment Knob. 2 Move the Seat Post (2) upward or downward slightly to make sure that the Adjustment Knob (23) is firmly engaged in an adjustment hole in the Seat Post. 23 1 7. Orient the Seat (22) and the Seat Carriage (3) as shown. 7 See the inset drawing. Attach the Seat (22) to the Seat Carriage (3) with two M8 Hex Nuts (66). Make sure that the nose of the Seat is pointing straight ahead before you tighten the Hex Nuts. Locate the Adjustment Knob (23) on the Seat Post (2). Loosen the Adjustment Knob and pull it downward. Then, insert the Seat Carriage (3) into the Seat Post. 22 2 3 23 Slide the Seat Carriage (3) to the desired position, release the Adjustment Knob (23) into one of the adjustment holes in the Seat Carriage, and then tighten the Adjustment Knob. Make sure that the Adjustment Knob (23) is firmly engaged in an adjustment hole in the Seat Carriage (3). 1 22 3 66 8. Make sure that all parts are properly tightened before you use the exercise bike. Note: After assembly is completed, some extra parts may be left over. Place a mat beneath the exercise bike to protect the floor. 7
-
 1
1 -
 2
2 -
 3
3 -
 4
4 -
 5
5 -
 6
6 -
 7
7 -
 8
8 -
 9
9 -
 10
10 -
 11
11 -
 12
12 -
13
-
14
-
15
-
16
-
17
-
18
-
19
-
20
 |
 |
