ProForm 760 Hr Bike Uk Manual - Page 6
Wire Harnesses 42, 43. Move the Upright up
 |
View all ProForm 760 Hr Bike manuals
Add to My Manuals
Save this manual to your list of manuals |
Page 6 highlights
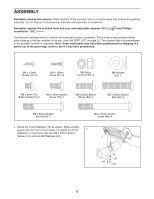
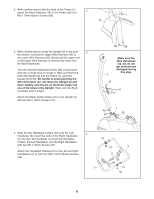
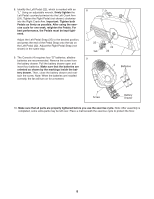
2. While another person lifts the back of the Frame (1), attach the Rear Stabiliser (16) to the Frame with four 2 M8 x 70mm Button Screws (68). 1 16 3. While another person holds the Upright (2) in the posi- 3 tion shown, connect the Upper Wire Harness (42) to the Lower Wire Harness (43). Gently pull the upper end of the Upper Wire Harness to remove any slack from the Wire Harnesses. Turn the indicated Adjustment Knob (20) counterclockwise two or three turns to loosen it. Next, pull the Knob, insert the Upright (2) into the Frame (1), and then release the Knob. Be careful to avoid pinching the Wire Harnesses (42, 43). Move the Upright up and down slightly until the pin on the Knob snaps into one of the holes in the Upright. Then, turn the Knob clockwise until it is tight. Attach the Water Bottle Holder (31) to the Upright (2) with two M4 x 12mm Screws (41). 68 68 Make sure the Wire Harnesses (42, 43) do not get pinched and damaged during this step. 2 31 41 1 42 20 43 4. Slide the two Handlebar Collars (73) onto the Left Handlebar (3). Insert the ends of the Right Handlebar (5) into the Left Handlebar. Connect the Handlebar Collars, the Left Handlebar, and the Right Handlebar with two M4 x 16mm Screws (57). Attach the Handlebar Bracket (6) to the Left and Right Handlebars (3, 5) with four M8 x 22mm Button Screws (59). 4 73 57 5 6 59 59 3 73 57 6
-
 1
1 -
 2
2 -
 3
3 -
 4
4 -
 5
5 -
 6
6 -
 7
7 -
 8
8 -
 9
9 -
 10
10 -
 11
11 -
 12
12 -
13
-
14
-
15
-
16
-
17
-
18
-
19
-
20
-
21
-
22
-
23
-
24
 |
 |
