ProForm 890 E Elliptical English Manual - Page 6
See HOW TO FOLD AND UNFOLD THE, ELLIPTICAL on and unfold the ellip, tical, To make assembly
 |
View all ProForm 890 E Elliptical manuals
Add to My Manuals
Save this manual to your list of manuals |
Page 6 highlights
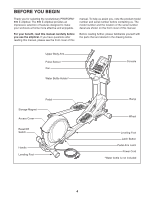
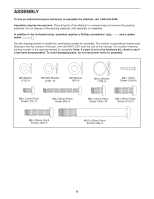
1. To make assembly easier, read the 1 information on page 5 before you begin. Identify and orient the Rear Stabilizer (4) as shown. See HOW TO FOLD AND UNFOLD THE ELLIPTICAL on page 15 and unfold the elliptical. While a second person lifts the Folding Frame (2), attach the Rear Stabilizer (4) to the Folding Frame with two M10 x 95mm Patch Screws 4 (100). 100 2. Orient the Front Stabilizer (3) so that the welded tubes are facing away from the Main Frame (1). 2 While a second person lifts the front of the Main Frame (1), attach the Front Stabilizer (3) to the Main Frame with two M10 x 95mm Patch Screws (100). 2 Welded Tubes 100 3 1 6
-
 1
1 -
 2
2 -
 3
3 -
 4
4 -
 5
5 -
 6
6 -
 7
7 -
 8
8 -
 9
9 -
 10
10 -
 11
11 -
 12
12 -
13
-
14
-
15
-
16
-
17
-
18
-
19
-
20
-
21
-
22
-
23
-
24
-
25
-
26
-
27
-
28
-
29
-
30
-
31
-
32
 |
 |

6
1.
Identify and orient the Rear Stabilizer (4) as
shown.
See HOW TO FOLD AND UNFOLD THE
ELLIPTICAL on page 15 and unfold the ellip-
tical
.
While a second person lifts the Folding Frame
(2), attach the Rear Stabilizer (4) to the Folding
Frame with two M10 x 95mm Patch Screws
(100).
4
1
To make assembly easier, read the
information on page 5 before you begin.
100
2
2.
Orient the Front Stabilizer (3) so that the welded
tubes are facing away from the Main Frame (1).
While a second person lifts the front of the Main
Frame (1), attach the Front Stabilizer (3) to the
Main Frame with two M10 x 95mm Patch
Screws (100).
2
3
1
100
Welded
Tubes