ProForm 940 Owners Manual - Page 9
depending, maximum, speed, setting., setting, miles
 |
View all ProForm 940 manuals
Add to My Manuals
Save this manual to your list of manuals |
Page 9 highlights
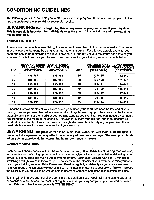
To program a speed setting for the first program segment, displayed in the CURRENT SEGMENT column, press the SEGMENT ADJUST increase or decrease buttons until the desired number of indicators is lighted. Each time the increase button is pressed, the speed setting will increase; every fourth time the button is pressed, an additional indicator will light. The button can be held down to increase the speed setting rapidly. The SEGMENT ADJUST decrease button operates in the same manner to decrease the speed setting. When the desired speed setting has been programmed, press the SEGMENT ADJUST left button. The first program segment will move to the left, and the second segment will be displayed in the CURRENT SEGMENT column. Program a speed setting for the second segment in the same manner. Repeat this procedure until you have programmed speed settings for all twenty segments. You may wish to program slow settings for the first few segments, a combination of faster settings for the middle segments and slow settings for the final few segments. An endless variety of speed settings can be programmed. Each program segment is preset to last for 1 minute, as shown in the SEGMENT TIMER display. (Since there are 20 segments, the program will last for 20 minutes.) The segments can be set to last for a different length of time, if desired. First, select the TIME/SET mode by repeatedly pressing the MODE button. (Make sure the SCAN mode is not selected.) Next, press the SET buttons to change the length of time the segments will last. Each time one of the buttons is pressed, the length of time will change by 1 second. (The length of time the program will last will be shown in the MONITOR display.) The buttons can be held down to change the length of time rapidly. The segments can be set to last for a minimum of 30 seconds, up to a maximum of 3 minutes. To start the program, press the START/STOP button. The first program segment will be displayed in the CURRENT SEGMENT column, and the speed of the walking belt will change to the setting programmed for the first segment. Step carefully onto the walking belt and begin exercising. The time remaining in the first segment will be shown in the SEGMENT TIMER display. When no time remains, the first segment will move to the left, the second segment will be displayed in the CURRENT SEGMENT column and the speed of the walking belt will change to the second setting. The program will continue in this manner until the twentieth segment is displayed in the CURRENT SEGMENT column and no time remains. The walking belt will then slow to a stop. While the program is in progress, you can change the speed of the walking belt, if desired, by pressing the SEGMENT ADJUST increase or decrease button. (The SPEED buttons will not operate while a user program or preset program is selected.) If you desire to stop the walking belt before the program has ended, press the START/STOP button. The console will then be in the same state as if the program had ended. After the program has ended, a different program can be selected or the console can be switched to the manual mode by pressing the MANUAL button. The user program you have created will be stored in memory. SELECTING A PRESET PROGRAM Press the PEAK, RAMP, INTERVAL or VALLEY button. A "P1" (PEAK), "P2" (RAMP), "P3" (INTERVAL) or "P4" (VALLEY) will appear for five seconds in the SEGMENT TIMER display to show which program you have selected. The small diagrams above the PROGRAM buttons show how the speed of the walking belt will change during each program. During the PEAK program, for example, the speed will gradually increase and then gradually decrease. After a program has been selected, a maximum speed setting should be selected for the program. This is done in the same manner as for a user program. Note: The minimum speed setting for the pro- gram will vary depending on the maximum speed setting. If the maximum speed setting is 3 miles per hour, the minimum speed setting will be 1 mile per hour. For each additional 1 mile per hour that the maximum speed setting is increased, the minimum speed setting will increase 0.5 miles per hour. For 9
-
 1
1 -
2
-
3
-
 4
4 -
 5
5 -
 6
6 -
 7
7 -
 8
8 -
 9
9 -
 10
10 -
 11
11 -
 12
12 -
 13
13 -
 14
14 -
15
-
16
 |
 |
