ProForm 980 Audio Trainer Treadmill English Manual - Page 11
If necessary, press the Left Accessory Tray 96
 |
View all ProForm 980 Audio Trainer Treadmill manuals
Add to My Manuals
Save this manual to your list of manuals |
Page 11 highlights
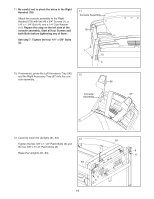
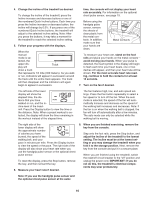
11. Be careful not to pinch the wires in the Right Handrail (78). Attach the console assembly to the Right Handrail (78) with two #8 x 3/4" Screws (1), a 1/4" x 1 1/4" Bolt (4), and a 1/4" Star Washer (10). Repeat this step on the left side of the console assembly. Start all four Screws and both Bolts before tightening any of them. See step 7. Tighten the four 1/4" x 5/8" Bolts (3). 11 Console Assembly 78 1 10 4 12. If necessary, press the Left Accessory Tray (96) 12 and the Right Accessory Tray (97) into the con- sole assembly. 96 Console 97 Assembly 13. Carefully lower the Uprights (81, 83). 13 Tighten the two 3/8" x 1 1/2" Patch Bolts (6) and the two 3/8" x 3 1/2" Patch Bolts (8). Raise the Uprights (81, 83). 83 81 8 6 8 6 11
-
 1
1 -
2
-
3
-
4
-
5
-
 6
6 -
 7
7 -
 8
8 -
 9
9 -
 10
10 -
 11
11 -
 12
12 -
 13
13 -
 14
14 -
 15
15 -
 16
16 -
17
-
18
-
19
-
20
-
21
-
22
-
23
-
24
-
25
-
26
-
27
-
28
-
29
-
30
-
31
-
32
 |
 |

11
11.
Be careful not to pinch the wires in the Right
Handrail (78).
Attach the console assembly to the Right
Handrail (78) with two #8 x 3/4" Screws (1), a
1/4" x 1 1/4" Bolt (4), and a 1/4" Star Washer
(10).
Repeat this step on the left side of the
console assembly. Start all four Screws and
both Bolts before tightening any of them.
See step 7. Tighten the four 1/4" x 5/8" Bolts
(3).
1
10
4
Console Assembly
78
11
12. If necessary, press the Left Accessory Tray (96)
and the Right Accessory Tray (97) into the con-
sole assembly.
96
97
12
13. Carefully lower the Uprights (81, 83).
Tighten the two 3/8" x 1 1/2" Patch Bolts (6) and
the two 3/8" x 3 1/2" Patch Bolts (8).
Raise the Uprights (81, 83).
8
6
13
8
6
81
83
Console
Assembly