ProForm Trailrunner 4.0 Treadmill English Manual - Page 10
Storage Latch.
 |
View all ProForm Trailrunner 4.0 Treadmill manuals
Add to My Manuals
Save this manual to your list of manuals |
Page 10 highlights
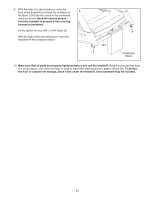
7. Slide the Right Upright Sleeve (90) up against the console assembly. Attach the Right Upright 7 Sleeve with two #8 x 3/4" Tek Screws (24). Attach the Left Upright Sleeve (not shown) to the console assembly in the same way. Console Assembly 24 90 24 8. Raise the Frame (67) to the position shown. Have a second person hold the Frame until 8 this step is completed. Orient the Storage Latch (87) so that the large barrel and the latch knob are in the positions shown. Remove the tie from the upper end of the Storage Latch (87). Attach the upper end of the Storage Latch to the bracket on the Frame (67) with a 3/8" x 1 3/4" Bolt (3) and a 3/8" Jam Nut (7). Remove the tie from the lower end of the Storage Latch (87). Keep the holes in the latch cap aligned with the holes in the Storage Latch. Make sure to keep the latch cap inside the Storage Latch. Attach the Storage Latch to the bracket on the Base (103) with a 3/8" x 2" Bolt (4) and a 3/8" Jam Nut (7). Note: It may be necessary to move the Frame (67) back and forth slightly to align the Storage Latch with the bracket. Lower the Frame (67) (see HOW TO LOWER THE TREADMILL FOR USE on page 27). 67 7 Latch Knob 3 87 Large Barrel 103 7 Latch 4 Cap 10
-
 1
1 -
2
-
3
-
4
-
 5
5 -
 6
6 -
 7
7 -
 8
8 -
 9
9 -
 10
10 -
 11
11 -
 12
12 -
 13
13 -
 14
14 -
 15
15 -
16
-
17
-
18
-
19
-
20
-
21
-
22
-
23
-
24
-
25
-
26
-
27
-
28
-
29
-
30
-
31
-
32
-
33
-
34
-
35
-
36
-
37
-
38
-
39
-
40
 |
 |
