ProForm Ze5 Rear Drive Elliptical English Manual - Page 7
Tip: To prevent the Main Wire 60
 |
View all ProForm Ze5 Rear Drive Elliptical manuals
Add to My Manuals
Save this manual to your list of manuals |
Page 7 highlights
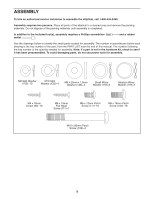
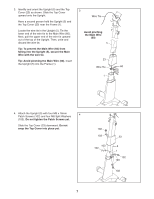
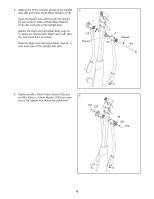
3. Identify and orient the Upright (5) and the Top Cover (23) as shown. Slide the Top Cover 3 upward onto the Upright. Have a second person hold the Upright (5) and the Top Cover (23) near the Frame (1). Wire Tie Locate the wire tie in the Upright (5). Tie the lower end of the wire tie to the Main Wire (60). Next, pull the upper end of the wire tie upward out of the top of the Upright. Then, untie and discard the wire tie. Avoid pinching the Main Wire (60) 5 Tip: To prevent the Main Wire (60) from falling into the Upright (5), secure the Main Wire with the wire tie. Tip: Avoid pinching the Main Wire (60). Insert the Upright (5) into the Frame (1). 23 Wire Tie 60 1 4. Attach the Upright (5) with four M8 x 16mm Patch Screws (102) and four M8 Split Washers 4 (103). Do not tighten the Patch Screws yet. Slide the Top Cover (23) downward. Do not snap the Top Cover into place yet. 102 103 103 102 23 5 1 102 103 102 7
-
 1
1 -
 2
2 -
 3
3 -
 4
4 -
 5
5 -
 6
6 -
 7
7 -
 8
8 -
 9
9 -
 10
10 -
 11
11 -
 12
12 -
13
-
14
-
15
-
16
-
17
-
18
-
19
-
20
-
21
-
22
-
23
-
24
-
25
-
26
-
27
-
28
-
29
-
30
-
31
-
32
 |
 |
