Pyle AZPLCMTR74 User Manual - Page 5
Monitor Stand Mounting
 |
View all Pyle AZPLCMTR74 manuals
Add to My Manuals
Save this manual to your list of manuals |
Page 5 highlights
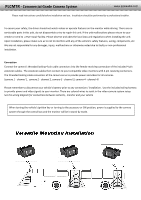
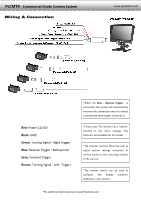
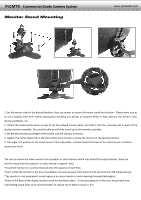
PLCMTR ‐ Commercial Grade Camera System Monitor Stand Mounting www.pyleaudio.com 1. Set the mount stand in the desired location, then use screws to secure the mount stand into location. Please make sure as to set a location free from vehicle obstruction including any wiring, or location where it may obstruct the driver's view, driving conditions, etc. 2. Attach the metal buckle piece on top of the fan shaped mount stand, and slide it into the receiving slot in back of the display monitor assembly. This metal buckle should slide in and up to the monitor assembly. 3. Set the desired position/height of the buckle into the monitor assembly. 4. Tighten the clamp‐style knob in the back of the stand mount to secure the monitor in the desired position. 5. The angle / tilt position of the stand mount is also adjustable. Located toward the base of the stand mount is another clamp‐style knob. *Be sure to mount the video monitor from speakers or other devices which may distort the output display. Keep the monitor away from the speaker's or other device's magnetic field. *Install the monitor on a surface that can bear the capacity of over 9 lbs. *Don't install the monitor in the line of ventilation areas (keep away from extreme hot and extreme cold temperatures). *The monitor is not waterproof, avoid exposure to excess liquids or harsh cleaning chemicals/detergents. *Holes in the back of the display monitor serve as ventilation ducts. To ensure operation of the unit, and protect from overheating, these holes must not be blocked, to reduce risk of electric shock or fire.
-
 1
1 -
 2
2 -
 3
3 -
 4
4 -
 5
5 -
 6
6
 |
 |
