Pyle AZPVNT7U PVNT7U Manual 1 - Page 7
Select USB Audio Device from Preferences
 |
View all Pyle AZPVNT7U manuals
Add to My Manuals
Save this manual to your list of manuals |
Page 7 highlights
Figure 1: Select USB Audio Device from Preferences 3. Play through the entire track/album you desire to record. 4. Press Stop 5. SAVE YOUR FILE NOW by clicking on 'File' -> 'Save Project'. Select the destination and file name for the project and click 'Save'. 6. You have completed the recording process. (See Figure 2) Figure 2: Recording Sample Adjusting Your Audio Level (Optional) 1. Select your entire recording by selecting "Edit", then "Select...", then click "All". You can also use Ctrl+A on a PC or APPLE+A on a Macintosh to quickly select all. Figure 3: Figure 3: Select All 2. Select the "Effect" menu and choose the desired effect. a. There are various types of effects which are described further in the software's help 7
-
 1
1 -
 2
2 -
 3
3 -
 4
4 -
 5
5 -
 6
6 -
 7
7 -
 8
8 -
 9
9 -
 10
10
 |
 |

7
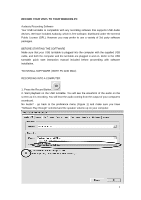
Figure 1: Select USB Audio Device from Preferences
3. Play through the entire track/album you desire to record.
4. Press Stop
5. SAVE YOUR FILE NOW by clicking on ‘File’ -> ‘Save Project’. Select the destination
and file name for the project and click ‘Save’.
6. You have completed the recording process. (See Figure 2)
Figure 2: Recording Sample
Adjusting Your Audio Level (Optional)
1. Select your entire recording by selecting “Edit”, then “Select…”, then click “All”. You can
also use Ctrl+A on a PC or APPLE+A on a Macintosh to quickly select all.
Figure 3:
Figure 3: Select All
2. Select the “Effect” menu and choose the desired effect.
a. There are various types of effects which are described further in the software’s help