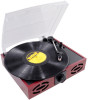
Pyle AZPVNT7U PVNT7U Manual 1 - Page 9
Click Get Noise Profile. The Noise Removal window will now close automatically.
 |
View all Pyle AZPVNT7U manuals
Add to My Manuals
Save this manual to your list of manuals |
Page 9 highlights
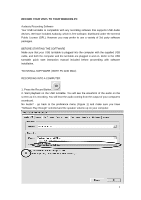
Removal" window. (See Figure 7) 3. Click "Get Noise Profile". The Noise Removal window will now close automatically. 4. Select the entire track of audio you wish to remove noise from. If you wish to clean up the entire recording, use "Select All" under the "Edit Menu" (See Figure 3) 5. Repeat Step 2 to bring up the "Noise Removal" Window. 6. Adjust the amount of audio that you would like to filter by moving the slider in the "Noise Removal" window. We recommend using the minimum noise removal for optimum sound. Note: you can preview the audio before removing the noise by clicking on 'Preview'. 7. Click on 'Remove Noise'. Cleaning Your Audio (Optional) 1. Drag the cursor over a portion of the audio track which contains noise. We recommend using the beginning or the end of a track where there is no music and only noise. (See Figure 6) 2. Select "Noise Removal" from the "Effect" drop down menu to bring up the "Noise Removal" window. (See Figure 7) 3. Click "Get Noise Profile". The Noise Removal window will now close automatically. 4. Select the entire track of audio you wish to remove noise from. If you wish to clean up the entire recording, use "Select All" under the "Edit Menu" (See Figure 3) 5. Repeat Step 2 to bring up the "Noise Removal" Window. 6. Adjust the amount of audio that you would like to filter by moving the slider in the "Noise Removal" window. We recommend using the minimum noise removal for optimum sound. Note: you can preview the audio before removing the noise by clicking on 'Preview'. 7. Click on 'Remove Noise'. Figure 6: Selecting Noise in Track Figure 7: Noise Removal Window 9
-
 1
1 -
2
-
3
-
 4
4 -
 5
5 -
 6
6 -
 7
7 -
 8
8 -
 9
9 -
 10
10
 |
 |
