Pyle PLCDBT65MRW User Manual - Page 7
Radio Operation
 |
View all Pyle PLCDBT65MRW manuals
Add to My Manuals
Save this manual to your list of manuals |
Page 7 highlights
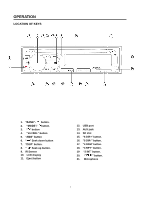
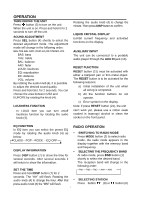
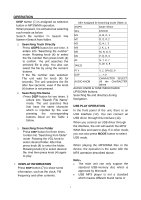
OPERATION TURN ON/OFF THE UNIT Press button (3) to turn on the unit. When the unit is on. Press and hold it for 2 seconds to turn off the unit. SOUND ADJUSTMENT Press SEL button (4) shortly to select the desired adjustment mode. The adjustment mode will change in the following order: BAS-TRE-BAL-FAD-LOUD-EQ-DX-STEREO-VOL BAS: bass TRE: treble BAL: balance FAD: fader LOUD: loudness EQ: equalization DX: distance VOL: volume By rotating the audio knob (4), it is possible to adjust the desired sound quality. Press and hold SEL for 2 seconds. You can choose the area between USA and EUROPE by rotating the knob (4). LOUDNESS FUNCTION In LOUD item you can turn on/off loudness function by rotating the audio knob (4). Rotating the audio knob (4) to change the minute. Then press DISP button to confirm. LIQUID CRYSTAL DISPLAY Exhibit current frequency and activated functions on the display. AUXILIARY INPUT The unit can be connected to a portable audio player through the AUX IN jack (13). RESET FUNCTION RESET button (21) must be activated with either a ballpoint pen or thin metal object. The RESET button is to be activated for the following reasons: a) Initial installation of the unit when all wiring is completed. b) All the function buttons do not operate. c) Error symbol on the display. Note: if press RESET button (21), the unit can't work yet, please use a cotton swab soaked in isopropyl alcohol to clean the socket on the front panel. EQ FUNCTION In EQ item you can select the preset EQ mode by rotating the audio knob (4) as RADIO OPERATION SWITCHING TO RADIO MODE below: Press MODE button (2) to select radio CLASS---POP---ROCK ---EQ OFF mode, the radio mode appears in the display together with the memory band and frequency. DISPLAY INFORMATION SELECTING THE FREQUENCY BAND Press DISP button (7) to show the time for At radio mode, press BND button (1) several seconds. After several seconds it shortly to select the desired band. will return to show the information. The reception band will change in the following order: SET THE TIME →FM1→ FM2→ FM3 → AM1→ AM2 Press and hold DISP button (7) for 2 seconds. The "HH" will flash. Rotating the audio knob (4) to change the hour. After that press audio knob (4) the "MM" will flash. SELECTING STATION Press button (8) or button (6) 7
-
 1
1 -
 2
2 -
 3
3 -
 4
4 -
 5
5 -
 6
6 -
 7
7 -
 8
8 -
 9
9 -
 10
10 -
 11
11 -
 12
12 -
13
-
14
 |
 |