Pyle PLDN70U PLDN70U Manual 1 - Page 11
Look over the Playback Status - audio
 |
View all Pyle PLDN70U manuals
Add to My Manuals
Save this manual to your list of manuals |
Page 11 highlights
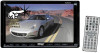
ZOOMx2,ZOOMx3,ZOOMx4,ZOOMx1/2,ZOOMx1/3,ZOOMx1/4,ZOOM OFF. Press one of the ^/v/>/< buttons to select the area you want to enlarge. 4.16 Change the Caption Language In the state of DVD playing, press the SUBTITLE button repeatedly to select the language of the caption or turn off the caption.(depend on the media used.) In the state of VCD/MP3/WMA/CD playing, the button is not available. 4.17 Change the Audio Language 1. In the state of DVD playing, press the AUDIO button repeatedly on the IR remote control to select the desired language type. (depend on the media used) 2. In the state of VCD playing, press the AUDIO button repeatedly to select the sound mode of the MONO L, MONO R, MIX MONO and Stereo, no language function. 3. In the state of CD/WMA/MP3 playing, the AUDIO button is invalid. 4.18 Change the Video Signal System During playback of DVD/VCD , press the BAND(P/N) button repeatedly to change the VIDEO SIGNAL SYSTEM mode . 4.19 Look over the Playback Status 1. In the state of DVD playing, press the OSD button repeatedly on the remote control to turn on/off the playback status. When it is on, it will display the information such as: the serial number of the playing title, the serial number of the playing chapter, the elapsed time of the playing chapter, the remained time of the playing chapter, the elapsed time of the playing title, the remained time of the playing title, etc. 2. In the state of VCD/CD playing, press the OSD button repeatedly on the remote control to turn on/off the playback status. When it is on, it will display the information such as: the serial number of the playing track, the elapsed time of the playing track, the remained time of the playing track, the elapsted time of the disc, the remained time of the disc. 3. In the state of MP3/WMA playing, press the OSD button repeatedly on the remote control to turn on/off the playback status. When it is on, it will display the information such as: the serial number of the playing track, the elapsed time of the playing track, the remained time of the playing track. 11.To do general setup To do general setup, first pop up Mode Menu as in item 2, then tap the icon in the Mode Menu to pop up GENERAL SETUP interface as right. In the interface, select one of CLOCK SET, RDS MODE , OSD LANG, RADIO FREQ and SENSE SET on the left side by tapping them, then set them by tapping some icons on the right side accordingly. * SENSE SET is used to set the sensitivity of stopping auto searching for an available radio station. When you tap it, it will ask you to input a password. The password is 191713, after inputting it, you can set the item. 12.To do calibration GENERAL SETUP To pop up Calibration interface during media playback, first press the STOP button twice, then press the ZOOM button, finally press the ^ and v buttons in turn. In the interface, you can have calibration by accurately tapping the cross cursor. 3. Radio Operation 1. Enter RADIO mode When you use MODE button or Mode Menu to enter RADIO mode, it will display RADIO interface as right. In RADIO interface, tapping the icon can enter Mode Menu; tapping the icon can turn on or off TFT display; tapping the icon can pop up AUDIO & VIDEO SETUP RADIO interface interface as right; the other icons are same as the corresponding buttons in the unit panel or in the Remote Control. In the AUDIO & VIDEO SETUP interface, you can adjust VOLUM E, TREBLE, BASS, BALANCE, FADER, BRIGHT- NESS, CONTRAST, COLOR, HUE; you can also turn on or off DBAS, MBP, LOUD; you can still select your desired transparency mode(by STD) and EQ mode(by EQ); tapping the icon can return back to the previous status. 2. BAND BUTTON AUDIO & VIDEO SETUP interface In RADIO mode, press the BAND button on the remote control to select your desired radio band of FM1, FM2, FM3, AM1 and AM2, and the word means which band is selected will be displayed on the small monitor of the front panel. 3. TUNE/SEEK UP/DOWN BUTTONS In RADIO mode: 1) Long press the >>|/ |>| / |
-
 1
1 -
2
-
3
-
4
-
5
-
 6
6 -
 7
7 -
 8
8 -
 9
9 -
 10
10 -
 11
11 -
 12
12 -
 13
13 -
 14
14
 |
 |