Pyle PLDN70U PLDN70U Manual 1 - Page 9

Unit Installation

Page 9 highlights

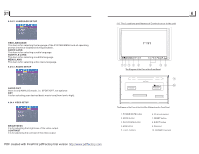
3. During IMAGE playback, press one of the >/: 90 deg cw; or < button to select an desired setup page. 3. Press the ^ or v button to select an setup item in the selected setup page. 4. Press the > button to enter the setup item. Then press the v or ^ button to select a desired mode of the setup item, finally press the OK button to confirm it. * Press the < button to return to the upper level. * Press the SETUP button again or use the direction buttons to highlight the item of the EXIT SETUP and then press the OK button to exit the System Menu. Description of Connecting the Parking Brake Line to the Parking Brake System Built in the Car Parking brake Parking brake line(green) Parking brake switch (inside the car) To metallic body or chassis of the car NOTE: after connecting the Parking Line, the video on the small monitor of the front panel will be display only after br aking the car. 1.8 UNIT INSTALLATION INSTAL LAT ION INSTRU CTIO NS 1)RE MOVE THE 2 DEC K TRA NSPO RT SC REW S BEF ORE I NSTALLATIO N. 2)PL EASE DO TH E CO NNEC TION OF TH E POW ER, SPEAK ERS AND A NTENNA ACCORDING T O TH E REQ UIREM ENT OF TH E INSTRUCTION BOOK . 3)IF THE L EFT AND RI GHT IN STAL LATIO N BR ACKETS SU PPLIED BY F ACTO RY ARE FIT FOR Y OUR CAR, PLEASE FIX THEM ON T HE CH ASSIS AND THEN FI X THE UNIT IN THE CAR WITH SCRE WS ACCORDING TO THE FOL LOWI NG DI AGRA M; OT HERW ISE, PLEAS E USE THE LEFT A ND RIGHT INSTA LLATI ON BRACKETS SU PPLIED BY YOUR CAR SUPP LIER. DASH BOA RD TRANSPORT SCREWS RIGH T INSTALLATION B RACK ET LEFT INSTALLATIO N BRA CKET COM PLETED UN IT PLASTIC F RAME PDF created with FinePrint pdfFactory trial version http://www.pdffactory.com

  • 1
  • 2
  • 3
  • 4
  • 5
  • 6
  • 7
  • 8
  • 9
  • 10
  • 11
  • 12
  • 13
  • 14

1.8 UNIT INSTALLATION
Description of Connecting the Parking Brake Line to the Parking Brake System Built in the Car
Parking brake
Parking brake switch
(inside the car)
Parking brake line(green)
To metallic body or chassis of the car
NOTE: after connecting the Parking Line, the video on the small monitor of the front panel will be display only after br aking the car.
INSTALLATION INSTRUCTIONS
DASH BOARD
PLASTIC FRAME
1)REMOVE THE 2 DECK TRANSPORT SCREWS BEFORE INSTALLATION.
2)PLEASE DO THE CONNECTION OF THE POWER, SPEAKERS AND ANTENNA
ACCORDING TO THE REQUIREMENT OF THE INSTRUCTION BOOK .
3)IF THE LEFT AND RIGHT INSTALLATION BRACKETS SUPPLIED BY FACTORY
ARE FIT FOR YOUR CAR, PLEASE FIX THEM ON THE CHASSIS AND THEN
FIX THE UNIT IN THE CAR WITH SCREWSACCORDING TO THE FOLLOWING
DIAGRAM; OTHERWISE, PLEASE USE THE LEFT AND RIGHT INSTALLATION
BRACKETS SUPPLIED BY YOUR CAR SUPPLIER.
RIGHT INSTALLATION BRACKET
LEFT INSTALLATION BRACKET
COMPLETED UNIT
TRANSPORT SCREWS
3. During IMAGE playback, press one of the >/</^/v buttons to change the angle of
viewing picture that is displaying as follows:
>: 90 deg cw; <: 90deg ccw; ^:UP<-->DOWN; v: LEFT<-->RIGHT
During IMAGE playback, press the PROG button to change the mode of refresh picture.
During IMAGE playback, press the STOP button to stop playing and return to the root
menu.
*
During IMAGE playback, the following buttons are not available: SLOW-FWD,
SUBTITLE, TITLE, ANGLE, AUDIO, RDM, INT and A-B.
*
In IMAGE mode, the other operations are same as ones in MP3/WMA mode.
1. The root menu is displayed on TV when beginning to switch on Mp4 mode, then it will
automatically play the first file.
During playback, press the STOP button to stop playing and return to the root menu.
2. When displaying the root menu, press the direction buttons to select your desired
FOLDER ,file or file sort icon, then press the OK or PLAY button to open the FOLDER,
open the files of the file sort icon or play the selected file.
When displaying the root menu, you can also use the number buttons to select the
serial number of the file and play the file.
*
The ANGLE, PROG, RDM, INT and TITLE/PBC button are not valid.
*
The other functions are same as ones in DVD mode; but the RPT function is same as
one in MP3/WMA mode.
There is ESP function for all formats of discs.
In MP3/WMA mode, during playback, the information of the file name, folder name,
will be scrolling on the LCD display. As long as the
current playing
music contains relevant
tag information in version 1.0/2.0
format, the 3 items underlined above will be scrolling on the LCD display; otherwise,
they will not.
1. Press the SETUP button on the remote control to access the DVD System Menu on
the monitor.
2. There are 6 setup pages in all for the System Menu. Press the > or < button to select
an desired setup page.
3. Press the ^ or v button to select an setup item in the selected setup page.
4. Press the > button to enter the setup item. Then press the v or ^ button to select a
desired mode of the setup item, finally press the OK button to confirm it.
*
Press the < button to return to the upper level.
*
Press the SETUP button again or use the direction buttons to highlight the item of the
EXIT SETUP and then press the OK button to exit the System Menu.
4.22 Playback MP4 files
4.23 ESP and
Function
song s title, artist and album
4.24 The DVD System Menu Setup Operation
ID3
MP3
ID3
PDF created with FinePrint pdfFactory trial version