RCA RP5020 User Manual - RP5020 - Page 5
Basic operation, Setting the time - digital recorder
 |
UPC - 044319503975
View all RCA RP5020 manuals
Add to My Manuals
Save this manual to your list of manuals |
Page 5 highlights
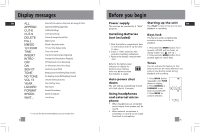
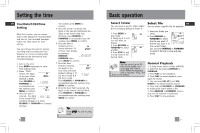
Setting the time EN Year/Date/12/24/Time Setting With this function, you can always read on the display the recording date and time of your recorded messages. Follow the steps below for time setting. You can still use this unit for normal recording without setting the time. However, no correct recording date and time can be referred for your recorded messages. 1. Turn on the unit. 2. Press MENU repeatedly to enter Time setting mode. 3. When "YEAR" flashes, the digits of the year blinks (default is 2006). Press REVERSE or FORWARD to increase/decrease the number, press MM DD MENU to confirm. 4. Once the year is entered , the digits in the month field will blink (default is 1). Press REVERSE or FORWARD to increase/ decrease 6 the number, press MENU to confirm. 5. Once the month is entered, the digits in the day will blink(while the digits in the month field stop blinking). Press REVERSE or FORWARD to increase/decrease the number, press MENU to confirm. 6. Once the date is entered, you can choose between 12/ AM 24 hour clock display by pressing REVERSE / FORWARD, then press MENU to confirm. 7. Once the time format is entered, the digits in the AM hour field will blink (default setting is 12 (12 hour mode) & 0 (24 hour mode). Press REVERSE or FORWARD to increase/decrease the number, press MENU to confirm. 8. Once the hour field is entered, the digits in the minute field will blink. Press REVERSE or FORWARD to increase/decrease the number, press MENU to confirm. Tip: Press STOP to exit to Stop mode. Basic operation Select folder You can select a specific folder (A/B/C/ D) for browsing. Default is folder A. 1. Press MENU in A stop mode. 2. Folder A, B, C or D icon will blink on display. 3. Press REVERSE or FORWARD to select B a folder. 4. Press STOP to exit to stop mode in the desired folder. Select file EN You can select a specific file for playback. 1. Select the folder you need. A 2. Press REVERSE or AM FORWARD to select DICT ONE the file you want. If REMAIN SP the file you want is in the current folder, you can press REVERSE or FORWARD to select it directly in stop and play mode. Note: You can record up to 99 files in one folder, not exceeding 396 files in total. When the maximum limit is reached, "FULL" will show on the display. Normal Playback 1. In Stop mode, select a folder (A/B/C/D). 2. Select file by pressing REVERSE or FORWARD. 3. Press PLAY to start playback. 4. Press PLAY to pause playback, press again to resume. 5. You can press VOL UP (+) or VOL DOWN (-) to adjust listening volume. 6. Press and hold REVERSE or FORWARD to make quick search within a file. 7. Press REVERSE or FORWARD once to skip one file forward or backward. 8. Press STOP to stop playback. 7
-
 1
1 -
 2
2 -
 3
3 -
 4
4 -
 5
5 -
 6
6 -
 7
7 -
 8
8 -
 9
9 -
 10
10 -
 11
11
 |
 |
