RCA RP5020 User Manual - RP5020 - Page 6
Recording mode, Bookmark - manual
 |
UPC - 044319503975
View all RCA RP5020 manuals
Add to My Manuals
Save this manual to your list of manuals |
Page 6 highlights
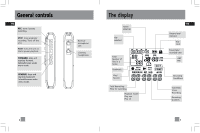
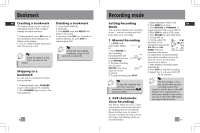
Bookmark EN Creating a bookmark This feature allows you to create an interception point in the recorded message for quick reference. 1. During playback, press REC once to set a bookmark, the bookmark icon flashes on the display. 2. You can create multiple bookmarks until the memory is full. Tip: When the memory is full, "FULL" will show on the display. Deleting a bookmark 1. Select folder (A/B/C/D) 2. Select file. 3. Press ERASE once and DELETE will blink on the screen. 4. Press and hold PLAY for 3 seconds to confirm deleting. (or press STOP to cancel erasing file) Tip: If the file have multiple bookmarks, steps 1-4 will delete ALL bookmarks. Skipping to a bookmark You can skip to a bookmark anytime during playbcak. 1. During playback, press FORWARD to go to the bookmark (if available). 2. Press FORWARD again to go to the next bookmark. 8 Recording mode Setting Recording Mode You can select between two recording modes - manual recording and AVR (automatic voice recording). 1. Manual Recording 1. In STOP mode, select folder (A/B/C/ D). 2. Press RECORD to start recording. AVR (recording time will be displayed once you press RECORD) 3. To pause recording, you can press AVR RECORD once, press again to resume recording. 4. To stop recording, press STOP. Tip: To view the remaining time and other recording information, you may press PLAY during recording. 2. AVR (Automatic Voice Recording) This feature allows the unit to sense sound and to record only when you are speaking into the microphone. When dictation stops for about 3 seconds, recording will stop and then start again automatically when you resume dictation. 1. Select destination folder (1-9). 2. Press MENU four times. EN 3. Press REVERSE or FORWARD to toggle between AVR on and AVR off. 4. Press STOP to exit to STOP mode. 5. Press RECORD to enter AVR mode. 6. During AVR on recording, adjust the A sensitivity of the AM microphone by pressing DICT VOL UP and VOL SP AVR DOWN, SEN with sensitivity value shows on display (e.g. increase sensitivity value when recording source is far from the unit or the recording envionment is quiet.). 7. Start dictation. Recording starts automatically. 8. Press STOP to end AVR recording. 9. Repeat step 2 and select AVR OFF for de-selection. Tip: The first syllable or two may be lost when you start recording because this 'sound' is used to turn on the AVR feature. It is a good pratice to make some 'sounds' or say a short word to activate the AVR before you begin actual dictation. 9
-
 1
1 -
 2
2 -
 3
3 -
 4
4 -
 5
5 -
 6
6 -
 7
7 -
 8
8 -
 9
9 -
 10
10 -
 11
11
 |
 |
