RCA l46wd250 User Guide & Warranty - Page 8
Connections and Setup
 |
UPC - 846042060592
View all RCA l46wd250 manuals
Add to My Manuals
Save this manual to your list of manuals |
Page 8 highlights
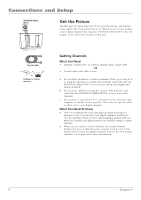
Connections and Setup Video (Basic) Connection This is an example of a connection using the Video jack. Go to the top of page 9 for specific instructions. 1 AUDIO/VIDEO INPUT 1 (VID1) Don't forget: If necessary, connect antenna or cable to get a picture. Go to page 6 for instructions. R AUDIO L VIDEO 3 2 INPUT VIDEO L AUDIO R S-VIDEO OUTPUT COMPONENT VIDEO L AUDIO R Y Pb Pr VIDEO L AUDIO R S-VIDEO Component Video (Advanced) Connection This is an example of a connection using the Component Video jacks. Go to the middle of page 9 for specific instructions. 1 Don't forget: If necessary, connect antenna or cable to get a picture. Go to page 6 for instructions. 8 R AUDIO L Pr Pb Y COMPONENT INPUT 1 (CMP1) 3 2 OUTPUT COMPONENT VIDEO Y Pb Pr L AUDIO R VIDEO L AUDIO R S-VIDEO INPUT VIDEO L AUDIO R S-VIDEO Chapter 1
-
 1
1 -
2
-
 3
3 -
 4
4 -
 5
5 -
 6
6 -
 7
7 -
 8
8 -
 9
9 -
 10
10 -
 11
11 -
 12
12 -
 13
13 -
14
-
15
-
16
-
17
-
18
-
19
-
20
-
21
-
22
-
23
-
24
-
25
-
26
-
27
-
28
-
29
-
30
-
31
-
32
-
33
-
34
-
35
-
36
-
37
-
38
-
39
-
40
-
41
-
42
-
43
-
44
-
45
-
46
-
47
-
48
-
49
-
50
-
51
-
52
 |
 |
