Reebok Rt 245 Bike English Manual - Page 12
How To Use Preset Programs
 |
View all Reebok Rt 245 Bike manuals
Add to My Manuals
Save this manual to your list of manuals |
Page 12 highlights
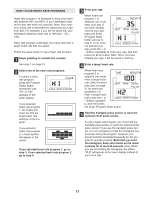
HOW TO USE PRESET PROGRAMS 1 Begin pedaling to activate the console. See step 1 on page 10. 2 Select one of the six preset programs. When the power is turned on, the manual mode will be selected. To select a preset program, press the Program Select button repeatedly until "P1," "P2," "P3," "P4," "P5," or "P6" appears in the lower display. When a preset program is selected, the matrix will show the first six resistance settings of the program. 3 Press the Program Start button or begin pedaling to start the program. Each program is divided into several time segments of different lengths. One resistance setting is programmed for each segment. (The same resistance setting may be programmed for two or more consecutive segments.) The resistance setting for the first Current Segment segment will be shown in the flash- ing Current Segment column of the matrix. The resistance settings for the next five segments will be shown in the columns to the right. When only three seconds remain in the first segment of the program, a series of tones will sound; all resistance settings will then move one column to the left. The resistance setting for the second segment will then be shown in the flashing Current Segment column and the resistance of the pedals will automatically change to the resistance setting for the second segment. The program will continue until the resistance setting for the last segment is shown in the Current Segment column of the matrix and no time remains in the program. Note: During the program, you can override the resistance setting for the current segment by pressing the Resistance buttons. However, when the next segment begins, the resistance will automatically change if a different resistance setting is programmed for the next segment. If you stop pedaling for several seconds, a tone will sound and the program will pause. To restart the program, simply resume pedaling. 4 Use the pace (RPM) guide. During preset programs, the pace guide will prompt you to increase or decrease your pedaling pace. When one of the indicators on the left side of the pace guide lights, increase your pace; when one of the indicators on the right side lights, decrease your pace. When the center indicator lights, maintain your current pace. Important: The pace settings of the program are intended only to provide a goal. Make sure to pedal at a pace that is comfortable for you. 5 Monitor your progress with the two displays. See step 4 on page 10. 6 Measure your heart rate if desired. See step 5 on page 11. 7 Turn on the fan if desired. See step 6 on page 11. 8 When you are finished exercising, the console will automatically turn off. See step 7 on page 11. 12
-
 1
1 -
2
-
3
-
4
-
5
-
6
-
 7
7 -
 8
8 -
 9
9 -
 10
10 -
 11
11 -
 12
12 -
 13
13 -
 14
14 -
 15
15 -
 16
16 -
 17
17 -
18
-
19
-
20
-
21
-
22
-
23
-
24
 |
 |
