Reebok V 6.80 Treadmill English Manual - Page 8
second Bolt Spacer 82, 3/8 x 4 Bolt 4 - v 6 f 80 treadmill
 |
View all Reebok V 6.80 Treadmill manuals
Add to My Manuals
Save this manual to your list of manuals |
Page 8 highlights
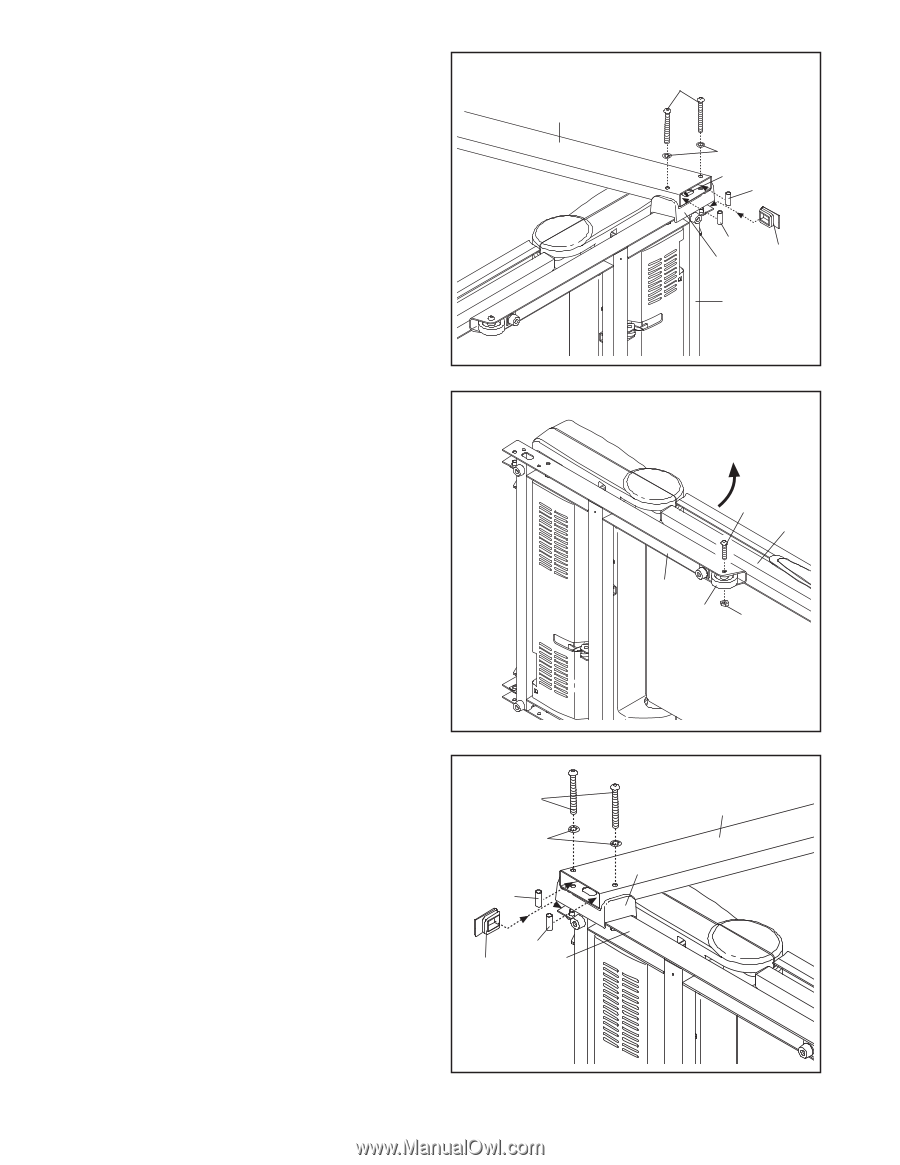
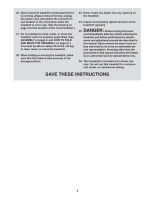
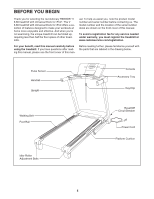
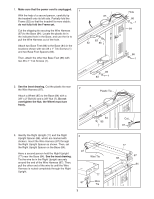
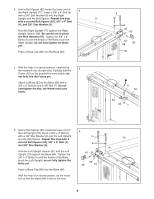
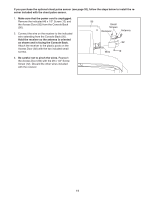
4. Hold a Bolt Spacer (82) inside the lower end of the Right Upright (77). Insert a 3/8" x 4" Bolt (4) 4 with a 3/8" Star Washer (8) into the Right Upright and the Bolt Spacer. Repeat this step 77 with a second Bolt Spacer (82), 3/8" x 4" Bolt (4), and 3/8" Star Washer (8). Hold the Right Upright (77) against the Right Upright Spacer (88). Be careful not to pinch the Wire Harness (87). Tighten the 3/8" x 4" Bolts (4) until the heads of the Bolts touch the Right Upright; do not fully tighten the Bolts yet. Press a Base Cap (80) into the Base (84). 5. With the help of a second person, carefully tip the treadmill onto its right side. Partially fold the 5 Frame (52) so the treadmill is more stable; do not fully fold the Frame yet. Attach a Wheel (85) to the Base (84) with a 3/8" x 2" Bolt (6) and a 3/8" Nut (7). Do not overtighten the Nut; the Wheel must turn freely. 4 8 87 82 82 80 88 84 6 52 84 85 7 6. Hold a Bolt Spacer (82) inside the lower end of the Left Upright (78). Insert a 3/8" x 4" Bolt (4) 6 with a 3/8" Star Washer (8) into the Left Upright 4 and the Bolt Spacer. Repeat this step with a second Bolt Spacer (82), 3/8" x 4" Bolt (4), 8 and 3/8" Star Washer (8). 78 81 Hold the Left Upright Spacer (81) and the Left Upright (78) against the Base (84). Tighten the 3/8" x 4" Bolts (4) until the heads of the Bolts touch the Left Upright; do not fully tighten the Bolts yet. 82 82 80 84 Press a Base Cap (80) into the Base (84). With the help of a second person, tip the treadmill so that the Base (84) is flat on the floor. 8
-
 1
1 -
2
-
 3
3 -
 4
4 -
 5
5 -
 6
6 -
 7
7 -
 8
8 -
 9
9 -
 10
10 -
 11
11 -
 12
12 -
 13
13 -
14
-
15
-
16
-
17
-
18
-
19
-
20
-
21
-
22
-
23
-
24
-
25
-
26
-
27
-
28
-
29
-
30
-
31
-
32
 |
 |