Rheem Versa Heaters Operating Instructions - Page 26
Immersion Well Replacement, Millivolt, Replacement Parts
 |
View all Rheem Versa Heaters manuals
Add to My Manuals
Save this manual to your list of manuals |
Page 26 highlights
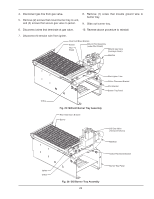
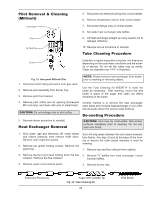
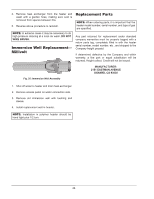
4. Remove heat exchanger from the heater and wash with a garden hose, making sure soot is removed from spaces between fins. 5. Reverse above procedure to reinstall. NOTE: In extreme cases it may be necessary to do high-pressure cleaning at a local car wash. DO NOT WIRE BRUSH. Immersion Well Replacement- Millivolt Replacement Parts NOTE: When ordering parts, it is important that the heater model number, serial number, and type of gas are specified. Any part returned for replacement under standard company warranties must be properly tagged with a return parts tag, completely filled in with the heater serial number, model number, etc., and shipped to the Company freight prepaid. If determined defective by the Company and within warranty, a like part or equal substitution will be returned, freight collect. Credit will not be issued. MANUFACTURER: 2151 EASTMAN AVENUE OXNARD, CA 93030 Fig. 35: Immersion Well Assembly 1. Shut off water to heater and drain heat exchanger. 2. Remove access panel on water connection side. 3. Remove old immersion well with bushing and sleeve. 4. Install replacement well in header. NOTE: Installation in polymer header should be hand tight plus 1/2 turn. 26
-
 1
1 -
2
-
3
-
4
-
5
-
6
-
7
-
8
-
9
-
10
-
11
-
12
-
13
-
14
-
15
-
16
-
17
-
18
-
19
-
20
-
 21
21 -
 22
22 -
 23
23 -
 24
24 -
 25
25 -
 26
26 -
 27
27 -
 28
28 -
 29
29 -
 30
30 -
 31
31 -
32
-
33
-
34
-
35
-
36
 |
 |
