Ricoh Aficio MP C3000 EFI Operation Manual - Page 96
Sample copy, Start, Continue, Suspend
 |
View all Ricoh Aficio MP C3000 EFI manuals
Add to My Manuals
Save this manual to your list of manuals |
Page 96 highlights
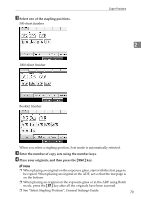
Copying C Enter the number of copy sets using the number keys. D Place your originals. When placing an original on the exposure glass, start with the first page to be copied. When placing an original in the ADF, set so the first page is on the top. When placing an original on the exposure glass or in the ADF using Batch mode, press the {q} key after all the originals have been scanned. 2 E Press the {Start} key. Note ❒ To confirm the type of finishing, press the {Sample Copy} key in step D. ❒ See "Memory Full Auto Scan Restart", "Rotate Sort: Auto Paper Continue", "Auto Tray Switching", General Settings Guide. Sample copy Use this function to check the copy settings before making a long copy run. Important ❒ This function can be used only when the Sort function is turned on. A Select Sort and any other necessary functions, and then place the originals. B Press the {Sample Copy} key. One copy set is delivered as a sample. AMG077S C If the sample is acceptable, press [Continue]. The number of copies made is the number specified, minus one for the proof copy. Note ❒ If you press [Suspend] after checking the results, return to step A to adjust the copy settings as necessary. You can change the settings for Staple, Duplex (1 sided → 1 sided, 1 sided → 2 sided), Copy Orientation, Margin Adjust., and Cover/Slip Sheet. However, depending on the combination of functions, you may not be able to change some settings. 74
-
 1
1 -
2
-
3
-
4
-
5
-
6
-
7
-
8
-
9
-
10
-
11
-
12
-
13
-
14
-
15
-
16
-
17
-
18
-
19
-
20
-
21
-
22
-
23
-
24
-
25
-
26
-
27
-
28
-
29
-
30
-
31
-
32
-
33
-
34
-
35
-
36
-
37
-
38
-
39
-
40
-
41
-
42
-
43
-
44
-
45
-
46
-
47
-
48
-
49
-
50
-
51
-
52
-
53
-
54
-
55
-
56
-
57
-
58
-
59
-
60
-
61
-
62
-
63
-
64
-
65
-
66
-
67
-
68
-
69
-
70
-
71
-
72
-
73
-
74
-
75
-
76
-
77
-
78
-
79
-
80
-
81
-
82
-
83
-
84
-
85
-
86
-
87
-
88
-
89
-
90
-
 91
91 -
 92
92 -
 93
93 -
 94
94 -
 95
95 -
 96
96 -
 97
97 -
 98
98 -
 99
99 -
 100
100 -
 101
101 -
102
-
103
-
104
-
105
-
106
-
107
-
108
-
109
-
110
-
111
-
112
-
113
-
114
-
115
-
116
-
117
-
118
-
119
-
120
-
121
-
122
-
123
-
124
-
125
-
126
-
127
-
128
-
129
-
130
-
131
-
132
-
133
-
134
-
135
-
136
-
137
-
138
-
139
-
140
-
141
-
142
-
143
-
144
-
145
-
146
-
147
-
148
-
149
-
150
-
151
-
152
-
153
-
154
-
155
-
156
-
157
-
158
-
159
-
160
-
161
-
162
-
163
-
164
-
165
-
166
-
167
-
168
-
169
-
170
-
171
-
172
-
173
-
174
-
175
-
176
-
177
-
178
-
179
-
180
-
181
-
182
-
183
-
184
-
185
-
186
-
187
-
188
-
189
-
190
-
191
-
192
-
193
-
194
-
195
-
196
-
197
-
198
-
199
-
200
-
201
-
202
-
203
-
204
-
205
-
206
 |
 |
