Ricoh Aficio SP C242DN Hardware Guide - Page 32
Pull both tapes gently upward to remove them from the printer at the same time.
 |
View all Ricoh Aficio SP C242DN manuals
Add to My Manuals
Save this manual to your list of manuals |
Page 32 highlights
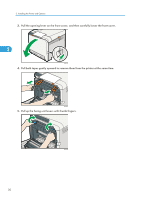
2. Installing the Printer and Options 3. Pull the opening lever on the front cover, and then carefully lower the front cover. 2 CER095 4. Pull both tapes gently upward to remove them from the printer at the same time. CER097 5. Pull up the fusing unit levers with thumb fingers. CER242 30
-
 1
1 -
2
-
3
-
4
-
5
-
6
-
7
-
8
-
9
-
10
-
11
-
12
-
13
-
14
-
15
-
16
-
17
-
18
-
19
-
20
-
21
-
22
-
23
-
24
-
25
-
26
-
 27
27 -
 28
28 -
 29
29 -
 30
30 -
 31
31 -
 32
32 -
 33
33 -
 34
34 -
 35
35 -
 36
36 -
 37
37 -
38
-
39
-
40
-
41
-
42
-
43
-
44
-
45
-
46
-
47
-
48
-
49
-
50
-
51
-
52
-
53
-
54
-
55
-
56
-
57
-
58
-
59
-
60
-
61
-
62
-
63
-
64
-
65
-
66
-
67
-
68
-
69
-
70
-
71
-
72
-
73
-
74
-
75
-
76
-
77
-
78
-
79
-
80
-
81
-
82
-
83
-
84
-
85
-
86
-
87
-
88
-
89
-
90
-
91
-
92
-
93
-
94
-
95
-
96
-
97
-
98
-
99
-
100
-
101
-
102
-
103
-
104
-
105
-
106
-
107
-
108
-
109
-
110
-
111
-
112
-
113
-
114
-
115
-
116
-
117
-
118
-
119
-
120
-
121
-
122
-
123
-
124
-
125
-
126
-
127
-
128
-
129
-
130
-
131
-
132
-
133
-
134
-
135
-
136
-
137
-
138
-
139
-
140
-
141
-
142
-
143
-
144
-
145
-
146
-
147
-
148
-
149
-
150
-
151
-
152
-
153
-
154
-
155
-
156
-
157
-
158
-
159
-
160
-
161
-
162
-
163
-
164
-
165
-
166
-
167
-
168
-
169
-
170
-
171
-
172
 |
 |

3.
Pull the opening lever on the front cover, and then carefully lower the front cover.
CER095
4.
Pull both tapes gently upward to remove them from the printer at the same time.
CER097
5.
Pull up the fusing unit levers with thumb fingers.
CER242
2. Installing the Printer and Options
30
2