Ricoh MP 2553 Manuals - Page 129
Deleting an E-mail Destination
 |
View all Ricoh MP 2553 manuals
Add to My Manuals
Save this manual to your list of manuals |
Page 129 highlights
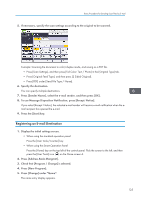
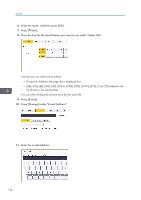
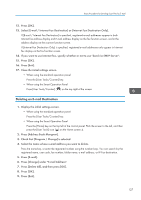
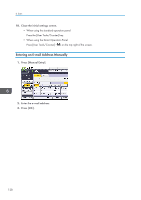
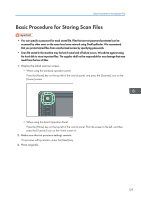
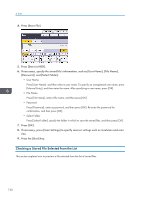
Basic Procedure for Sending Scan Files by E-mail 12. Press [OK]. 13. Select [E-mail / Internet Fax Destination] or [Internet Fax Destination Only]. If [E-mail / Internet Fax Destination] is specified, registered e-mail addresses appear in both Internet fax address display and E-mail address display on the fax function screen, and in the address display on the scanner function screen. If [Internet Fax Destination Only] is specified, registered e-mail addresses only appear in Internet fax display on the fax function screen. 14. If you want to use Internet fax, specify whether or not to use "Send via SMTP Server". 15. Press [OK]. 16. Press [Exit]. 17. Close the initial settings screen. • When using the standard operation panel Press the [User Tools/Counter] key. • When using the Smart Operation Panel Press [User Tools/Counter] ( ) on the top right of the screen. Deleting an E-mail Destination 1. Display the initial settings screen. • When using the standard operation panel Press the [User Tools/Counter] key. • When using the Smart Operation Panel Press the [Home] key on the top left of the control panel. Flick the screen to the left, and then press the [User Tools] icon ( ) on the Home screen 4. 2. Press [Address Book Mangmnt]. 3. Check that [Program / Change] is selected. 4. Select the name whose e-mail address you want to delete. Press the name key, or enter the registered number using the number keys. You can search by the registered name, user code, fax number, folder name, e-mail address, or IP-Fax destination. 5. Press [E-mail]. 6. Press [Change] under "E-mail Address". 7. Press [Delete All], and then press [OK]. 8. Press [OK]. 9. Press [Exit]. 127
-
 1
1 -
2
-
3
-
4
-
5
-
6
-
7
-
8
-
9
-
10
-
11
-
12
-
13
-
14
-
15
-
16
-
17
-
18
-
19
-
20
-
21
-
22
-
23
-
24
-
25
-
26
-
27
-
28
-
29
-
30
-
31
-
32
-
33
-
34
-
35
-
36
-
37
-
38
-
39
-
40
-
41
-
42
-
43
-
44
-
45
-
46
-
47
-
48
-
49
-
50
-
51
-
52
-
53
-
54
-
55
-
56
-
57
-
58
-
59
-
60
-
61
-
62
-
63
-
64
-
65
-
66
-
67
-
68
-
69
-
70
-
71
-
72
-
73
-
74
-
75
-
76
-
77
-
78
-
79
-
80
-
81
-
82
-
83
-
84
-
85
-
86
-
87
-
88
-
89
-
90
-
91
-
92
-
93
-
94
-
95
-
96
-
97
-
98
-
99
-
100
-
101
-
102
-
103
-
104
-
105
-
106
-
107
-
108
-
109
-
110
-
111
-
112
-
113
-
114
-
115
-
116
-
117
-
118
-
119
-
120
-
121
-
122
-
123
-
 124
124 -
 125
125 -
 126
126 -
 127
127 -
 128
128 -
 129
129 -
 130
130 -
 131
131 -
 132
132 -
 133
133 -
 134
134 -
135
-
136
-
137
-
138
-
139
-
140
-
141
-
142
-
143
-
144
-
145
-
146
-
147
-
148
-
149
-
150
-
151
-
152
-
153
-
154
-
155
-
156
-
157
-
158
-
159
-
160
-
161
-
162
-
163
-
164
-
165
-
166
-
167
-
168
-
169
-
170
-
171
-
172
-
173
-
174
-
175
-
176
-
177
-
178
-
179
-
180
-
181
-
182
-
183
-
184
-
185
-
186
-
187
-
188
-
189
-
190
-
191
-
192
-
193
-
194
-
195
-
196
-
197
-
198
-
199
-
200
-
201
-
202
-
203
-
204
-
205
-
206
-
207
-
208
-
209
-
210
-
211
-
212
-
213
-
214
-
215
-
216
-
217
-
218
-
219
-
220
-
221
-
222
-
223
-
224
-
225
-
226
-
227
-
228
-
229
-
230
-
231
-
232
-
233
-
234
-
235
-
236
-
237
-
238
-
239
-
240
 |
 |