Ricoh SFX2000TE User Guide - Page 14
GETTING CONNECTED, The Digital Interface (DI), PSTN (G3), FAX2000L Operator's, Manual
 |
View all Ricoh SFX2000TE manuals
Add to My Manuals
Save this manual to your list of manuals |
Page 14 highlights
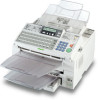
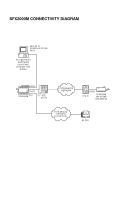
GETTING CONNECTED GETTING CONNECTED To install the SFX2000M see section 8 in the FAX2000L Operator's Manual, and the Connectivity Diagram facing page 1 of this guide. The Digital Interface (DI) The SFX2000M is designed to send and receive fax messages through an external DCE, which can manipulate the signals for encrypted transmission and reception through the PSTN. The DCE for the SecureFax is usually a modem encryption device with an RS232 digital connection, such as a STUIII or STE. The device is connected to the PSTN line from its own RJ11 jack with its own telephone cable. The SFX2000M has a female RS232 serial port, which is connected to the external DCE with a shielded serial cable that is required to reduce signal interference. Several types of cable are available through your Ricoh sales representative. • Straight-through DTE to DCE cable with DB25 male connectors. • Straight-through DTE to DCE cable with DB25 connectors which is designed for XON/XOFF flow control. It is intended for connection to XON/XOFF devices used in asynchronous networks. • Personal computer DTE to DCE straight-through cable with DB9 male and either DB9 or DB25 female connectors. This is designed for use with the Secure PC Interface option. PSTN (G3) G3 faxing is clear and unencrypted: fax message data do not pass through the encryption device. For G3 operation the SecureFax has an internal modem and an RJ11 jack. A telephone cable is provided with the SFX2000M to connect it to a PSTN line. Use Function # to switch from the DI Mode to the PSTN Mode. 4 SFX2000M User Guide
-
 1
1 -
2
-
3
-
4
-
5
-
6
-
7
-
8
-
 9
9 -
 10
10 -
 11
11 -
 12
12 -
 13
13 -
 14
14 -
 15
15 -
 16
16 -
 17
17 -
 18
18 -
 19
19 -
20
-
21
-
22
-
23
-
24
-
25
-
26
-
27
-
28
-
29
-
30
-
31
-
32
-
33
-
34
-
35
-
36
-
37
-
38
-
39
-
40
-
41
-
42
-
43
-
44
-
45
-
46
-
47
-
48
-
49
-
50
-
51
-
52
-
53
-
54
-
55
-
56
-
57
-
58
-
59
-
60
-
61
-
62
-
63
-
64
-
65
-
66
-
67
-
68
-
69
-
70
-
71
-
72
-
73
-
74
-
75
-
76
-
77
-
78
-
79
-
80
-
81
-
82
-
83
-
84
-
85
-
86
-
87
-
88
-
89
-
90
-
91
-
92
-
93
-
94
-
95
-
96
 |
 |
