Ridgid K-375R Owners Manual - Page 11
Accessories, Maintenance Instructions - k 375
 |
View all Ridgid K-375R manuals
Add to My Manuals
Save this manual to your list of manuals |
Page 11 highlights
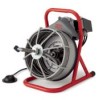
Kollmann K-375R 1/2″ Cage Machine 3. Hook finger under release pin and lift upward to release the drum lock mechanism (Figure 12). With the other hand grasp the drum by one of the hand holes on front. 4. While holding the release pin in the unlocked position, pull the drum forward. Drum should slide freely on shaft. Grasp drum with both hands and slide it off shaft. Installing Replacement Cable To Remove Damaged or Worn Cable 1. Remove drum from machine (as outlined above). 2. Pull out excess cable from drum allowing access to cable bracket. 3. Loosen screw on back of drum that fastens cable bracket clamping cable against back wall of drum. 4. Pull end of old cable from drum and discard. To Install Replacement Cable NOTE! To make cable installation easier, completely uncoil new cable before proceeding. Also, a 30° bend about 4 inches from back end of cable will facilitate it entering the drum. 1. Insert about 24 inches of cable through the guide tube into the drum. IMPORTANT: Cable should coil into the drum in a counter-clockwise direction (Figure 13). Figure 13 - Coil cable into drum as shown. 2. Reach inside the drum and maneuver cable so that it is under the cable bracket. 3. Retighten the screw to clamp the cable against the back wall of the drum. 4. Mount the drum on the machine and, leaving the Vbelt disengaged, push the cable into the drum. The guide tube will spin freely to evenly distribute the cable around the drum. Accessories WARNING Only the following RIDGID/Kollmann products have been designed to function with the K-375R Drain Cleaning Machine. Other accessories suitable for use with other tools may become hazardous when used on the K-375R. To prevent serious injury, use only the accessories listed below. Catalog No. 87592 62995 63035 54842 59230 41937 37787 59782 59982 29987 Model No. C-44 IW T-202 T-211 T-205 A-13 - A-375 - - - Description 1/2″ x 50′ Solid Core Cable Bulb Auger, 11/8″ Spade Cutter, 13/8″ "C" Cutter Pin Key Gloves Plastic Drum Assembly Two-Wheel Transport Cart Cable Rust Inhibitor, 1 Quart Cable Rust Inhibitor, 1 Gallon Maintenance Instructions WARNING Make sure machine is unplugged from power source before performing maintenance or making any adjustment. Lubrication Grease all exposed, moving and rotating parts, such as guide tube assembly, as required. NOTE! No lubrication of the Motor Shaft is required. Cables Cables should be thoroughly flushed with water to prevent damaging effects of sediment and drain cleaning compounds. Periodically lubricate cables and couplings with RIDGID/Kollmann Cable Rust Inhibitor. See accessories for catalog numbers. When not in use, store cables indoors to prevent deterioration by the elements. Ridge Tool Company 9
-
 1
1 -
2
-
3
-
4
-
5
-
 6
6 -
 7
7 -
 8
8 -
 9
9 -
 10
10 -
 11
11 -
 12
12 -
 13
13 -
 14
14 -
 15
15 -
 16
16 -
17
-
18
-
19
-
20
-
21
-
22
-
23
-
24
-
25
-
26
-
27
-
28
-
29
-
30
-
31
-
32
-
33
-
34
-
35
-
36
-
37
-
38
-
39
-
40
-
41
-
42
-
43
 |
 |
